Step by Step guide to creating simple and beautiful DIY Gift Boxes

Easy and Creative gift wrapping for christmas and birthdays
Are you looking for a creative way to wrap your christmas gifts or are you here to find a simple way to craft cool paper boxes? I will give you a step by step guide to one of the best gift wrapping methods I know; folded paper boxes.
Not only are the paper boxes a creative packaging idea for gifts, they are also nice to look at in and by themselves. That means that they can be used afterwards by the gift receiver to store jewelry or or smaller objects in. My grandmother used one of my crafted paper boxes for her needles and I myself have used them to keep buttons or pearls in. The folded paper boxes are not just creative wrapping, they are also very versatile containers.
These cute little origami boxes are great gift wrapping and a beautiful alternative to ordinary and boring cardboard boxes.
This guide will take you through all the steps of creating the boxes and you will see that it really is very simple to make them, so simple in fact that the boxes can easily be made by children as well. If you love crafting, origami or just a bit of fun paper folding then this step by step guide will help you create some sweet home made gift boxes/
First thing to do is find some paper you like the pattern of. The size of the paper will obviously determine the size of your box. Here is a pointer. Your box will be as wide and broad as the paper is when folded over the middle and then folded again into a square. If you want to know the depth fold it over the middle once more. As such a piece of paper that is 16 cm across will produce a box that is approximately 8 cm wide and broad and 4 cm in depth.
You will need 2 pieces of square paper. One should be slightly smaller than the other. depending on the size of the box, the size difference should be smaller or bigger. For the aforementioned box you would be looking at approximately 0.8 cm difference. (see to the left)
Now that you have your paper sorted, you are ready to start producing your creative gift wrapping.
How to make a paper box #2
Now that you have your two pieces of paper for your gift box, put one aside. Take the other one and fold it diagonally so the opposite corner pointers touch each other. Unfold and repeat with the other diagonal. Once you have done this your paper should look like so:
How to make a paper box #3
Next step is to fold the gift box to be over the middle so the bottom and top side aligns. Unfold and fold it over the middle axis again, but this time so the left and right side touches.
Unfold the paper. Take the bottom left point and fold it towards the middle using the lines made from previous folding as a guideline. You will have something like the below.
Box Crafting Tip
If your christmas presents are wrapped in really pretty paper be careful when you open the gift. Store the recovered paper and use it to create your own cool gift boxes for next time someone is getting a present.
Next follows a lot of folding. Proceed with the other points of the square as above until you have something that looks like the picture on the left. Ideally everything will line up perfectly at this stage.
Now that the bottom part of the square and fold it towards the middle so its boarder aligns with the middle line of the box.
You should now have something that looks approximately like this. Are you seeing the gift wrapping yet? :)
How to make a paper box #5
Next step is to unfold the previous fold and grab the leftmost point of the square and unfold that too. Your box in the making will look like this:
Do the same with the rightmost point and then take the bottom part of the square and fold it back up to the middle. Do the same with the uppermost part and you will have this:
Box Crafting tip
These boxes are perfect for jewelry presents. Put a bit of flat cotton wool or some stylish black foam in the bottom of the box and arrange the jewelry on top. This works especially well for boxes made out of metallic paper
Now comes the only slightly tricky part of this gift wrap idea. You need to fold the diagonale fold at the end of the rectangle. You are basically making a triangle and by doing that you are creating the two first sides of the box.
Do the same with the other side of the same end as per the picture to the right.
Now fold the paper over the two rectabgle folds you have just made.
Finally stuff the point of the paper below the two points in the buttom of your gift box like so:
How to make a paper box #7
Repeat the process on the other side of the box and voila, you now have the first part of you gift box.
Take the other piece of paper and start again from step 1 when you reach this step again you should have this:
Wall paper
Try asking your local paint shop if they have any outdated wallpaper sample books. Many will be happy to get rid of them without having to pay for the trashing and the wall paper samples makes for funny, cute and cool gift boxes that area bit more sturdy.
How to make a paper box #8
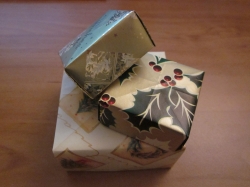
Slide the lid onto the bottom box part
Finally enjoy your masterpiece. You are ready to add your present to this beautiful little gift box.


