Beginners Guide to Soap Making


Making Soap at Home
Making homemade soap can be both rewarding and useful. Whether it be for a hobby, business or just to give away as gifts, you will feel spectacular when your first batch of soap is completed. There are thousands of different soap recipes catering to every characteristic soap offers. We will explore a few different popular recipes and some simple recipes to get started soap making.
Soap Making supplies
Before we get started with the recipes or terminology, you need to make sure you have all the tools necessary to make soap. You will need:
> kitchen scale
> soap form or mold
> lye
> Flat Scraper or Chopper
> Safety Goggles
> Rubber Gloves
> 2 - 3 quart stainless steel or heat-resistant platic pitcher with lid
> Long stainless steel or plastic spoon
> Large Pyrex pitcher
> 8 - 12 quart stainless steel pot with lid
> 2 - 3 quart glass bowl
> Quick read thermometer
> Stick Blender
> rubber spatula
Below you can find a few of these items to purchase.
Soap-Making Terminology
Before you start looking at the recipes, you need to familiarize yourself with the terminolgy and what everything means.
Trace - Trace happens after you have blended the oil/fats and lye solution together. Once this blend becomes like a pudding you will be able to pull your blender out and the drizzle that falls from the blender will puddle on top before sinking back into the solution. At this point you have reached Trace.
Saponification - This is the chemical process which begins when you mix the lye solution with the fats/oils. When that chemical process is complete you have soap!
FO - abbreviation of Fragrance Oil.
EO - abbreviation of Essential Oil
Flashpoint - The temperature at which the essential and/or fragrance oils will evaporate. Most essential oils have a low flashpoint.
SAP Values - Every oil/fat has a saponification value, meaning the amount of lye it takes in order to turn the oil/fat into soap. This can be tricky, but you will find a calculator below to help you in the process.
Superfat - Superfat is the amount of fat leftover in the bar of soap after the saponification is complete. Most recipes call for 5% superfat. This will keep the bar together but to much superfat can cause the bar to go rancid or be soft.
Additives - Anything that you might add to the soap at trace to provide fragrance, color or exfoliation.
Curing - The amount of time, usually 2-4 weeks it takes for the saponification process to be completed and for the bar to naturally harden into useable soap.
Glycerin - This is a by-product of the soap making process. Glycerin is a natural moisturizer and is taken out of commercial soaps to be placed into expensive moisturizers.
Two Basic Ways to Make Soap
There are two basic ways to make soap; cold process and hot process, that we will discuss. Some people refer to Melt-n-pour as a method, but it is not actually creating soap since the soap is already been made, you are just modifying it by reshaping or putting in additives. Melt-and-pour it is a widely used practice and we will get deeper into it later on.
Cold Process Soap

Cold Process Soap Making
Cold process soap making is the most practiced method among artisan soap makers due to the ease of coloring your soap and the finish it produces. Basic cold process soap is simple to make since there are not a lot of tools required, just oil, lye, water, a pot, stirring utensil and a mold.
For new soap makers, you could start out purchasing basic oils from Wal-Mart since there is one on every corner. Lye can be purchased at most hardware stores, just check the label to make sure it is 100% lye and no additives. Never use aluminum for any container holding lye/water or tracing soap, there is a chemical reaction between the aluminum and the lye. For a mold, you could use a simple tupperware freezer container.
If you are wanting to experiment with cold process soap making, use a 50% lard 50% olive oil base for your first batch. Use the link listed below for soap calc to make sure you get your correct oil to lye ratio and get ready to mix. I will be posting a video to show you step-by-step instructions to making the soap.
Hot Process Soap
Hot Process Soap
Hot Process Soap is exactly just what the title states. While cold processing soap takes 4-6 weeks for the soap to cure, hot process soap is ready to use generally the next day (once it has hardened fully). The ingredients would still be the same for this method though the process is a bit different.
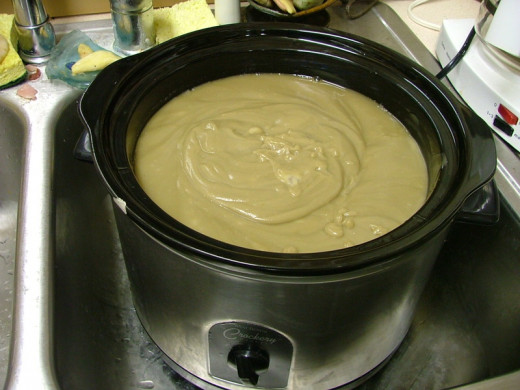
You will need an old crock-pot, preferably one that you will only use for soap making. First, you will measure out your oils and put them in the pot then add your lye/water. Next, let the solution cook in the pot undisturbed until the mixture has completely turned back in on itself. Never stir the mix while it is processing. Once the mix is ready to be taken out, place in molds to cool and harden.
The hot process soap method basically cooks the lye out of the soap by speeding up the chemical process that takes place between the lye and the oil. If you do not care about the rugged appearance of hot process soap and you just want some natural, chemical free product that is ready to use quickly, this method would fit your needs suitably.
Soap making Preference
What method of making soap do you prefer?
Making Cold Process Soap
In this article, we will primarily discuss Cold Process Soap Making. This is the staple of most soap makers since it provides a top quality bar. The only negative to the cold process style is the cure time in order to have the bar usable.
First, make sure you have a clean work area and all your supplies organized close by. Use a simple recipe from the Recipes tab and follow accordingly.
Find the ingredients list in the recipe and measure ALL ingredients to ensure they are ready at the proper times. Add measured oils to a large stainless steel pot and bring the temperature up high enough to melt the hard oils, but do not over heat.
In a separate plastic container, measure and place your lye and water. Be careful when mixing the lye and water together, and do this in well ventilated area. The lye solution emits a noxious gas that is not good to inhale. Once you have thoroughly mixed the lye into the water place a thermometer in the solution and bring down the heat to about 100-120 degrees. At the same time place a thermometer in the oils and bring down the heat to match.
Once both the lye solution and oils have cooled, poor the lye solution into the oils and begin to mix with the stick blender. At this point the oils will turn a milky color and slowly begin to thicken. Once the soap solution has thickened to a point where it will hold a ripple when you dribble the soap make into the container, it has reached the point of "trace". Now is the time to add your fragrance oils and colorant and continue to mix until this has been mixed thoroughly.
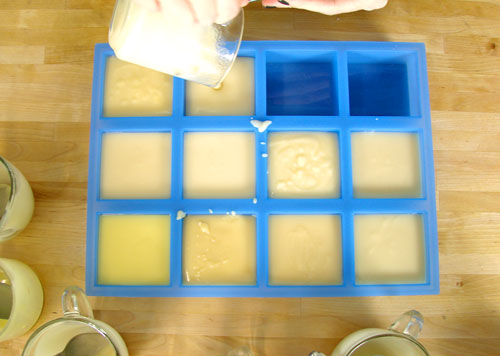
Once the soap has started to thicken a little more, you may now pour the soap into the prepped mold and make any design on top that you would prefer. At this point you can either refrigerate in order to keep the bar a dull color or put into the oven at about 100 degrees to help the saponification reaction.
After 3 - 4 days or when the soap is solid enough, it is time to unmold and cut into bars. Let the bars then sit in a dry area where there is good airflow for 4-6 weeks before using.
Congratulations, you have now successfully created real soap!
Important Soap making links
- Complete Soap Making Supplies and Tutorial Resource
Soap making is an absolute blast. Here you will find recipes, strategies, tips, and, of course, quality soap making supplies. Learn everything there is to know about making soap at home today. - Bramble Berry® Soap Making Supplies
Bramble Berry® Soap Making Supplies offers an extensive selection of soap & toiletry making products for everyone - SoapCalc
Free versatile lye calculator for home soap making


")
