How to Make Upcycled Christmas Cards

How to Make Christmas Cards out of Stuff You Already Have!
I never used to like sending out Christmas cards - I mean we don't keep them - by the time we get to January they're already in the trash.
But I do want my friends and family to know that I'm thinking about them so I decided that this year I wouldn't add to the trash heap by buying new cards. Instead I decided that I'd make cards out of junk mail, packaging, cereal boxes, old books and catalogs.
I chose to sew my cards together to add decoration but if you don't have a sewing machine (or you aren't willing to use yours on card) then it's just as easy to use glue.
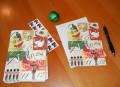
As you can see opposite I went for a toned down Christmas but there's no reason why you can't use these instructions to make something glam and sparkly. It just depends on the papers and imagery you use.
You Will Need...
- Cereal Boxes or other thin cardboard packaging.
- Papers - catalog pages/book illustrations/ junk mail/old novel pages/brown paper bags etc.
- Glue or thread and needle or a sewing machine
- Scissors
- Markers
- Images or something to make images
Start with a piece of Card
I used cereal boxes as the main piece of cardboard for my card but any piece of card will do - and there's plenty of it in packaging so you're really spoilt for choice!
I decided to cut each front and back of the cereal box in half to make smaller cards as Christmas cards don't need to be massive and I don't want to be spending ages covering and decorating a load of large cards when I have so many to make.
You might like to make your cards smaller or bigger so I haven't included any measurements - it's not really important and cereal boxes come in all sizes.
Cut out Rectangles from Cereal Boxes

Fold
Don't worry if you get some unsightly creases in the fold of your card - we're going to be covering the card so you won't see them anyway.
I like to fold the card by hand and then use my metal ruler to get a firmer crease. You might prefer to score the card first - I didn't do this as it would involve measuring and I wanted to crack on!
Fold the Cardboard in Half


Cover
I used pages from a catalog to cover my card.
Use whatever you have - interesting book pages, junk mail, brown paper - you just want to cover the printed image on your cereal box.
Either glue or sew your background piece of paper onto the cereal box - below you can see I've used my sewing machine to sew the paper into place. I recommend only using an old sturdy sewing machine for this as you don't want to ruin one of the more expensive fancy models. Remember to change your needle often as card and paper blunt them quickly.
You could also try hand-sewing your card.
Sew or Glue Background Paper to the Front of your Card

Adding to the Front of the Card
I've chosen neutral colors for my card and decided to not go with glitzy Christmas glitter but you can choose whatever you want. I've also decided not to hide that I'm using recycled paper.
I chose some brown paper that had come as stuffing in a parcel from Amazon (check the link below for more Amazon packaging recycling) and some pages from an old paperback that was beyond recovery.
I love using text from old books - but remember to check out what the pages say before you read them - you don't want to send an erotic or violent scene to your spinster aunt!
I roughly cut out some rectangles out of the brown paper and the book pages and sewed them down onto the front of my card.
I decided not to cut off the excess thread as I like the look of it dangling there.
Working on the Front of the Christmas Card

Neatening it Up
I decided to define the edges of the paper with a brown felt tip - I did this very roughly by hand but you might prefer to use a ruler and do it more carefully - or you could add dimensional paint or sew ribbon along the edges.
If your papers are more contrasting you may wish to leave them - I just wanted to distinguish the decoration on the front from the background catalog page.
Outlining the Borders


Adding an Image
You can add an image to the front of your card in any way you wish.
You could draw something or cut out color pictures from an old book. You could use last years Christmas cards or you could use a stamp or stencil.
I decided to make my own polystyrene stamps which I then defined with pen.
Check out the link featured below to find out how I made my stamp (it couldn't be easier!).
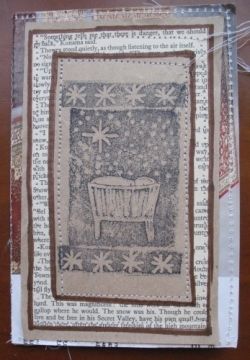
I used a simple star design to decorate the card opposite but chose a more detailed pic below of a baby in a manger under a starry sky.
The Stamped Front

Neatening Up the Insides
If you've used sewing to decorate the front of your card then you might want to hide the mess on the inside.
I simply cut a piece of paper to size and stitched it down the middle of the card on the inside. You could glue the paper or stitch it all around the edge of the inside to completely cover the inside.
Making the Insides of Your Cards


I Made This
I added little card labels to the back of my cards to let people know they were handmade by me.
This was just a simple piece of card that I wrote on and then stitched in place on the back of my card - this was also useful for covering up anything on the catalog pages that I didn't want to be visible like prices of items for example.
Just be careful not to stitch through the clean paper you've inserted in the middle of the card.
The Finished Card

Find out How to Make an Envelope for Your Card
- Country Living
How to Make an Envelope From Recycled Paper. - About.com
Make an Easy Folded Paper Envelope. - WikiHow
How to Make a Greeting Card Envelope.
Upcycled Card Articles on the Web
- Make-it + Mail-it
Classy cards using upcycled handles from a bag for decoration. - Pinterest
Links to lots of Upcycling projects. - Upcycled & Repurposed Greeting Cards
An article on upcycling cards. - How to Make Greeting Cards with Recycled Materials
Cute upcycled cards with hand stitching. - Zero waste recycled Mother's Day cards zero waste recycled Mother's Day cards
Ideas for making upcycled/recycled cards.