How To Photograph Food At Home

Want to make your food photos look fantastic?
I will show you how to photograph food at home for professional results so you can use them in recipe articles or hubs. There’s no need for a fancy camera that costs $$$, all you need is an automatic point and click camera that takes sharp, in-focus photos. And, of course, you'll need some lovely food to photograph!
The idea for this hub came to me from CraftytotheCore, who commented on my Saganaki Recipe photos. I thought “It really isn’t all that hard, maybe I should share my techniques so that other people can do the food photography for their recipes.” So here we are…
You will need:
- An automatic point and shoot digital camera
- Food to photograph
- A table (optional)
- A white sheet or white paper (optional)
- Adobe Photoshop (or similar graphics program)
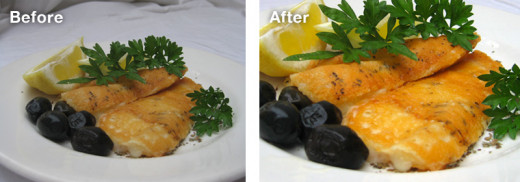
I will teach you how to make photos that look like this:


Are you tired of looking at horrible indoor food photos?
Step 1: Preparing Your Location
If you’ve been creating food photography inside, then you will know that you get grainy, dark and sometimes blurry shots that just don’t look very good, even if you try hard to get the photo shoot to work.
This is because your camera is automatic and needs lots of white light to get a sharp, in-focus picture. Fluorescent lighting or a flash helps, but it isn’t perfect because the photos can be grainy, and considering you want magazine style photography, it’s probably best to spend five minutes extra setting up a proper shooting space.
Even if you try to photograph near a large window with lots of natural light, you can still get shadows that prevent food from looking perfect.
Can you flip the picture the other way and have it still look good? If it looks somehow weird, but you can’t quite tell why, then shadows may be the problem. So the best solution is to remove most of the shadows.
The ideal location is outside. If you pick an overcast light time (such as dawn or dusk, or the middle of the day on a cloudy day) then you will get the vibrant colours showing through in the end result.
Do not do this type of photography when there is lots of sunshine as there is too much white light and it makes the colours less vibrant.
There are two ways to photograph food outside.

Using Garden Surroundings
If you have a nice garden or a particular spot that would look good as the background of a photograph, move a table outside and set up your food on it.
If you want to put your food onto a white background in Photoshop later, make sure there are no shadows cast on the food by errant trees, neighbouring rooves and other items.
Sometimes shadows can be quite artistic though, depending on how they are used. In the context of having food with a garden background, feel free to play with shadows, though not on a blindingly sunny day as too much white light will make the colours look washed out (faded).


Using A Backdrop
This method is for creating the photos with the white background in Photoshop.
Grab a white sheet and set it up so you have a “floor” and a “wall”. Make sure the floor has plenty of space to work with and is situated in such a way that you can photograph the food without the wall casting a shadow over the food.
In this case, I used a garden chair and tucked the bit of sheet between floor and wall under the chair legs. You can also use white paper with nothing printed or written on it and tape the back sides together to form a sheet.
The reason for using a white backdrop is because if you were just to photograph the food on a normal background, the background can reflect light and put different hues or “casts” onto the food. Also, when you cut out food later on in Photoshop, it is best to have a white “fringe” to work with so that the cut is very clean, easier to do and natural looking.
It is important there are no shadows at all on the food when using a white backdrop.

Step 2: Preparing The Food
You can see from the saganaki photos I took that I spent a few minutes making the food look presentable.


Plates & Platters
Pick lovely platters, bowls and cutlery to use and try to imagine how the food will look on it. Is the design too busy or distracting to show small elements (eg dried herbs)? If you use white dinnerware, do you want a plate to blend into a white background completely or for it to stand out from the background?
In my humble opinion, you really can’t go wrong with dishes that have 1-2 plain colours on them, with minimal embellishment. A nice decorative rim works well, but where the food is placed should be of a plain colour.
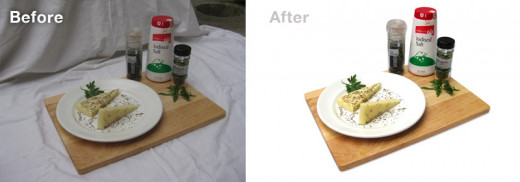
You’ll see I used a white plate for the saganaki photos. The reason for this is that my best blue plate was hidden in the bottom of the sink that day, so I made sure when I used the white plate to put it on a chopping board for a background (see photo #2).
As you can see, it does blend into the background a touch, but I was too excited to worry about changing the plate and the effect was OK anyway.

Props
You’ll notice that many good food photos have props in them. This helps the photo to be more interesting. I like to use natural props with lots of colour (such as fresh herbs, fruit or vegetables) to embellish the photo.
You can use anything that reminds you of the food ingredients. This could include packaged ingredients, natural ingredients, colourful utensils, napkins, tablecloths (for when you are not cutting the photo out), flowers or more.
If you are stuck for inspiration, try looking at a few food photographs to get ideas.

Examples Of Different Angles


Step 3: The Photo Shoot
Take some photos of your food, concentrating on making sure the food is in the foreground and focused. Often, you can hold down an automatic camera button halfway and it will focus for you.
Look at the photo you are taking and imagine if it will go into a magazine. Does the background look suitable and enhance the picture? Can you see too many props? Is anything detracting from the food itself because it is too brightly coloured or busy in design?
Angles are very important. When you do a photo shoot, walk around the food and take many different photos from different heights and angles. Change the camera setting to close ups (the flower icon instead of the mountain icon) and go in really close for a detailed view of the food.
With the white sheet on the ground, I had to lay on my stomach to capture the saganaki photos!
You should take lots of photos in any photo shoot, to make sure you have plenty to pick from when selecting the final one to use.
Also, you need to take quite a few photos because sometimes you get random elements such as flies, wind, hair or hands that make their way into the photo when you don’t see them.
Step 4: Selecting A Suitable Photo
The best photo is the one that looks "right", with the elements sitting together nicely. Don't worry about the colours/lightness just yet, that is what Photoshop is for.
One way you can choose the right photo is to look at each picture and flick through them. You can certainly see the bad ones straight away, so eliminate those. Now pick between the good ones!


Step 5: Dressing Up The Photo In Photoshop
Follow these instructions to make a photo look colourful and vibrant.
Step By Step Screenshots
All of the steps are in order in the gallery below. Click on the big gallery photo under the thumbnails (don't click on the thumbnails) to see a larger view for clarification, as I've highlighted necessary elements.


NOTE: You can do the step 6 cropping after step 1 if you want to see how your photo will look more accurately.
Instructions
- Open Photoshop and select File/Open then choose your ideal photo.
- Choose Image/Adjustments/Levels and move the little triangles for black and white in a bit until you get the desired effect. Click OK.
- Select Image/Adjustments/Hue & Saturation. Move the saturation triangle to the right until the photo has a bit of extra colour.
- Choose Image/Image Size and in the Resolution field, type 72 pixels/inch (for web resolution). Make sure you do this step BEFORE the next one.
- With the Image Size box still open, type in the Width box 800 pixels. Click OK.
- If you want to crop (resize) the photo, select the Crop tool. Draw a box where you would like to cut the photo. A dotted line will appear as you draw. When you let go of the mouse, it will show the area you wish to crop. Click the arrow tool, then click Crop.
- Choose File/Save For Web & Devices and choose JPEG and Very High in the top left area and click Save.
- Congratulations, you now have a good web food photograph!

Step 6 (Optional): Creating Food On A White Background In Photoshop
Follow these instructions to put food onto a white background.
For best effect, use a white backdrop to take the photos if you want to do this. You can do it with ordinary photos, but reflection from the background means that the food will appear more colourful around the edges than what you intended and won’t blend into the white background properly.
Instructions
Follow all of these steps in order to have a workflow which will allow you to save different versions of the photo for other work. If you’re going to put in the effort, it’s best to keep a high resolution version for later instead of having to repeat path creation again!
Step By Step Screenshots
All of the steps are in order in the gallery below. Click on the big gallery photo under the thumbnails (don't click on the thumbnails) to see a larger view for clarification, as I've highlighted necessary elements.


. Set strength in the top menu area box to 25%.")


. Set strength in the top menu area box to 25%.")

Adding A Shadow
Add a "drop shadow" (the professional term for it) to the cut out image to make it appear more natural after Step 19. To do this:
1. Click on the layers palette box and select the cut food layer (Layer 1).
2. Click on the top right little arrow in the layers box and select Blending Options.
3. When the Layer Style box opens, click on Drop Shadow. Make sure it is ticked in the left column and adjust the settings to suit. You should be able to see what the drop shadow looks like as you play with the settings.
NOTE: A “path” is an outline for cutting out the food.
- Open Photoshop and select File/Open then choose your ideal photo.
- Choose Window/Paths and on the Path palette box which opens, click and hold on the little arrow in the top right of the box. Choose New Path.
- Click on the magnifying glass and hold over the image until you see a + sign. Click to zoom into the picture. Use the scrollbars on the bottom and right to move the picture until you see the edge of the food you want to cut out.
- Click on the Pen tool in Photoshop.
- Click on the edge of the food you wish to cut out. This will put a dot there.
- Click on a different point not far away from the original point. You will see that there is a line created. This is going to be the outline of the food. If you click and drag at the next point, you can see that the line curves, so you can create curved lines for the outline. Practise with this a bit before proceeding. If you want to delete the dud path, go to the Paths dialogue box, click the arrow in the top right and choose Delete Path. Then start again from Step 2.
- Create an outline around the food. You can stop making a path in the middle of it to move the scrollbars around if needed. But any other clicking will stop the path creation and give you an incomplete one. When you get to the end of your path (you have done a complete shape of the food) hover over the first path dot (or “anchor point”) and you should see a circle. Click on the dot to finish the path (when the circle shows, you can the path together in a complete shape).
- On the Paths dialogue box, click on the right top arrow and select Make Selection. Make sure feather radius is set to 0 and it is a new selection. Click OK. You will see a moving dotted line.
- Choose Edit/Copy, then Edit/Paste. Click on Window/Layers if it isn’t already open. You will see that there is now a separate layer on top of the old one, containing the cut out bit of food. Click the eye icon to the left of the Background layer in the Layers palette to turn off the old image.
- At the bottom of the Layers palette, you will see a page icon, right next to Trash. Click it to create a new layer. Click and drag Layer 2 underneath Layer 1 in the Layers palette.
- Go to the main toolbar and make sure that you have white selected as a foreground colour (click on the square to change it if needed).
- Click the paint bucket icon (also on the main toolbar) and then click it onto the image. The background will turn white.
- Go to the Layers palette and click on Layer 1. Select the blur tool and make the size small enough to work with (see diagram). Set strength in the top menu area box to 25%.
- Draw right onto the edges of the cut food. You will see that after clicking and dragging on the edges, the edges get blurrier. This means they will blend in better to the white background. You can view the effect by going to View/Actual Pixels to see how it will really look.
- When you have finished blending the sharp cut edges into the background with the Blur tool, choose File/Save As.. and save the file as a .psd file. This will preserve all your layers and paths in high resolution, so you can use them for both print and web.
- After saving, choose Image/Adjustments/Levels and move the little triangles for black and white in a bit until you get the desired effect. Click OK. To view screenshots of this and all of the other steps after this, look at the tutorial above this one.
- Select Image/Adjustments/Hue & Saturation. Move the saturation triangle to the right until the photo has a bit of extra colour.
- Choose Image/Image Size and in the Resolution field, type 72 pixels/inch (for web resolution).
- With the Image Size box still open, type in the Width box 800 pixels. Click OK.
- Choose File/Save For Web & Devices and choose JPEG and Very High in the top left area and click Save.
- Congratulations, you now have a food photo on a white background!
I hope I can help you make fantastic food photographs with this tutorial. If you don’t have Photoshop, I believe Paint Shop Pro might also do a similar job (though with slightly different tools). If you want more information on doing this procedure on a Mac or to clarify what I have written, Google “step by step cropping in photoshop” and add in to the search Mac or Paintshop Pro as needed.
For your reference, the camera I use for this type of photography is a Canon Digital IXUS 80 IS, which cost about AU$100 5 years ago. There are probably better ones out there now.
If this tutorial was useful to you, please vote below and support my next automatic camera purchase!

© 2013 Suzanne Day


