How to Sew a Numbers Book or Banner for Small Children

Make Your Own Cloth Book
Below I show you how to make a simple cloth book of numbers for your small child. If you would prefer to make a Numbers banner that's easy too.
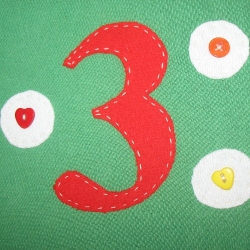
This is a super-squishy, bright and fun cloth book featuring bold numbers and spots (see in-progress image opposite).
Make one for really small children with just dots or for a slightly older child (well past the sticking-everything-into-their-mouth phase) with fun buttons or beads.
What You Will Need
- Fabric in at least 3 colors (fabrics like felt or cotton jersey are great for this project as they won't fray).
- Pins
- Needle
- Thread
- Scissors
- Wadding/batting
- Optional: Buttons or other embellishments - remember if you're giving this to a very young child that buttons etc could be a choking hazard.
Print Out Number Templates

I knew if I just drew my own numbers onto the fabric that there was a chance they'd come out wonky!
I printed out a set of large numbers from a Word document - choosing the style that would use the least amount of ink and cut these numbers out carefully.
Draw Your Numbers onto Interfacing or Bondaweb

I turned my paper number templates the wrong way round and drew them onto Interfacing.
Bondaweb, Heat 'n' Bond or a similar product (sticky on both sides) would be great for this but I only had Interfacing to hand.
I then ironed the interfacing in place onto my fabric.
You can see in the image here that I chose to cut all my even numbers from an old green t-shirt. I used a red fabric for my odd numbers. I thought it would be fun to have contrasting pages. You can keep all your pages and numbers the same colors if you wish, instead of alternating them.
Old t-shirts (or anything else made out of cotton interlock jersey) are great to use for this project because the fabric won't fray. Felt works really well too and is perhaps easier to cut out without having to worry about using interfacing. I just used what I had to hand!
Cut Out Your Fabric Numbers
Carefully cut out all your fabric numbers, checking that you cut them the right way round!

Make Your Pages

If you used felt your pages will most likely be easy enough to cut out. I decided to back my pages with Interfacing as cotton jersey can be a bit difficult to cut straight.
Make sure you cut out ten pages for each of your numbers.
You want to make your pages big enough so that they have room for your numbers (especially number 10!), the spots and seam allowance. I found that page 10 got a little tight for room with all those spots and the double number width.
Remember to put aside some fabric for your cover. I'm going to use a different fabric for my cover.
Choose Your Number Counters
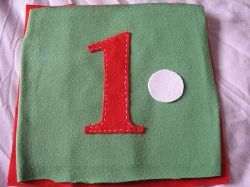
When I first started making this book I planned to find some sort of button or bead to act as counters beside the numbers. Then I decided maybe it would be safer with a young child to just use fabric spots on the pages.
In this tutorial you can see that I ended up using both fabric spots and buttons. This was because I figured that the pages looked a little too boring with just the white fabric spots - this could be remedied by using different colored spots.
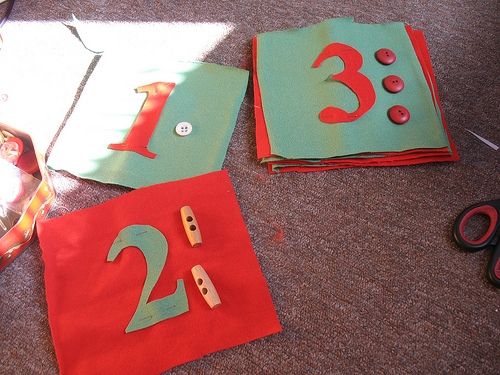
Above: Playing with ideas for counters.
Sew Everything into Place
I chose to hand sew all the numbers and dots in place as my sewing machine isn't very well behaved! This takes a long time, however, so you might be better off carefully sewing everything in place on your machine.
Be careful to place your numbers into the middle of each page and check that your counter spots are evenly spaced.
Once the numbers and counters were all sewn into place I sewed each page to its neighbor along the side edges (check out the photo in the next section below).

Sew Your Pages Together and Making Them Squishy

I laid all my pages out next to each other in order and then pinned them right sides together. For example - I pinned Number 1 to Number 2, with the numbers facing each other along the side I wanted to join. I then stitched the 2 numbers down that one side (Number 1's right hand side and Number 2's left hand side).
I used the sewing machine to stitch the pages together and carried on in order until I'd attached all of the numbers in one long strip (see image below).
I then cut out a piece of wadding the same length and size as the strip of numbers.
If you want a numbers banner then ignore the next bit and move onto the Banner section below.
The next stage can be a bit fiddly but what you need to do is lay the piece of wadding aside.
Then fold your 2 page and your 3 page so that they are facing each other. From the wrong side you need to stitch along the top and bottom edges - this encloses the fabric on 3 sides and when you fold them back out the right way they will form a page. You need to continue doing this for all your numbers except 1 and 10 - those will be backed with the cover.
Once all the pages are the right way round you can stuff the wadding into them which should still be long enough to give all the numbers a backing - alternatively (and perhaps easier) you could cut your wadding into pieces that fit perfectly inside each page pocket.
When you are finished you should have a cover-less book and be ready to move onto the next stage.

Making a Banner instead of a Book
If you're making a long Numbers banner instead of a book then don't fold your pages into a concertina.
Lie your long piece of fabric flat and cut out another piece of long fabric the same side - this will be your banner backing.
Lay your numbers pages face up and lay the background fabric on top (right side in). Add tabs along the top edge from which to hang your banner. The loops of your tabs should be facing inwards with their raw edges facing up. You could make "tabs" from string, yarn, ribbon or sew some from fabric.
Sew both layers together, leaving one end still open and making sure that your "tabs" are trapped in place by the stitches.
Turn the fabrics the right way around and insert the wadding. Once the wadding is in place, sew up the open side.
Adding Decoration
As I've already mentioned - you can leave your spots plain (whether they're white or multi-colored) or you can add something in the middle of them.
I bought a pack of brightly-colored mixed buttons to decorate my counter spots and where possible used different ones on every page.
Use a strong thread to sew them on.
I also used my buttons to keep the wadding in place on the back of my pages.

Making the Front Cover

Once you made all your pages and you have them all sewn together you need to make your front and back cover.
I left making the cover for last because you need to measure the "spine" of your padded pages.
The piece of fabric you need for your cover needs to measure the height of your pages (+ seam allowance) and the length of 2 of your pages and the "spine" width of your book (+ seam allowance).
I had some extra fabric left over from the red pages so I decided to use some of that for my front cover.
Cut out another piece of wadding with the same measurements minus the seam allowance (you want the wadding to be the same dimensions as the book, not the fabric for the cover).
Trap the wadding between the closed book and the cover and begin to pin the cover fabric in place all around the front of the book, the spine and the back of the book (make sure to tuck the wadding and the seam allowance inside).
Sew all around the edge so that your cover is now a part of the book. It's easiest to hand sew the cover.
Ideas for Decorating the Cover
- Cover the cover in buttons or charms - whatever you have left over from your number counter.
- Hand or machine embroider a cover - perhaps with your child's name or something like "My Numbers".
- Cut letters and numbers out of felt.
I went with a simple felt letters cover reading "Numbers".
I cut my letters out freehand but you might want to print out a template.
I hand sewed the letters in place so that the cover matched the hand sewn look of the rest of the book.

Tutorial Links for Making Cloth Books for Kids
- Soft Baby Book
A tutorial for making a cloth book for a boy using old jeans, Heat 'n' Bond, and fabric scraps. - Printed Cloth from Spoonflower
Printed baby book cloth. Just cut up and sew together! - Crinkly pages tutorial
How to make a baby cloth book with crinkly pages. - Cloth book instructions
How to make a cloth book instructions. - Cloth books? Anyone have a pattern or instructions?
Awesome forum posts about how to make your own cloth books.


")
