Using Ice Resin to Create Jewelry

Creating a New Jewelry Look
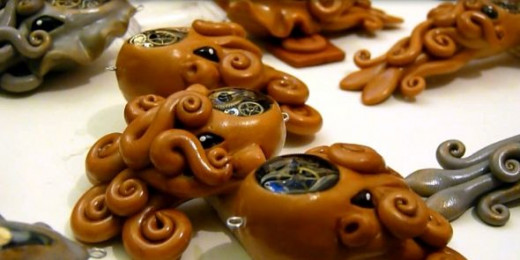
I recently started using Ice Resin for making my steampunk pendants. I previously used Diamond Glaze which is a great product for thin applications such as glazing over paper but I found that for my necklaces that it tended to get cloudy when too thickly applied. Ice Resin is a very hard, crystal clear, and waterproof resin specifically designed for use in jewelry. As an added bonus it's also non-toxic which makes it a big improvement over many other clear resins. This lens is a tutorial with several videos on using Ice Resin in your jewelry designs.
About Ice Resin
From IceResin.com
ICE Resin® is a crystal clear resin that is jeweler's grade. It can be used in jewelry, craft projects, paper arts and more. Its safe to use indoors and is the ideal use for projects you want to preserve.
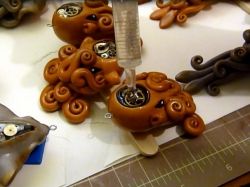
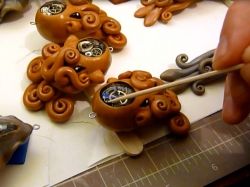
I use Ice Resin to fill in a bezel that has had small watch parts glued into it. In this case the bezel in question is one I have sculpted myself using polymer clay however you can use pre-made bezels set into clay, glued to another jewelry piece, or there are many blank bezel pendants and rings available from jewelry suppliers.
If you are planning to use any uncoated paper with ice resin, you should seal if first with mod podge and allow it to dry thoroughly, this will prevent the inks on the paper from bleeding into the resin. Always glue down the objects you are sealing under resin so they will not move around when you pour the resin and make sure the glue is dry as well.
Get Ice Resin
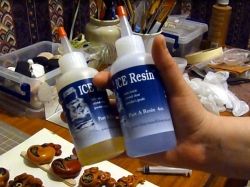
Ice Resin (left) vs. Diamond Glaze (right)
 vs. Diamond Glaze (right)")
What You Need
Necessary Materials and Tools
- Ice Resin
- 2 Small measuring cups (included in most kits, they are marked medicine dose-type cups)
- 1 Small Plastic Mixing Cup (3oz bathroom size works great)
- Craft Sticks
- Toothpicks
- Newspaper, scrap paper, silicone mat, etc to protect your work surface
- Baby wipes (for cleanup)
Optional But Recommended
- Disposable Pipette or Syringe
- More craft sticks or other objects for leveling your jewelry
- Plastic bin or similar transparent or translucent cover.
- Latex or nitrile gloves
Basic Instructions
1. Pour equal parts of each of the two parts of the Ice Resin into separate measuring cups. Make sure you measure this carefully as you need to mix equal part to get a good cure. The manufacturer recommends mixing at least 1/2 oz of resin at a time, I've mixed less but it's a risk to do so.
2. Pour each of the two parts into the mixing cup and stir gently with a craft stick until there are no longer any streaks in the resin. Don't stir too rigorously because that will cause more bubbles to form in the resin.
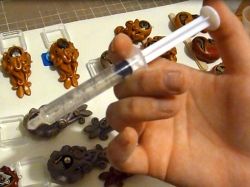
3: Carefully pour the Ice Resin into your jewelry bezel, mold, of inset. You can use a craft stick or a plastic spoon to do this but I prefer to use a syringe for the most control.
4: Use a toothpick to spread the resin into the corners of your piece.
5: Allow the resin to cure at least 24 hours. If you are concerned about dust or pet hair that could get into the resin during this time you can cover it with a plastic shoebox or similar item but prop it up a little bit to allow for some airflow (a couple 1 gallon paint stirrers, under opposite ends of the box works well).
Ice Resin Supplies


Tips
- When pouring your Ice Resin bubbles may form. Small bubbles with generally take care of themselves but larger bubbles you should pop. You can use your toothpick or blow gently on the resin.
- If you want a more domed effect to your resin, pour it in two stages. Pour the first layer almost to the upper edge of the bezel then allow the resin to cure. After 24 hours or so pour another thinner layer on top, make sure however that it doesn't overflow the bezel.
Cleanup
You will make mistakes and spill resin, have it overflow your jewelry, etc. You can clean up liquid resin with baby wipes or a paper towel moistened with isopropyl (rubbing) alcohol. Once the resin sets though you can't clean it up short of using a knife or dremel to carve if away so get it while it's still liquid!
This is why it's incredibly important to cover your work space with something you can throw away when you are done like newspaper or a cut open plastic bag, or that the resin won't stick to like a silicone mat.


