Ideas for Making Summer Clothes and Accessories

Jazzing up Your Wardrobe with a Little DIY Fashion!
It's Summer again and all my clothes are for Winter. I'm boiling!
I'm thinking of making some new clothes to wear this season so I thought I'd collect some ideas together for things I could make and share them with you.
I'm not an expert at clothes making so I'm mostly looking for some easy options.
Below I've collected info on using t-shirts, making tops, skirts, dresses, shorts and even accessories.
Treat this lens as a starting point and inspiration for your own ideas.
Opposite: Sample for t-shirt decoration.
Learn How to Make Your Own Patterns
It can get expensive if you need to keep buying patterns to make every piece of clothing that you want to make.
That's why it's awesome if you can learn to make your own patterns.
One of the best things I ever got was a selection of patterns to make basic "blocks" from anybody's measurements. These blocks can then be adapted to make any shape of garment that you want.
You can find out how to make these basic patterns yourself from books such as the one below.
Metric Pattern Cutting for Women's Wear

Cheating!
This isn't a foolproof method but one idea I have for making your basic block (for your top half), without having to draft a pattern.
I haven't tried this out myself so you may need to make some slight modifications to get it to work.
I've suggested using a t-shirt with these instructions but on reflection I think it would be wiser to use a shirt or something that's made out of fabric that isn't going to stretch when you pin it into shape.
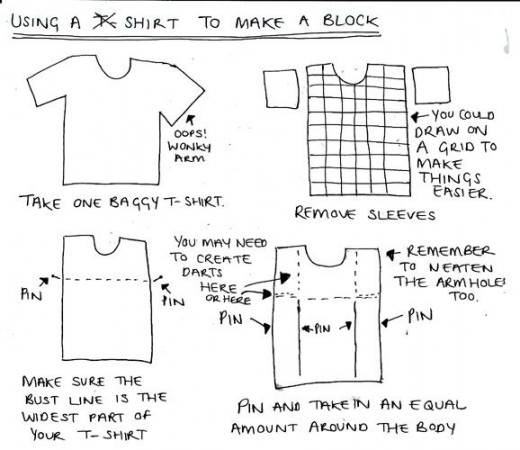
1. Grab a baggy t-shirt.
Cut off the sleeves.
1a. This task will be much easier if you draw a grid onto your t-shirt.
It's imperitive that this grid is straight and all the lines are at proper right angles to each other. You could try using carbon paper and printed grid to make this easier.
2. Put the T-shirt on.
Make sure you've got it on straight.
3. Get a friend to help you pin the t-shirt into your body.
Check out the diagram below to see how to do this. Don't pull the fabric as you pin or you won't get a true shape.
You need to pin the sides of the t-shirt at the bustline first. Make sure this is equal on both sides.
Once the bustline is pinned, you need to pin the shape of the body. You need to do this by pinning the excess fabric away at equal points - the sides and directly under where your nipples should be on the bust line. Choose two similar places to pin in at the back.
The 4 places on the front and on the back of your t-shirt are going to be the darts in your pattern pieces.
You also need to pin the excess fabric away from the top of your bust to your shoulder line - on both sides - make these into neat darts.
4. Make sure that the fabric is tight to your body everywhere.
If it isn't you'll need to rethink your darts.
5. Work out where your true armhole should be.
Mark it in place on both sides, front and back.
6. Draw the darts in place.
Once you've pinned all the darts in place, using the grid for accuracy, draw the lines in on either side of the darts, take out the pins and slip the t-shirt off again.
7. Neaten up the darts
Make sure they are equal and then trim away the excess fabric.
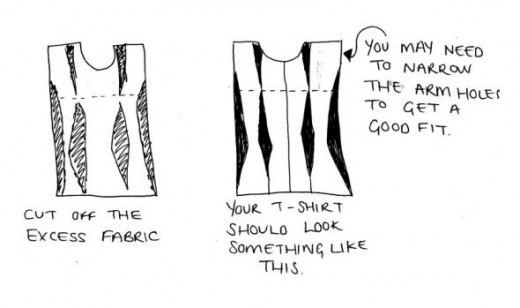
8. Cut your t-shirt into pattern pieces
Cut the t-shirt up the sides and up the centre front and centre back. You now have 4 pattern pieces.
Bits and Bobs to Make Your Pattern Drafting Easier


Recycling T-shirts
I've got a collection of old brightly-coloured t-shirts in my fabric stash, just waiting for me to do something interesting with them.
I've also got a tube of bright yellow t-shirt jersey fabric that I want to use to make myself some t-shirts.
My first thoughts about making a t-shirt were "how boring" - mainly because I love texture and I love colour and stitch and the word "t-shirt" brings to mind some sort of plain, one-textured cloth with maybe something printed on it if you're lucky.
And then I started thinking about t-shirts a little bit more.
My partner has got some t-shirts with some great little details on them - and I've been thinking for years about how I could maybe make him something cool and funky to wear.
Check out the details from some of his shirts below.


My Designs for T-shirts
In the photo gallery below you'll find a photo of my yellow t-shirt so far.
This was created from a tube of t-shirt fabric - I cut hole for the arms and sewed the shoulders up. I've still got sleeves to make - although sleeves can be difficult so I hope they're not going to be too much of a nightmare!
I've cut another piece of t-shirt fabric (in white) out and pinned it in place on the yellow t-shirt. I'm trying to come up with some cool imagery to add on the white rectangle.


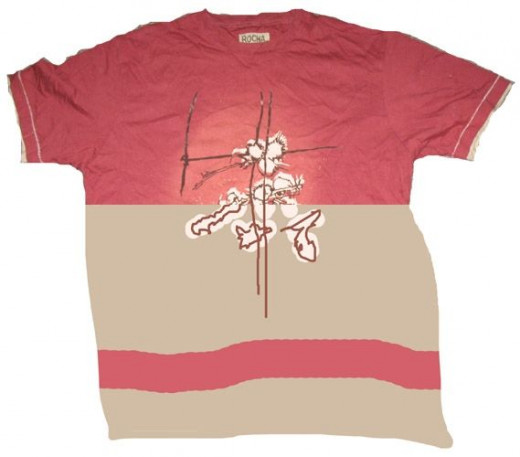
Fixing T-shirts
The t-shirt below was one of my partner's favourites but it unfortunately got covered in bleach. And then I had the really stupid idea of trying to paint the bleach spots to match - like that was ever going to work!
The second image shows an idea I have for taking a second t-shirt and replacing the ruined bottom half of the shirt.
I wonder if I can cut around the image - as it's mostly undamaged by the bleach - and reattach it to the new bottom half of the t-shirt?


Customising T-Shirts
At university I went through this stage of buying cheap t-shirts and customising them.
Usually this involved some form of bleach and cutting holes!
T-shirts are great because the fabric won't fray, meaning you can cut shapes into them, change the neckline, snip and knot bits.
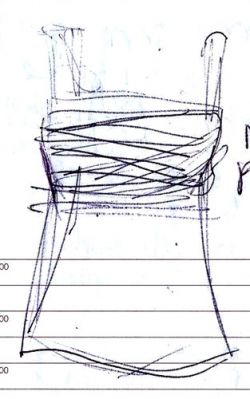
T-shirts also bleach very well (check out the image below). The doodle opposite is a doodle of a vest top I used to own - unfortunately I retired it recently (after many years) without taking any photos so all I can show you is this doodle!
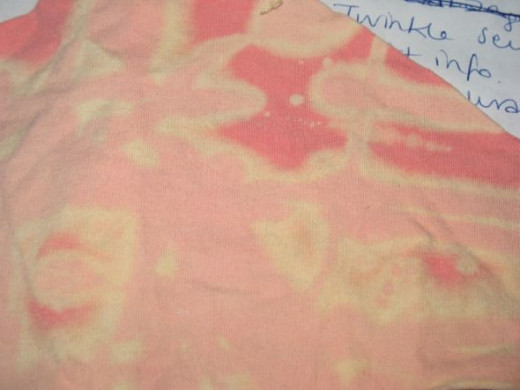
Above: A small sample of fabric cut from a bleached t-shirt.
Generation T

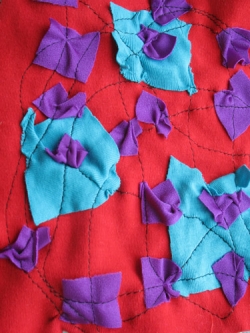
Ideas for Adding Texture into T-Shirt Fabric
1. Get lots of different colours of t-shirt fabric and cut them up into little pieces. Randomly sew these pieces in place on your t-shirt. Don't worry about the squares getting caught up in the stitching - this will add more texture.
2. Instead of using just t-shirt fabric - attach squares of all sorts of fabric to the t-shirt. Don't worry about fraying - that's part of your texture.
3. Cover your t-shirt in embroidery - even try using it to create puckers in your t-shirt.

Above: I pinned some squares of t-shirt fabric and other stretch fabric bits on top of my t-shirt sample and randomly sewed them in place - not worrying about puckering the fabric.
Tops
Cute, well-fitting tops are a bit of a nightmare for me. It seems like a lot of the cute tops for summer are made for people who have a bustline that's in proportion with the rest of their body! If I get a top in my size the cups or bustline are never in the right place.
I really want to try making one of those tops that has some pretty detail on the top to cover the "boob area" seeing as in commercially available tops the "boob area" always finishes about halfway down my actual "boob area"!
I'm contemplating either trying to design something from starting with a basic female block made from my measurements or I've found a cute little pattern for a contoured bodice top on Burda Style - the only problem being that I'd have to adapt the pattern a little because I think it's made for smaller sizes.
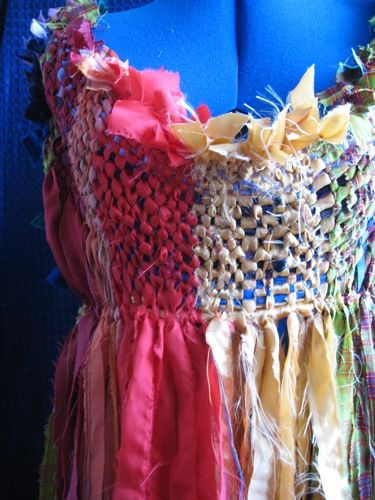
Above: Design for a top with a woven piece over the bust.

Above: I've always loved the idea of making a cute wrap-around top. I imagine that I'd make this by starting with my close fitting block and extending the pattern pieces to make the wrap-around sections.
As mentioned above I'd like to make myself close-fitting tops that actually fit my bust.
I love the idea of little capped sleeves.
Patchwork seems like a good option for using up smaller pieces of fabric although matching the pieces up might be a nightmare.
Twinkle Sews
Sometimes it's hard to think of shapes and designs for your own patterns so it can help a lot to make a few commercially available patterns first - that way you learn what pattern modifications make what shapes and you also learn about what suits you.

Skirts
I figure that the easiest skirt to make would be some kind of wrap around skirt where hopefully tailoring won't be too much of an issue.
I love the idea of using up some scraps of fabric to make an apron-style wrap-around skirt (see the doodle below).
Of course even easier than a wrap-around skirt is a sarong. All you'd need to do is cut and hem a piece of fabric that's wide enough to wrap around your body. You can then dye, paint, embroider and bead. Nothing could be easier!
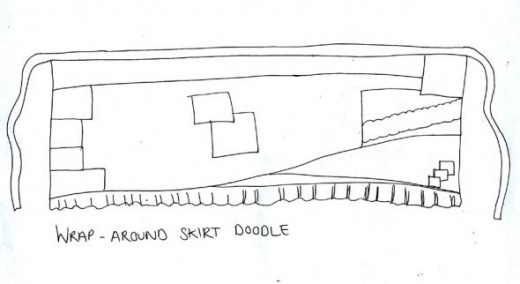
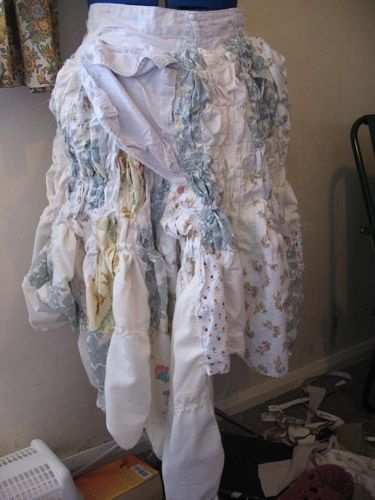
Above: I want to make a patched-together wrap-around skirt that's got masses of ruffles coming off the bottom edge.
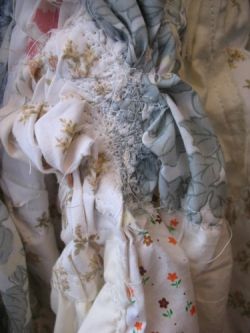
Raggedy Skirt
I love the skirt pictured below but it doesn't look too flattering on a curvier figure!
I couldn't quite get it to sit right.
I'm going to try again and make something similar but I'm going to concentrate on getting the top half of the skirt to sit against my hips and not bag out into funny shapes.
To make it I sewed squares of fabric together (I didn't worry about seams or making them too neat - I just layered one square over the edge of the other and sewed it together).
I made gathering stitches across the top of each section and pulled them until the fabrics were ruffled up.
I then made several sections for the skirt until I had enough to fit an old waistband (complete with pockets) that I cut from an old pair of trousers.
I then attacked the skirt with a sewing machine and sewed down the gathers, not worrying about pulling the fabrics or making them buckle.
Other Ideas for Skirts
Another simple idea for making a skirt (although it needs a huge piece of fabric) is to make a circle skirt.
For a circle skirt you need a large piece of fabric and your waist measurement. Make a circle in the middle of your fabric which is the same circumference as your waist. Then enclose it in a larger circle. The distance from the small circle to the large circle is going to be the length of your skirt.
A pair of trousers can be made into a skirt by cutting up the inside seam of both legs and adding a new section of fabric between the legs (both on the front and back). Voila! You have a skirt that already has a waistband and opening!
My favourite way of cheating is to draw around a skirt you already have - instant pattern! Just don't forget to add an opening and any splits in the hem (if needed).
To make a more fitted skirt make sure you take accurate measurements of your waist and hips - or even lie down on a piece of paper and get someone to draw around your body.

Above: Ideas for skirts.
A circle skirt, fabric attached to a waistband to make a skirt, jeans made into a skirt, a ruffly skirt and using a skirt you already own for a pattern.
Sew What! Skirts

Dresses
I don't think I've actually owned a dress since I was about 14. This may have something to do with the ample cleavage problem I've already mentioned, although to be honest, I don't think I've even looked at dresses in shops. Then again, I'm not big on shopping so I guess that explains why!
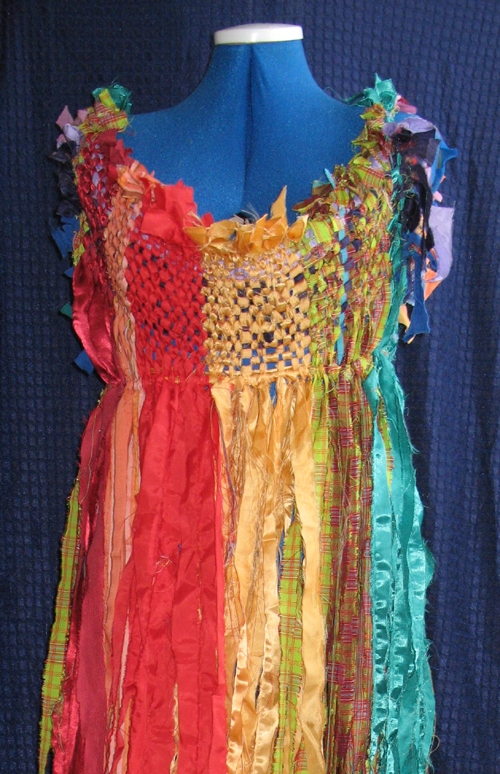
I would, however, love to have a play at making some dresses. I've made a woven overdress before (which you'll find further down the page) but I didn't make it to fit me so it would be fun to make something summery, just for me.
The important part to get right with a dress is the top half - so it's important to get those measurements right. Many of the ideas I've come up with for tops could be applied to dresses too - you just have to make sure that as well as extending the pattern pieces you have to accommodate the hips as well!

Above: Some doodles for dresses.
I seem to have a big thing for patches at the moment and I love the idea of wrap-around stuff.
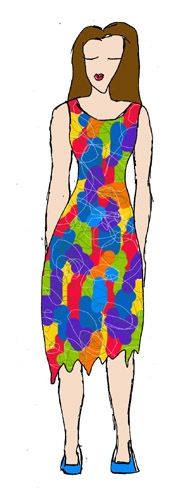
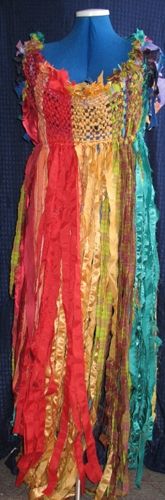
I love the idea of creating a dress out of little strips of fabric and piecing them together to form a beautiful multi-coloured dress.
I imagine it would be hard to make this dress from a flat piece.
The dress might need to be made from a lightweight fabric first and put onto mannequin - although this would make sewing the strips in place difficult too! Unless, of course the dress could be left completely unsewn at the opening and treated as one big piece of fabric. I'd have to be mindful of not losing the shape of the dress.
Perhaps individual pattern pieces could be covered in strips and sewn together later?
Perhaps a patchwork piece of fabric could be made from scraps of fabric? The pattern pieces could be cut out of this fabric.
To cover the seams I could attach scraps of fabric once the piece had been sewn together.
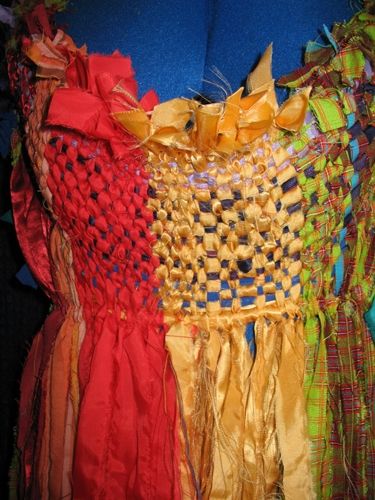
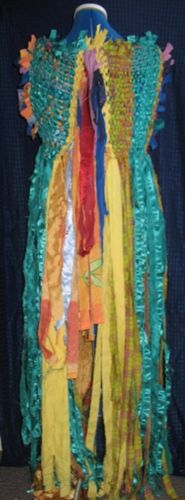
Maypole Dress Images
Click thumbnail to view full-size


Shorts
Shorts can be dead easy.
Just take an old pair of trousers and cut off some of the leg!
Denim cut-offs are my favourite - especially as you don't need to hem them - the frayed edge can look pretty cool! Or they can just be rolled up and simply stitched in place.
Rolled up legs seem quite popular at the moment and can be used to hide the rough edge of any cut-offs - although with some fabrics it might be best to zig-zag stitch along the raw edge of the fabric to stop your shorts from disintegrating!
If you want to make shorts from scratch then all you'll need is a trouser pattern - just fold over the leg where you want the shorts to stop - don't forget to give yourself some extra leg if you want to roll up the hems.
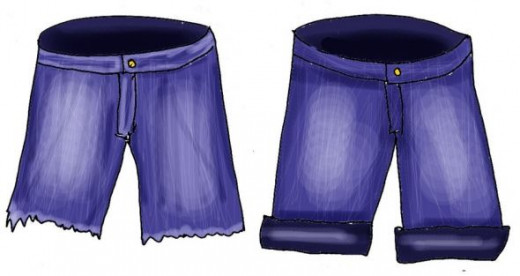
Above: Some very scrappy doodles of denim cut-offs.
Sew Everything
Accessories
Summer accessories could encompass anything from bags, jewellery, hats and sandals.
I'm thinking that a summer hat could be really important for me right now - I sunburn very easily and I hate it when my scalp goes red!
A while ago I saw someone wearing cardboard flipflops - I love that idea! It's just not very practical for the water! There's also a Threadbanger video floating about on Youtube for how to make flipflops out of an old yoga mat - pretty cool if you've got a yoga mat that needs recycling! (Check out the directory further down this page for links to Threadbanger and other cool DIY fashion websites).
Jewellery and bags are huge topics that need lenses of their own so I'm not even going to think of tackling them today!
Below are a couple of very basic doodly ideas to set you off on a train of thought.
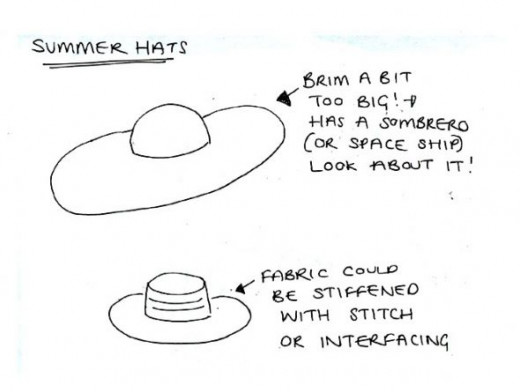
Above: Hat doodles.
I love the idea of stitching a brim of a hat so much that it holds a sturdy shape - this would be a great way to showcase your embroidery skills!
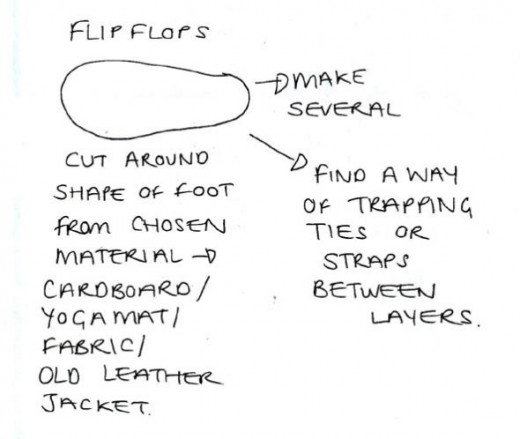
Above: I've always wanted to make a pair of my own shoes. Maybe I'll get round to making some fabric flipflops one day!
Make Your Own Clothes

Clothes Making Directory
These are some of my favourite places for finding ideas for making clothes.
- Burda Style
Burda Style is full of patterns. - Craftster
Craftster is an awesome community of crafty people and there's some great stuff on how to make your own clothing. - Threadbanger
Threadbanger is an awesome site with a blog, community and lots of tutorial videos.


")

