Make A Rustic Rose Wreath

Create A Rustic Rose Wreath For Your Home Or Wedding
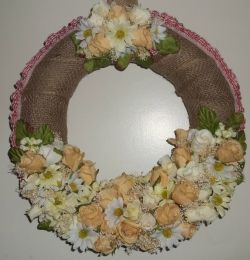
There is something warm and homey about a rustic wreath. It just says, "Welcome home !" Creating this delightful wreath for your door or as a rustic or rose themed wedding piece is not difficult at all. It is fairly easy to do even for the beginning crafter. With a simple wreath form, some burlap and a few flowers, you can really create something to be proud of. You could vary the flower colors to suit your needs. I love this wreath for fall. It just reminds me of the warmth of home and loved ones. If you are planning a rustic wedding or rose wedding, two of these wreaths on the doors to your reception, would be a loving welcome to your guests
Use Any Combination For This Wreath
Even with the rustic flavor of this wreath, you could use any combination of flowers to suit your home or wedding colors. There are so many choices available ! Here are just a few ideas
Buying flowers in bunches and off season is a great way to save money on all your wreath projects
Rustic Rose Wreath Directions - How to make a rustic rose wreath

This wreath is easy to create with just a few materials and tools. The steps are simple, and anyone can do this simple arrangement.
Time required: Depends on your experience level
Difficulty: medium
Cost: About $10-$12
Materials:
- Straw Wreath Form in the size of your choice
- Wide Burlap rolls
- Silk cream roses
- Silk white roses
- White daises in different sizes
- Babies breath
- Red gingham stretch ribbon- May Arts Is best
- Glue gun sticks-clear
Tools:
- Scissors
- Glue Gun
- Floral wire cutter
Instructions:
1. Gather materials and tools. Lay wreath on a plastic craft mat or newspapers
2. Cut flower heads off of all roses with floral wire cutter. Separate leaves and cut them into single leaves. Disgard the stems
3. Remove Plastic cover from the wreath form. With the glue gun, glue one edge of the burlap roll to the back side of the wreath
4. Wrap the burlap tightly around the wreath securing it every so often with a little of the hot glue. Once it is wrapped completely around the wreath form, cut the end and secure it to the back of the wreath form.
5. Cut a small loop of the burlap and secure it to the back of the wreath form to act as a hanger for the wreath
6. Glue the gingham ribbon around the back of the wreath with the glue gun, making an edge to the wreath
7. Starting at the bottom of the wreath, lay out two of the roses opposite to each other. Glue the roses against each other in the center of the wreath. In this case, with two colors, I put one cream against a white flower. The first two flowers were placed upright.
8. Build a "Bouquet " around your center. Vary the roses and the daises and move around the wreath form, layering on your design. Some flowers will be upright and some will be on their sides. Let your eye guide your design. Think about each section of the wreath as a "mini" bouquet, one next to each other. Build your flowers about half way up each side of the wreath
9. As you work in each section of the wreath, place and glue the leaves between the flowers on the bottom
10. Cut little groups of the babies breath and group small "bouquets" together with the hot glue. Fill in the spaces between your flowers using the babies breath as filler
11. At the very top of the wreath, Build a small bouquet using all the flowers. First glue the leaves down. Then place and glue the flowers using three flowers upright and the rest built around them
Rustic Rose Wreath Tip
Burlap wrapped around a wreath frame adds a rustic touch to any wreath. No matter what types of roses or colors you use, the burlap will add a rustic effect to your project.
More Project Details - Inspiration For The Rose Rustic Wreath
Click thumbnail to view full-size


Rolled Paper Rose Wreath

How To Make A Paper Rustic Rose Wreath
Upcycling an old book into a lovely rustic rose wreath is a perfect way to spend an afternoon crafting. Not only is this project a perfect addition to your home, but it also makes a wonderful gift. You can also add this wreath to a nostalgic wedding theme.
You can leave the roses in their natural paper color. Or you can add some color with acrylic paint thinned down with water. The print will still show through but there will be a touch of color.
You can also edge the flowers with distress inks or ink oxide ink. The brown colors would age the glowers.
Another more sophisticated option would be to add just a tiny touch of glitter to the edge of the flowers.
Supplies
- Grapevine wreath form
- Old book pages
- Burlap
- Silk or paper leaves
- Scissors
- Hot Glue gun and sticks
- Remove the pages from an old book. On average, you will need three pages per flower
- Trim off any binding left with the scissors
- Fold the pages in half horizontally
- Then fold the pages corners to create a triangle shape
- Use the scissors to round the edges of the closed shape to create a flower petal
- Unfold and set it aside. Do this three times.
- Trim one flower off the first flower
- Cut two petals off the second flower.
- Cut three petals off the third flowers.
- Repeat this process 5-6 times
- Glue each of the flower petals together with the hot glue gun.
- Glue the three pieces of the flower, starting with the largest piece. Then layer each piece gluing it in the center.
- Repeat creating as many flowers as you wish.
- Glue the leaves to the back of the flowers
- Glue the flowers to the wreath
- Add any additional elements to your wreath like a bow at the top or a ribbon loop to hang your wreath.
Whenever you are using a glue gun, make sure to have a bowl or cup of water handy in case you get hot glue on your fingers
Create Burlap Roses

More Rustic Rose Wreath Ideas
- HOW TO MAKE A PAPER ROSE WREATH - hello, Wonderful
How to make a gorgeous paper rose wreath to celebrate spring or summer. Comes with a free printable template so anyone can make gorgeous paper flowers. - Pajama Crafters: Red Burlap Rose Wreath Tutorial

This content is accurate and true to the best of the author’s knowledge and is not meant to substitute for formal and individualized advice from a qualified professional.
© 2014 Linda F Correa


