How To Use Shaving Foam To Create Marbled Craft Papers

What Is Marbled Paper?
Marbled paper is probably familiar to everyone, even if you are unsure of what it is called. Those swirled and patterned end papers in books are probably the best examples but it is used in many applications.
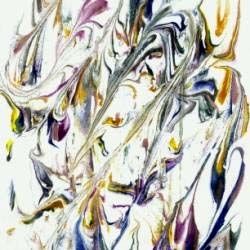
There are many methods of achieving this sort of patterning, some easy and some hard. Some use special chemicals to give the correct surface tension in the color bath and some use items that you will find in most homes. This photograph is an example which I made using a simple method which utilises nothing more than shaving foam and food colouring or inexpensive acrylic paints. It was actually made using an A4 ( 11 x 8.5 inch) sheet of ordinary printer paper, the image shows a detail The size you can make is only limited by your equipment.
This page shows you how to achieve such patterns with ordinary shaving foam.This particular technique uses the foam to make a bed for the colours, which can be food colouring dyes, or acrylic inks or paints. this lens shows you how to create marbled papers that you can use for your craft projects. It is easy and guarantees great results. Interested? Then read on............
The Equipment You Will Need For This Project
Marbling A Sheet Of Paper Using Shaving Foam
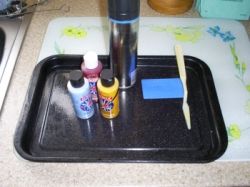
Nothing too onerous in this list, you will probably have most of it in your kitchen.
A tray to hold the foam and colour layer
A palette knife to level the foam
An implement to swirl the colours
A sqeegee to remove the foam (I used an ice scraper from my car)
Newspaper and tissue to help avoid any mess
The colours. These can be food colouring, acrylic inks or acrylic paints thinned down.
Prepare The Foam Layer
This Forms A Bed For The Colours
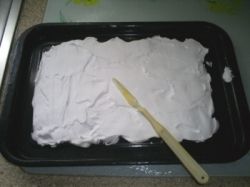
Give the can a shake to liven up the contents, in case it has been standing around too long. You will need to spray a layer of foam over the tray, about half an inch ( 10-15 mm) deep. Use a palette knife to roughly level the surface. No need to be too discerning about this.
Spread Your Colours
Choose Them To Give The Desired Colour Scheme
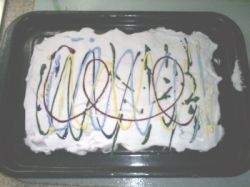
Take your selected colours, Until you are practised it is probably good enough to use 3 or 4 and pour or drip them onto the surface of the foam. The colours you choose will reflect the colour scheme that you wish to achieve. The amount of colour is best found out by experimentation. But for starters do not be too generous. Take small steps before bigger ones.
You can see what colours will work together, if you need help by visiting my lens On how to use the colour wheel.
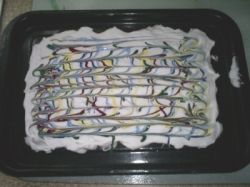
Swirl The Colours
Have Fun With This Step
Use your creative imagination to swirl the colours to provide an interesting pattern. This could be as simple or as complcated as you want . But do think of the end result as you twirl away. From side to side and cross-ways is good. Little eddies or whirlpools can be very effective
Now The Exciting Part
Printing The Pattern
Laying And Pulling The Paper
We now have a bed of foam with a coloured pattern on it. Take the paper and place it on to the foam bed. Lightly press or rub the back of the paper to make sure that the whole surface contacts the foam bed and the colour.
Now take a corner of the paper and peel it back without disturbing the foam bed. Lay it on some newspaper ( face-up) to allow the colour to take for a few minutes. I often print a second or third sheet at the same time to use up the colour on the foam bed.
Now take a scraper or squeegee and remove the foam from the paper by lightly pulling the scraper across the paper. You may need several passes, wipe the scraper after each pass. You may need to practice to find out how long to leave the paper before removing the foam as it will depend upon the colours you have used and how quickly they dry.
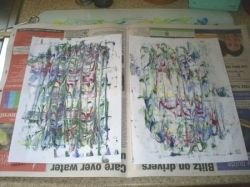
More Examples Of Paper Marbling Using Shaving Foam
These are some examples of marbled paper which I did earlier: The first is actually a print from a third impression (i.e. the third print from a foam bed after the foam had been re-swirled) and the surface of the foam was getting quite "dirty" from the paint which shows as a greyness in the image.
The combinations are endless. With different colours and different ways of swirling or combing the surface of the foam. The resulting papers can be used in all sorts of craft projects.
Books on paper marbling from Amazon - learn the professional techniques
using shaving foam is a fun project and the items are to be found in most kitchens ( use food colourings rather than acrylic paints) but the real beauty of marbling can only be achieved using techniques explored in these books.

I would welcome any comments on this lens, especially suggestions for improvement. But I would really be glad to hear about your own experiences with this method.


