Basics of the Digital Photography.

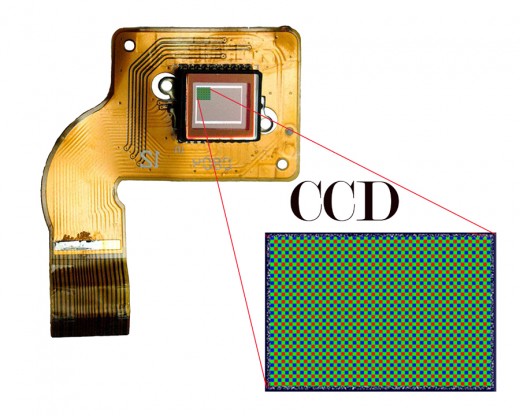
CCD placement

Magic of pixel count and the size of the print.
If you tell your friend that you are planning to buy a digital camera, I’m sure his very first question will be “How many megapixels you want your camera should have”? Or, if someone is buying a digital camera and he is seeking your advice the most probable question he will ask is “How many megapixels should my digital camera have”? Every next day camera manufacturers introducing newer models having more and more pixels and the lure of having more megapixels is also increasing among photographers. Is it necessary to go for higher resolution camera or not? How one can use the existing pixel count for once benefit without compromising the quality of the final print. To understand this factor, it is important to first learn in detail about the structure and nature of the camera sensor.
One of the very important specification of any digital camera, the number of megapixels it has. (Just to understand Megapixel = One Million pixels, quite a large number)However, is the importance given to this figure justified? What role number of pixels play in defining the quality of a photograph, is it real or perceived, and if real up to what extent?. How does the number of pixels affect the final result that is the print and its size?
In this write-up we will look into this aspect plus others, such as the effect of pixel size, sensor size, resolution, etc. Before we can discuss in detail about all these issues, you need to get to know the terms pixel, pixel count, resolution and more importantly the difference between the pixel count and resolution.
CCD Sensor
Pixel, pixel count and effective pixels
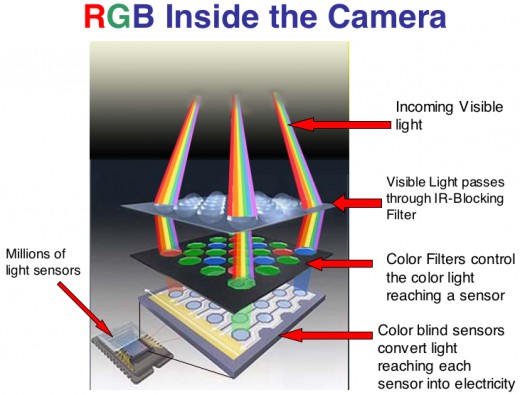
Word Pixel is in fact is the short form of “Picture Element”, single smallest element when arranged in rows and columns, forming a Photograph. The sensor is a device placed in the camera body (most probably acquires the place of the film, as in analogue cameras, behind the lens.) and it is here the light rays from the lens focus. The sensor consists of photosensitive e elements, which gather the light and arranged in multiple row and columns forming a rectangular grid. These elements produce an electric charge in proportion to the intensity of the light falling on each element. The greater the intensity of falling light, the greater will be the electric charge. The complex circuitry built in the camera measures this charge , and the analogue to digital converter , converts this charge into the digital information, and the on board processor is able to construct the image, which is then stored in memory. When required the system replays the image on the LCD of the camera, and afterwards can b e transferred to a desk top computer for further processing. Each DOT of the image thus formed corresponds to one picture element, or PIXEL and the total number of pixels presents in a sensor is called the PIXEL COUNT, specified as MEGAPIXEL. Since the these pixels are arranged as a rectangular grid, in rows and columns, a 12MP sensor will have 4300pixels in columns and 2800 pixels in rows, just for example. Thus it is the pixel which forms an image. Though there are certain numbers of pixels which do not take part in forming the image, as they are allocated for non picture forming part. In this way, if we subtract these pixels from the total number of pixels we get the EFFECTIVE PIXELS.
If you have two different models of digital cameras with different resolution but the same sensor size, then the camera with less resolution will perform much better as it will have smaller Pixel Density Ratio and, consequently , larger pixel size which will have better light grabbing properties. Pixel density is a calculation of the number of pixels on a sensor, divided by the imaging area of that sensor. The greater the density, the more will be noise generated by the sensor. The digital noise is a characteristic of the image sensor and the image processing algorithm.
Sensor
What is Resolution?
When any system, camera, lens, sensor or film is capable of recording very fine (Almost 125) lines arranged in a millimeter (or may be an inch) in such a way, when seen back they appear as distinct images, separately, is called the resolving power of the system or lens and this is called Resolution, or in simple words basically tells the details that a camera can capture. The higher the resolution, the smoother will be the transition of information from pixel to pixel. The resolution depends on many factors, e.g. the number of pixels, the quality and resolving power of the lens, the quality of falling light, and the test target of subject etc. Resolution is an important factor but camera manufacturer hardly mention it in the specification, as there are many other variable are involved. Mostly it is used in measuring the resolving power of the lens. Thus it is clear that the number of pixels present in the sensor of the camera (e.g.12MP) is known as its Pixel count and not the Resolution. One should not get confused about this, and this fact can be verified by going through the specification sheet provided by the manufacturer of the camera.
The only important role the term resolution plays is in cases of printing and print quality. A print is composed of a number of DOTS, and each dot corresponds to a pixel that has been captured by the camera. As for a given print size, higher number of dots and smaller sized dots will allow you to see finer detail in a print. Regardless of print size, the standard requirement for a good quality print, number of pixels per inch is specified. The abbreviation of DOT PER INCH is dpi and this is known as print resolution. Generally accepted print resolution is “300 dpi” in almost most of the cases, as beyond this number a human eye cannot resolve, as the normal viewing distance remains at 14”.
The number of pixels in our cameras has a direct bearing on the size of the print we can make. For example, a 12MP image of 4300x2800 pixels when printed at 300 dpi, it will yield a print of approximately 14.5x9.5 inches. Which is known as ‘NATIVE RESOLUTION”. In cases where large prints than this size are required (eg.30x20in), with the same number of pixels, one has to distribute the same number of pixels over a larger area. Then the size of the dots will proportionally become larger automatically and will bring down the number of dots per inch. Resulting in the reduction of the print resolution. For example a 12MP image when printed at 30x20 in will have a resolution of 140 dpi. Over all loss of quality in details and sharpness will make the print less admirable.
In cases where large size prints are required
Taking into account, the factors of pixel count, effective pixels, native resolution, etc. there are many ways by which we can make prints of larger size.
Action 1:
In most of the cases, the normal viewing distance remains at 14 to 18 inches. By making a print at 250 dpi is more than sufficient, because by increasing the size of the print, a viewer needs a longer distance to look at it, and due to the greater distance a human eye cannot resolve that much. If the large size prints is viewed from closer distance it will definitely look worse, this is the reason, the bill board prints appear fine from longer distance but their quality and fuzziness becomes highly noticeable when viewed from a closer distance. In most of the cases a resolution of 250 dpi gives a print of 30x20 inches , which is acceptable , unless otherwise for very special purposes size becomes more than this.
Original image

Action 2
On can print beyond the native resolution, by applying a process known as Interpolation. Since the number of pixels remains fixed when the camera captures an image, in case we still want to Up size the print, we can use interpolation as an option. We know the pixels in the camera sensor are arranged in rows and columns organized in a rectangular grid, there is possibility we can insert some extra pixels (Interpolation) thus can increase the total number of pixels needed for larger size prints. Due to the regular nature of grid formation, the transition of information from pixels will be smooth and the quality of the image remains fine and acceptable in most of the cases. Though it is necessary to have the original captured pixels should be of very high quality, which depends upon the fact that we are using good lens, and expose under excellent lighting condition, focused sharply etc. One can increase from the original print size of 14.5x9.5 in. by using a 12MP camera up to 54MP, which will give a large print of 30x20in. By this process of Interpolation, that is why I mentioned earlier, the magic pixels play. At the same time, for the purpose of display on the computer monitor, transmitting the image through email, or uploading for other uses, we need to down size the image, as the large file size takes more time to upload. In these cases we are required to reduce the number of pixels in such way that never affects the quality of the image.
Action 3
Technology is advancing in leap and bounds and now the camera manufacturers are producing equipments of very high quality. Available in the market, cameras having 24MP and even 36MP sensors. Advantage of high resolution cameras is that they are capable of giving prints of very large size originally. One can opt for higher resolution camera if the cost of the camera is not a factor .Thus the greater the number of pixels, the greater will be size of the prints at native resolution. In this case the original image shot by using a high megapixel camera, under perfect conditions will give a large size print and one needs nothing else to manipulate the image. A camera having 54 MP, at 300dpi will give a print of 30x20 in. having 9000pixels horizontally and 6000pixels vertically.
Other examples are;
6MP camera at 300dpi wills generate approximately 10x7in. Print having 3000 by 2000 pixels
12MP camera at 3400dpi will produce approximately 14x9 in. print having 4300 by 2800 pixels and so on.
Action 4
Another very good technique by which we can get more megapixels from our existing camera is somewhat similar to making panoramic images. In conditions where the subject is static (e.g. landscapes and involving buildings etc.) and without changing the position several overlapping shots can be taken and then stitched together to get a large size print. In this case adjusting to a longer focal length is necessary so that a smaller are is covered. The final image arrived by stitching together several images will look the same as that taken by using shorter focal length. But this technique is not suitable in each and every situation and there are limitations.
The attached image no3 is an example of the process described in action 4.Though it was a difficult situation, where a number of students working in the Science Laboratory situated in a large room. What I have done, I asked all the students to remain strictly still at least for 2 minutes, and with the fixed focal length, having camera on a sturdy tripod, I took several overlapping shot quickly. Afterwards, during post processing I then stitched together all the shot in such a way that gave a resulting print of 20”x72” using a camera of 10MP.
Stitched image

The camera having high pixel count cost more. So before going for it, it is of prime importance to ask yourself, how large you want to print and how often. Most of time we do not print more than 12’x18’ and for this a camera having 8MP is sufficient and with the extra money one can buy lenses and other accessories.


