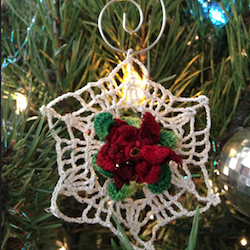
Celia's Winter Rose Snowflake Free Crochet Pattern

My Sister, Celia, Is The Inspiration For My 2012 Annual Snowflake!
Each year for the past several years, it's been my tradition around the holidays to design one special snowflake pattern for my "fans" - those crocheters who are kind enough to join my mailing list or otherwise show interest in my designs. While the stitches aren't that advanced - just treble and double treble crochet, the way you have to twist the petals in the rose makes me tend to call this a more advanced pattern. It's just... unusual.
You can crochet it up fairly quickly and have several colors of them sparkling around your tree in no time! Crochet a few extras for gifts for special friends or relatives - what a nice surprise to find tucked into their Christmas card or added to a package tie!
In all honesty, I've been trying to figure out how to design this little rose for about 15 years! Recently, when sitting having a chat with my sister Celia, a flash of inspiration hit and I knew exactly how to do it! So it is named in her honor. Our love for roses doesn't stop just because summer's blooms have faded! And sometimes, we're lucky enough to find a very special rose blooming in the snow! So I've created Celia's Winter Rose Snowflake just for you to enjoy.
Happy crocheting, and Merry Christmas to everyone!
What Do You Think Of This Pattern? - Come On, You Can Tell Me!
What Are Your Thoughts On This Pattern?
A Word About Thread Selection...
It does not matter what size of thread you choose, as long as you keep all your threads of very similar size and weight so as not to throw off the pattern.
Crocheting is a lot better for you than candy!
A Word About Blocking & Starching
Snowflakes really should be blocked and starched in order to look their very best when hung.
I put 1/4 cup of sugar in 1 cup of water and bring it to a full boil then cook for about 1 minute. Remove from heat and immediately put crocheted item into hot sugar water. When soaked, remove item to a damp towel and press to absorb solution. Lay item on counter surface and gently stretch into place until it looks just like you want it, then leave undisturbed for 12 hours. Flip over and let dry.
You Say...
Has Someone Ever Given You A Hand Crocheted Gift?
The Schnauzer Difficulty Rating!

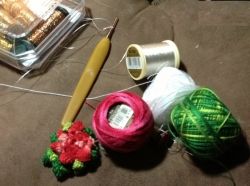
What You Will Need
Small amounts of your favorite #10 crochet thread in white, red and green (or your favorite colors)
You may also choose to use size 8 Perle cotton for your snowflake, as I did. Or you may wish to use two strands of embroidery floss. It's up to you!
One spool of metallic sewing thread OR Kreinik fine braid metallic thread
Crochet hook size 8 or your preferred size
How To Make The Magic!
With Red variegated Perle Cotton, ch 8, join with sl st to form ring.
Round 1
Ch 3, work 5 TRC in ring. *Ch 3, turn work, TRC in base of turning ch just made and TRC in rest of TRC's. Turn work back, flip petal just completed to back and right, and holding thread taut, work 6 TRC in ring. Repeat from * until you have 6 petals. End with sl in first TRC of first petal.
Round 2
Sl st into ch 3 space. Ch 4, work 7 DTRC in space. *Ch 4, turn work, DTRC in base of turning ch just made and DTRC in rest of DTRC's. Turn work back and holding thread taut, work 7 DTRC in next ch 3 sp. Repeat from * . End with sl in right side of first petal. Fasten off.
Round 3
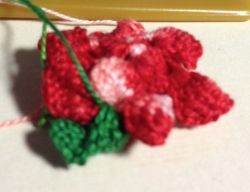
Attach Green variegated perle cotton in any ch 4 space. Ch 4, work 7 DTRC in space. *Ch 4, turn work, DTRC in base of turning ch just made and DTRC in rest of DTRC's. Turn work back, flip petal to back and right and holding thread taut, work 7 DTRC in next ch 4 sp. Repeat from * . End with sl st in right side of first petal. Fasten off. NOTE: At this point, your work should be a "puff." Make sure you have six petals and six ch 4 spaces.
Round 4
Attach White #20 held together with silver sewing thread or floss in any ch 4 space. CH 4, TRC in space. (Ch 1, TRC in space) twice. *(Ch 5, TRC in base of ch 5 just made) twice. (TRC, Ch 1) in next ch 4 space 3 times; TRC in same space. Repeat from * around. End with a slip stitch in 3rd ch of beginning ch 4.
Round 5
Ch 5, TRC in next TRC. (CH 2, TRC in next TRC) 2 more times. *Ch 5, work a 3-DTR Cluster with the DTR "legs" in next space, the stitch in between the spaces, and the next space. Ch 1 to close. Ch 4, SC in base of ch 4 just made. Ch 5, work (TRC, CH 2) in next 3 TRC. TRC in next TRC. Repeat from * around. End with ch 5, sl st in 3rd ch of first ch 5.
Round 6
Ch 6, TRC in next TRC. (Ch 3, TRC in next TRC) 3 more times. *Ch 7, DTR in next ch 5 loop. Ch 5, SC in base of ch 5 just made. Ch 7, work (TRC, CH 3) in next 3 TRC. TRC in next TRC. Repeat from * around. End with ch 7, sl st in 3rd ch of first ch 6. Fasten off, weave in ends. Starch and block if desired.
Note: There are two ways you can flip the rose petals. If you leave them as crocheted, they resemble one of those little pointy bows. If you pop them thru in the other direction, you get a totally different look. Play with it!


")


