Creating Framed Backgrounds for your Rusty Summer Photos

Rust can be Art. Frame it and Hang it on your Wall!
One of my favorite things to do during the Summer is to drive around and find unusual photo subjects.
My favorite subjects are old things and generally, old rusty objects. Something about the color of rust is beautiful to me.
While I leave most of the images in my files for later use, I also create projects for myself and others using these photos.
Many think these old rusty objects are just junk. However, when I look at them and think of their origins and ties to people, my imagination unfolds with the stories that could've been connected to them.
I like to put a frame or background on or behind my photos. It not only makes the objects look better, it can make them very unusual or unique. I have learned some Photoshop techniques for you to try below and you can frame or outline your old photos.
Please enjoy my photos and tips and please leave some feedback. If you send some along some of your framed works, I will include them on this website.
All of the photos on this website were taken by myself during my Summer travels.


Crafty Creative Photo Frames using Photoshop
If you are creative or crafty, then you probably have Photoshop.
While there are many versions available, all of them have the basic tools necessary to crop, copy and paste objects either out of a photo, or into them.
I also use the eyedropper to match colors and to pull colors out of one object into another to make them blend together better.
In addition, the sharpen image tools are also good when a photo or parts of a photo are blurrier than you would like.
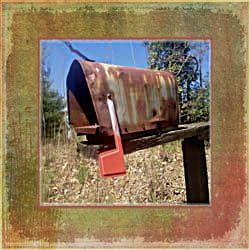
When matting or framing rusty objects, I will try to find a frame or border than is similar to the rusty object, itself. This draws attention to the actual object in the photo. If you have blue eyes and wear a blue shirt, do you notice that the blue in your eyes is much more pronounced? This is the same principle. The large blue item draws your attention to other blue items that you are wearing.
Take a look at some of the photos I have matted and framed below and try to identify the color and pattern matching scheme that I have used. These examples will make it easier for you when you want to match your own colors.
Have fun and experiment to make that excellent photo item for a craft project, or just to hang on your wall.
Learn how to be a Picker of "Rusty Gold"

If you've never seen "American Pickers," here is a Classic Episode with Hobo Jack
Step by Step Instructions to Frame or put a Background behind your Photo using Photoshop - Use the finished creation in a crafty project!
- Locate the photo that you are going to frame.
- Find a frame background that you would like to use. It does not need to be a frame but can be any photo in which the edges would look good around your photo. I select by color palette and try to pick a color in my photo that matches the frame. To locate backgrounds, I used Flickr Creative Commons. Creative Commons has free-use images. Right click and select "save as" and name your frame background to your photo album. Remember where you saved it as you will be opening it in Photoshop.
- Open the frame background and the photo you want to use into Photoshop.
- Go to your photo and using the square outline feature, make the photo the size or shape that you want it. When done selecting the area, select "crop" from the "edit" menu.
- Once your photo is cropped, it will still have the outline around it. Select the "copy" command from the "edit" menu.
- Move to your frame background and go to the edit menu and select "paste." Your photo will paste on or over your frame or background image. The pasted photo will not fit perfectly.
- Hold down the "Ctrl" button on your keyboard and tap the "T" button. You will now see a frame around the photo that you just pasted.
- Around your photo, you will see little marks. Move your cursor over these marks and left click and drag the edges until the size of the photo fits either into or over the frame that you want to show in the background. Resize the photo using these frame marks until the frame or background photo has an even border.
- On some of my photos, I use the Photoshop "line" feature to outline the photo that I placed over the frame or background.
- Go to the "File" menu and save your creation. Save as a JPG and not as a PSD (Photoshop Document).
- Print your creation the size you would like it to be or save it in a folder and do something creative or crafty with it, such as using it in a collage.
The Rusty Gallery
Please browse through my photos that I have "Rusted-up" by using frames or background images.
Below each one, please let me know what you think about the matches that I have chosen.
A Rusty Caterpiller

This rusty caterpiller is crawling through the photo, what do you think of this frame match?
A Rusty Jellyfish

Do you like the colors and textures in this frame match?
A Rusty Painting of Christ

How do you feel about this photo and frame match?
A Rusty Leaf

How do you feel about the framed leaf and the frame & photo match?
A Rusty Roof

How do you feel about this rusty roof match? Say "Rusty Roof" ten times really fast!
A Rusty Tractor

What are your thoughts about this tractor photo and frame match?
The Rusty, Rusty Tractor - A children's book that will spark their imagination about rusty stuff!

A Rusty Fly

Your thoughts on the rusty fly.
A Rusty Train

Do you like this rusty train photo match with frame?
A Rusty Ring in the Ground - An old gun placement for the West Coast during the Cold War

Do you like the matchup of the rusty ring and its frame?
A Rusty Tree

Do you like this tree with a forested background?
A Rusty Caboose