Scrapbooking for Beginners: Decorative Edges - Tips and Techniques

Get ready to learn how to scrapbook...
Scrapbooking is such a fun and rewarding hobby. Not only is paper crafting a way to express yourself and put a host of artistic skills to use, but turning your work into a scrapbook gives your family a keepsake that can be treasured for generations. There are so many neat tools and supplies and so many great techniques that a person can scrapbook every day for a lifetime and never be at a loss for ideas.
The big problem is that it can be so confusing for beginners! When someone looks at scrapbooking supplies or browses a craft shop for the first time, it's so overwhelming. Some people make investments in things they end up never using. Others can get scared off before they even start-- not knowing where to even begin.
If you've wanted to get started in scrapbooking but haven't quite known how, try to shake all the items from the craft stores out of your head. You don't need to invest in a Cricut, a die cut machine or make any major supply commitments to get started on your scrapbook. In fact, it's best that you accumulate supplies at a slower pace so you don't end up wasting your money.
Just get some pretty paper, a ruler, your glue sticks, and a few photos. Start with a very simple technique or tip, and learn it-- then you can build on it.
One quick and easy thing to learn first is making decorative borders and edges. Once you know a few techniques to make borders look stylish, you can apply those techniques to your mats, frames, page edges, layers, banners and in other ways only you can imagine. You just apply the same principles in a mix of different ways and you can come up with tons of great combinations.
With decorative borders and edging, right away you'll notice a big difference in your pages-- and the more you layer, the better they'll look.
I'm going to give you a few of my beginner's tips here, and while you'll find them very easy to do you won't believe how much more advanced your finished layouts will look.
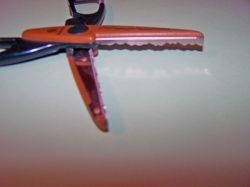
Decorative Edge Scissors
Simple, Practical, Versatile Scrapbooking Tools.
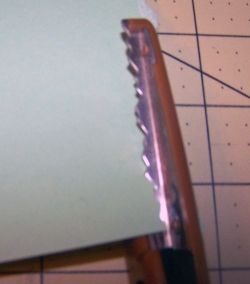
Decorative edge scrapbooking scissors are one of the best tools you can have in the craft cabinet when you start out. You can do so much with them, they are very versatile. They are not like regular scissors. If you look carefully at the edge of the scissor in the photo on the right, you'll see that the edges form a pattern or design.
It's this design that enables you to create a specific edge. There are a lot of different styles of decorative edge scissors, from scallops to waves to zig-zags, to more creative edges like "grass" or "torn paper".
Some edges for all occasions
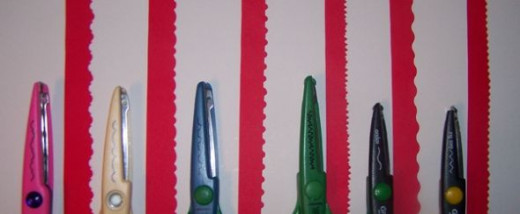
Decorative Edge Scissor Cuts
You can see that on the side of the scissor, it shows you the design you will get. If you match up the design each time you reposition the scissor, you can create a continuous edge.


And if you want, you can cut strips down both sides. By making them double-sided, you can make fancy page strips or paper ric-rac embellishments.
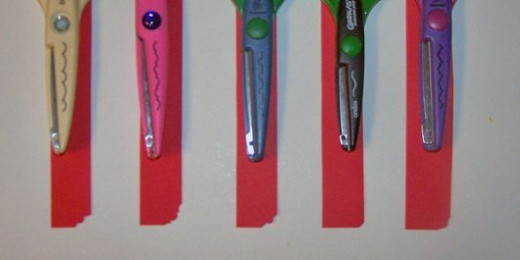
Try cutting several mats of varying sizes and using different decorative edge scissors. Layer them, glue them together and then glue your photo to the multiple mats to really feature your photo on the page.
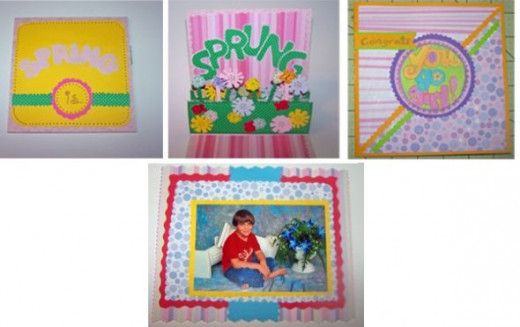
They're good for more than scrapbooking, too. Use them for gift wrapping, school projects, or making cards like the ones below. Any paper crafts, basically, can benefit from a decorative edge. Notice how below they are cut both straight and in circles.
Making Quick, Decorative Photo Edges
Here's an easy project: decorative photo corners.
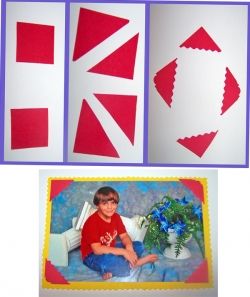
1. All you have to do is make small squares (I like about 1.5 inches, but you can make them whatever size you want).
2. Cut them caddy-corner to make four triangles.
3. Cut the edges with your decorative scissors.
4. Then glue them to your photo corners.

While these decorative edge scissors are great for nice, neat, or fancy cuts, there are other options. Paper punches make absolutely beautiful edges and page borders.
Paper Punch Page Borders

Decorative Paper Punched Edges
This page was very easy to make: 12-x-12 black cardstock, a tilted piece of trellis-printed vellum askew, and 8-x-10, and a few embellishments like the cardboard word "lovely", glued-on flowers and glued-on rhinestones (in case you can't see the picture well enough here, the center of the flowers are black rhinestones, and the upper right hand corner is trimmed with rhinestone edging).
Tip: when your scissors and punches start to get a little dull, get a sheet of heavy-duty aluminum foil. Cut or punch away on it. This will sharpen their edges again!
It needed something, though, and that's where the paper punch edger came in. Using three different layers of varying colored reds and greens to go with the flower in the photo, I punched three borders and layered them. That gave that great sidebar to this page.
This page came out classic and is very easy to replicate with the page punches, or with decorative edge scissors.
What Do You Prefer? - If you use decorative edge scissors
Which do you like working with better? Decorative edge scissors or page punches?
Distressed Edges
A Very Cool Technique!
While the scissor and punches are great for nice, neat edges, sometimes that's just not the look I'm going for.
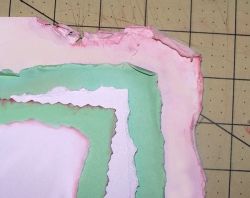
I really LOVE the rustic, rough, distressed edges in my layouts-- particularly when working on featuring a special photo, when I want to frame the layout to hang it up, or if working on vintage family pictures. It gives such great texture and presence to the layout.
Notice the assortment of distressed edges to the side. They were made using different techniques, but they all achieve an excellent finish. Not surprisingly, it isn't that hard to make paper look so perfectly messy, but you need the right techniques to get the look just right.
Let's have a look at some of these techniques.

Torn Edges
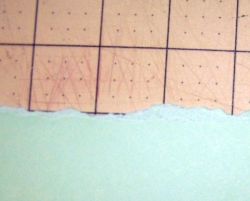
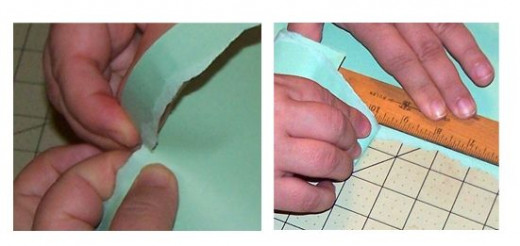
The easiest, fuss-free way to distress your page edges is to tear them. This is actually easier with thicker paper like cardstock than it is with thin papers, but either way you can get the hang of it with practices.
Don't worry that it doesn't come out perfect; it's supposed to be imperfect. The only concern is that it comes out approximately the right size-- you don't want your tear going crooked and making the paper shorter than you had intended.
To tear outright by hand, pinch each side and tug back one side in short, quick bursts. Keep moving your fingers along with the tear, keeping them right near where you want the rip to go. This gives you much more control.
Alternatively, you can tear the paper by putting something over it to protect the areas you don't want torn, like a ruler or book. Press down on the heavy object, then just start tearing away at the edge until you like the look.
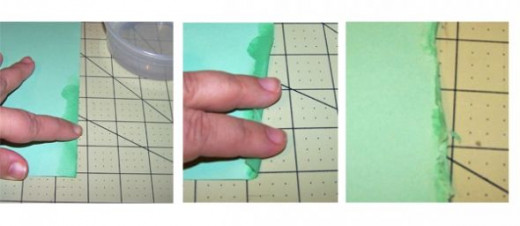
Hand-tearing has its benefits because it gives that nice, feathered edge.
"Torn Edge" Decorative Edge Scissor
If you just don't have the confidence to tear expensive paper yourself, don't worry-- there is a solution.
You can actually get decorative edge scissors that cut an artificial jagged edge resembling a tear. This is a great effect and ensures a great deal more control over where you want the edge of your paper to be-- you don't have to worry about accidentally ripping it until it's too small.
The only drawback is that they don't give you as nice and natural an edge as hand-tearing, but they're certainly a great alternative. And there are still things you can do to rough up that edge some more, but we'll get to that in a bit.
Water Distressing
Finally, another technique you can use is water distressing. You will get the hang of this one pretty quickly as well. Just get your paper and a small bowl of water.
Trace guidelines in pencil very lightly to mark where you want your final edges. Remember, it's best to err on the side of larger; you can always roll or trim it more. You can't make it bigger and you'll have to start over with a new sheet.
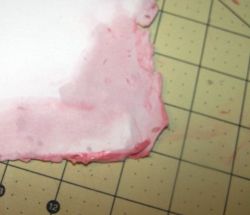
Dip your finger in the water and rub along the edge. Alternatively, you can use a damp sponge or a cue tip. Now you do not want to saturate the paper, you merely want it to start breaking apart a bit around the edges.
At first the color of your paper will probably start to fade, then the paper will start to fall apart. Keep working on it a bit at a time. I use my finger to roll or crinkle it at random.
Set it aside to dry before you put it in your layouts. If you didn't get the paper too damp, it will not be very long. The more you roll and crinkle and tear it, the more distressed texture it will have. You can go as wild or as subtle as you like.
If you want, instead of just making a mat by distressing the edges, you can make a frame and distress the inside edges of the photo like this:

If you want to discolor the edges a little for an even more aged appearance, put a drop of ink or watercolor paint into the water, then rub it on.
The color really must be added sparingly as it's very easy to overpower the page. Many colors are darker when they dry.
Remember the old rule of thumb: you can always do more, you can't undo.
Another great way to get the edges of torn, jagged cut or water distressed paper (after it's dry) discolored is by running an ink pad along the edge, or by using colored art chalks brushed on with a dry paint brush or cotton swab.
And you are really ready to make some rocking scrapbook pages now!

Now that I've shown you mine, you can show me yours. Do you have anything to add on the topic of making attractive edges? Let me here ya!
And if you like this hub, please share it with some other scrappy friends!


")

