Step by Step Paper Snowflake Construction

Make Paper Snowflakes
Winter is here! Even if you don't have snow on the ground, you can make it snow in your home.
Paper snowflakes are not just for children - when you make them yourself, each one is unique, and your friends will be impressed when they see your holiday decorations.
In this lens, I will take you step by step through my snowflake formation process.

#1 - Get Your Supplies
You will need white paper and sharp scissors to make your paper snowflakes (things that you likely have laying around your house!)

#2 - Create a Square and Fold the Paper
Take one corner of your piece of paper and fold it so you create the largest triangle you can. If you cut off the remaining ~2 inch strip, you will have created the square that will be the basis for your snowflake.
Once you have your square, fold the paper in half on the diagonal 3 times. The natural 6-fold symmetry is difficult to accomplish when you are folding paper, so we will aim for 8-fold symmetry. The tighter you can fold it the more intricate you can get the finished product. After these three folds, you paper is divided into 8ths.
Snowflakes naturally have 6-fold symmetry, but it is easier to create 8-fold symmetry with paper and scissors.

#3 - Make one last fold
This next fold is not a symmetrical one. You are folding the square into 16 sections. This will allow you to create a square with 8-fold symmetry since each edge of this folded piece is repeated 8 times through your snowflake.

#4 - Begin Cutting
I always start by cutting the outside edge of my snowflake. In this photo, you can see that the edge I cut off of the sample snowflake remained in one piece. I like to make a U shaped cut at the edge so there will be some points to the snowflake.
When cutting, I make a lot of little triangles, or cut two parallelish lines, then snip it out of the middle. I try to have as little uncut space as possible.
Don't Open the Snowflake While You're Cutting
You won't be able to fold it back together properly. And part of the fun is seeing the reveal at the end!
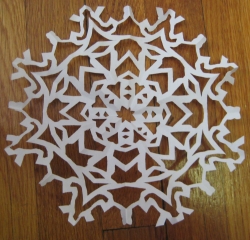
#5 - Unveil the Magic
Open up your Snowflake
The magic happens as you start to open it up. I like to do this slowly so I can really appreciate the beauty of my snowflake. (Opening it slowly also allows you to avoid tearing the snowflake.)
http://i1.squidoocdn.com/resize/squidoo_images/250/draft_lens15930661module136967361photo_1291046630paper-snowflake_2.jpg width=200>
The Snowflake Revealed!

Like Natural Snowflakes
No two snowflakes you create will be identical!
Mistakes happen: Can you see where I messed up here? (The Fix was easy!)
")
This opened into the introduction snowflake.


