Better patchwork quilt (or other crafts) photos

How hard is it?
Actually there's more to taking photographs of quilts and other craft work than you might think!
As the webmaster of an Australian art quilt site, I have been sent some truly awful photos to put on the site. Crooked, cropped off at the edges, badly lit, the list goes on.
Where can you get a simple set of 'rules' for taking quality quilt or craft photos?
I'll show you how easy it is to achieve.
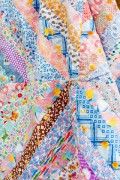
Poor photograph

Can you see what's wrong
with this quilt picture?
It's very bright on the bottom left.
How did that happen?
The studio has spot lights which can be turned to shine whever I like, but right beside the design wall, there's a door.
The top half is a clear pane, and I should have covered it with some dark fabric before I took the photo.
Speaking of lighting
we can't all have tungsten lights
But if you take a few minutes to check that the ambient light is evenly distributed where you want take your quilt photo, it will save errors like the one above.
You can make the lighting better by placing a floor lamp nearby, or even two. And if you put daylight globes in the lamps, then the light shining on the quilt will be free from colour casts.
Try with and without the flash on your camera. Note which one works best in your situation.
The background matters
use plain mid grey, unless your quilt is mostly grey!
In order to get the best shots for print or web, you need to place the quilt against a neutral background, not a striped wallpaper or some such!
Set up the wall by hanging a piece of mid-grey fabric that has been pressed flat. This fabric should be larger all around the quilt by about 3 inches.
Position the quilt so that it can then be deep etched — that's cut away from the background — with ease. Floral prints or busy backgrounds will make that very difficult.
Using a neutral background can make cropping easier for all sorts of end uses, because it will act as a subtle frame, and will not detract from your quilt.
Get yourself a colour scale
Put it in every quilt photo so that the person who uses your image for print or web, will know what the colours in your quilt actually are.
How will that make a difference?
When a designer needs to know what the colours are, as they do if it's quilt picture, then they need a standard by which to set the colours.
The scale has bars of black to white with different shades of grey between. It also has coloured swatches, but I usually only need to sample the black and the white, and occasionally, the mid grey.
How this works is that if I sample the black swatch, then Photoshop® or other software knows that all the parts of the image that have the same value as the black swatch are to be rendered as black.
The same with the white and grey swatches.
So, if they are correct, then probably all the other colours in the quilt photo or craft item will be too.

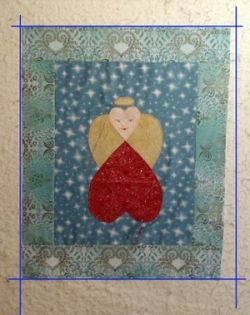
Parallax error
para what???
When taking pictures of long quilts, you can get a shift in the parallel lines at the edge of the quilt.
The best example of this phenomenon is the way railway tracks seem to join together at the furthest point from you.
If you focus your camera upwards when taking a picture of a tall building, the sides of the structure will seem to converge at the top.
The same thing happens when you take a picture of any object with parallel sides. The blue lines in the picture show how the photographer was not dead centre.
How do you stop that from happening?
Very simply.
Position yourself in front of your quilt, at the very centre — both horizontally and vertically. Sit on a chair, or a table if that gets you in the right position.
I have a three step solid step ladder with wide steps and that lets me stand in just the right spot to get 'square on'.

Focus on the dead centre
not on the general quilt
If you have a focus setting on your camera which lets you set the centre focal point, use it when taking quilt pictures.
The setting is usually called prefocus and works by locking the focus on the centre and then recomposing the whole shot.
Check the manual for your camera for how to do this.
Place a piece of even width striped fabric, black and white is best, at the exact centre point of your quilt.
I like to draw a little red cross in the centre to make focussing easier. Set your prefocus on that.
Compose the entire shot and shoot.
Psst! Don't forget to remove the black and whitre fabric before you shoot!
Tripods keep you steady, no camera shake then
No matter how hard I try, I don't seem able to keep my camera still.
I bought an inexpensive tripod, with a spirit level (to help with parallax error) and I can take good clean shots. It is adjustable in so many directions that I can shoot from all angles for taking extreme close-ups for details, or wide shots of students working, and everything in between.
There should be a hole for a screw in the bottom of your camera. This is to attach the mounting pad from the tripod, which in turn arraches the camera in place on the top of the tripod.
You can also buy a tiny, three-legged tripod, with bendy legs for setting your camera up on a table to take macro shots.
For good photos of your craft and artworks, get a tripod to hold the camera steady.
A good investment.
Get yourself a tripod on Amazon
They are relatively inexpensive.

Crop carefully
or you'll chop off its bits
Many people crop their photos to make the quilt look straight, and all that does it make it worse.
Cropping tools in image editing software vary in their features, so you will need to check your help files for your software.
Photoshop® has some amazing cropping features which allow you to straighten and adjust the quilt's sides. The Transform command will also allow you to push and pull the sides until the image is straight on all sides.
If you are sending the image to a third party for use on a website or in a print publication, don't crop too close. The designer will deep etch the background away. He/she can't do that if part of the edge is missing.

Taking photos of other craft items: small items
While my expertise is in taking quilt photos, I have taken hundreds of pictures of my husband, Bob's, restored Tonka toys.
Some are very tiny, some are Mighty Tonkas.
Since they needed to be fairly good pictures for his blog, I had to devise a system for 'getting it right'. I set up a 'studio' on the dining room table. A couple of chairs were positioned on top with their backs to the end of the table, at a distance which allowed us to place the trucks in front. Over the chairs and the table top, I draped the largest white tablecloth I had. This formed the backdrop.
The light in this room came from a large skylight, and to stop unwanted shadows, I shone a work light onto the backdrop.
The results were pretty good.
In the image at right, I used a green cloth because the tiny duck didn't show up against the white one.
The 'studio' setup - on the table

© 2009 Jan T Urquhart Baillie