Free Crochet Pattern - My Favorite Edging

Edgings Aren't Just For Towels!
I'm not sure what year I came up with this design, but it has been my favorite edging for years now. I've used it to add a pretty edge to everything from guest towels to sundresses to jersey knit pants!
When I'm shopping, I often buy something with putting a crochet edge on it in mind. Maybe now you will, too!
This edging pattern is easy to learn, you just have to know double crochet stitch. It looks equally pretty when done in thread as it does crocheted in yarns of different weights. I have a second variety of this edging which uses treble crochet and one additional chain and I use it when I want an edging with more height to it.
Why not try it on a "blank" cotton dish towel and see what a difference it makes! Edgings take ordinary household items and garments and elevate them to the next level. Use them to tie into a color scheme - say, a beige edging on a gray towel for example.
Get The Hooks I Use! - You Will LOVE Them!

What You Will Need
Coordinating crochet thread in desired size
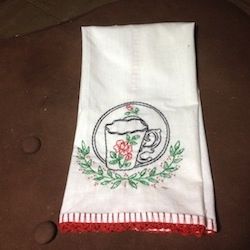
A Towel With This Edging
How To Make My Double Crochet Edging
To crochet this pretty edging, the only stitches you will need to know are single and double crochet!
Attach your thread at the top corner of the long side of the towel. If your towel has a right and wrong side you will want the right side facing you.
Round 1:
SC in towel about 1/4" from edge. *Ch 1, SC in towel again, making your stitches about 1/4" apart. Repeat from * around entire towel. Join with sl st to first stitch.
NOTE: Some towels have a wider hem at the top and bottom ends. They may also be thicker than the sides. It's your choice - you can continue to work 1/4" from the edge, or you can work further into the towel, say 1/2" and just pull up longer stitches.
Round 2:
(I use this on the short ends only but you could certainly do the whole towel or other item). Attach thread to right hand corner of one short end, right side facing. *CH 3, DC in base of ch 3 just made. Ch 3, SC in base of ch 3 just made. CH 3, DC in base of ch 3 just made. Skip one space, SC in next space. Repeat from * across. Fasten off.
My Treble Crochet Edging
Work a SC, CH 3 edging around object. End with ch 3, sl st in first SC.
Round 2
CH 6, TRC in base of ch 6 just made. CH 4, SC in base of ch 4 just made. CH 6, TRC in base of ch 6 just made. Skip next SC, SC in next SC. Repeat * across ending with sl st in base of first ch 6.
Optional 4-sided edging and/or additional rounds:
You can do a 4-sided edging and you can also keep going with this edging indefinitely. The only thing you'll need to do for a 4-sided edging is to add a corner grouping. To keep going indefinitely, you'll just expand at each corner with each round. To do so, work in pattern over to corner. SC just before corner edge. (CH 6, TRC in base of ch 6 just made. CH 4, SC in base of ch 4 just made. CH 6, TRC in base of ch 6 just made). SC in corner stitch. Repeat from ( ). SC in next SC after corner and proceed in pattern.
What Do You Think Of This Pattern? - Come On, You Can Tell Me!
So, what do you think of this pattern?
To punch or not to punch... that is the question. The answer is up to you! Sometimes you have a really thick towel and it's just really hard on your hands to have to punch through it so hard - not to mention, I've been known to stab myself in the leg with the hook doing it! If you are so inclined, you might want to pre-punch your holes around the item to be edged. Just be careful!!
A Word About Thread Selection...
If you want to combine different threads, great! Just keep them very similar in size and thickness and the pattern will work fine. This pattern even works with yarn!


")


")