Recycled Fleece Project: A Travel Pouch for Beading

Make a "Go Pouch" for Your Compact Beading Projects
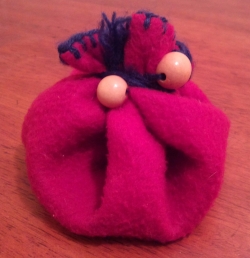
I call it my "go pouch" or "go bag." This recycled fleece project doubles as a bead mat while I'm beading. Then when I'm on the go, I just scoop it up, tie it off, and hit the road.
I love beading projects, but I hate putting away my supplies every time I want to move. Sometimes, I want to do beadwork in front of the television. Other times, I want to take in a local outdoor concert at a nearby farmers market or the community park while keeping my hands busy doing something I enjoy.
Wherever I go, I want my project(s) to go with me, so I created my own bead mat and go pouch out of recycled fleece and I'm going to share with you the "Secret of Portable Beading." So, get out there - anywhere - and bead!
All photos and designs on this page are my own.
From Torn Fleece Bag to Go Bag
We had an old fleece sleeping bag that was left out one day and the dog chewed into it. The holes on the end made it unusable for the purposes of sleeping in the great outdoors, but most of the fleecy goodness was still in decent shape. I couldn't bring myself to throw it away.
Around that same time, I had started making large quantities of flat peyote stitch bracelets and rings for my craft business. My projects got interrupted frequently. I didn't want to have put everything completely away and couldn't leave it out for fear the cat would come and make a mess of my work. So I needed an easy way to button it up and still have it easily accessible the next time I had a few minutes to pick it up.
Inspiration... the Go Pouch! Here's what you'll need to make your own:
* Fleece (or felt or felted wool)
* A pizza cardboard (or other large round object like a 5-gallon bucket)
* A permanent marker
* Scissors
* 10 grommets
* Grommet pliers
* Yarn (you don't need much, so a scrap ball of yarn is fine)
* A darning or tapestry needle
* 2 wooden beads (or 2 buttons with large enough holes for yarn to pass through)
Tools for Creating Your Go Pouch - on Amazon


Quick and Easy Go Pouch Instructions
Photo instructions are also available below.
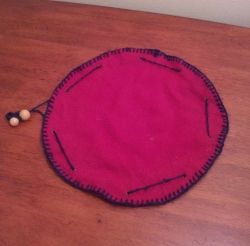
- Trace your round object on a piece of fleece. I used a 12-inch pizza cardboard, but look around your house for the diameter you want for your project - pan lids, buckets, pots, etc. Use the fabric pencil to trace a line around the object. Then cut out your circle. (Note: If you don't have a fabric pencil, use a permanent marker and cut on the inside of your drawn line.)
- Do a simple blanket stitch around the outer edge. Cut a length of yarn about 3 times the distance around your fleece circle and thread it through your needle. If you don't know how to do a blanket stitch, watch the short video below or click here to see it.
- Set your grommets. Use a fabric pencil to mark where you will set your grommets. Make a ring of dots about 1 inch from the edge of your Go Pouch and about 2 inches apart, making sure you have an even number of dots (this will be important when you add your drawstring later). Cut tiny slits in the fabric at each dot and fit your grommets through the slits, setting them with your grommeting pliers as you go. There is another short video of how to use a grommeting pliers below. If you do not choose to use grommets, you may consider just cutting the slits. In that case, I suggest a buttonhole stitch, which is basically a tighter version of the blanket stitch, for reinforcement.
- String your yarn through the grommets to create a drawstring for the Go Pouch. Run your yarn up through one grommet and down through the next all the way around the circle, making sure that both ends come out on the outside of the pouch. String both ends through the first wooden bead. Then knot the ends together through the second bead, which serves a a stopper so the first one stays on and helps secure the end when you are wrapping up a project. (Note: These same instructions apply if you want to use 2-hole buttons instead of wooden beads).
- Your Go Pouch is complete. To close it up, simply wrap your project inside, pull the drawstring tight and push the first wooden bead close to the fabric. Then wrap the end around until you can tuck the second wooden bead into the previous wrappings.
Photo Instructions for Making the Go Pouch
Click thumbnail to view full-size


How to Do a Blanket Stitch
The tutorial shows how to use a blanket stitch to sew two pieces of fabric together. However, the stitch is the same as you would use to add a finished edge to the single layer of your Go Pouch.
Portable Bead Mats on Amazon - In case you don't feel like making your own...


How to Use a Grommet Pliers
For fabric, I recommend cutting a small slit and fitting the grommet through the slit first, rather than trying to use the pliers and grommet to cut the hole as it does in this video. Then, use the pliers to set the grommet.
Variations on the Go Pouch
- If you like to sew, this is an easy project for leftover flannel, cotton, or other fabric that needs hemming.
- Use a different type of cord (rather than yarn) for a sturdier or a decorative drawstring. Mine has held up for years, but I'll probably have to restring it soon.
- Use buttons instead of wooden beads. Same instructions apply. You'll just have two holes instead of one.
- Vary the size of your go bag for different sizes of projects.
More Craft Projects for Reusing Your Fleece
We've all seen no-sew fleece projects like blankets, pillows, scarves and hats. The internet is loaded with them, because we love them so much. Here are a few no-sew projects that were different enough to catch my eye. I'll be adding to the list as I see more and more. Enjoy!
- Yarn Wreath Tutorial
This lovely yarn wreath uses felt (or fleece) to make the decorative flowers. - Make Reusable Swiffer Covers
Save yourself some money by making the simple, washable Swiffer covers. - Pocket Hand Warmers
Sew rice into a fleece pocket in any shape you want, and you have microwavable hand warmers (or just purchase some from this Etsy shop owner). - Fleece Rope Dog Toys
Even dogs like fleece. Braid and knot your own tug-of-war toy for your loyal companion (instead of spending way too much to buy one in the store). - Fleece Chrysanthemum Project
With only scraps of fleece, you can create a springy flower in this no-sew project. Use it as a gift topper, hair decoration, pin, or anything else you can imagine.

Beading On the Go?
Whether you're beading at home or on the go, your Go Pouch will be handy, inexpensive to make, and oh so easy to use. I hope you enjoy it and experiment with the right material for you. While I found the fleece to occasionally catch on the end of my needle, I was able to get used to it and hardly had any trouble with it after that.
As you can see, my Go Pouch is well used and continues to be whenever I choose to take my projects on the road with me. I love the freedom and flexibility it gives me and I hope you do too.
Link Party Connections
Here are parties and blog hops this page is linked to. Click on any of them to find hundreds more ideas, recipes, crafts, and much more!
Monograms, fun colors, specialty beads or buttons? How would you make it your own?


