DIY-printing with a Gocco

Print at home with a Print Gocco!
A Print Gocco is a small contraption used for do-it-yourself printing. Touted as a kitchen table printer back in its home country Japan, it has all the components of traditional screen printers but its compact size, portability, sleek design and ease of use has made it kind of a cult phenomenon amongst crafters, DIY printers, and hobbyists.
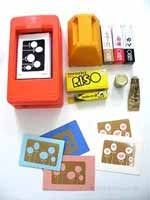
On this page I will show you the many beautiful things you can do with a Gocco machine, what others have done (such as this selection of exquisite Gocco works of art to the right), how to use it, what kind of Gocco printers are available, and where to buy Gocco supplies you will need for DIY printing.
Why I made this page
Well, I love the Print Gocco (I suppose that much is obvious) and since RISO Japan, its manufacturer, has decided to cease production on all Gocco machines forever* (sniff), I wanted to pitch in and devote a little corner of the web to this wonderful but gone-too-soon invention.
*Read more about it on the Save Gocco campaign page.
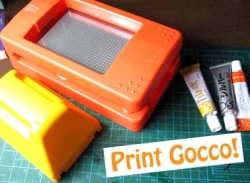
Main photo is a picture of my own personal Gocco. Photo of artworks is via Taryn Hipp
The Gocco model I have is the PG-5 which I bought at the Shibuya Tokyu Hands back in 2006 for an amazing 6825yen (or US$63.60) -- I say amazing because it can cost as much as US$305 in reseller shops these days, about 5x what I paid for, so I would say that Japan might be the best place to get it from. Just remember to pronounce it this way -- Purinto Gokko -- to avoid awkward Lost in Translation moments.
Using a Gocco Tutorial
1: That's my PG-5 with all her accessories inside her crib. Gocco supplies are hard to come by so I made sure to stock up on inks, screens, and bulbs while we were in Japan.
2: I wanted to conserve on bulbs & screens (the bulbs especially since you'll need to use two per print and they can only be used once) so to make the most of them I made 4 gift tag designs to fit one 4" x 6" screen. I used the special carbon ink based pen that's specially made for use with the Gocco to sketch my master. [Newsflash: There is now another way of printing with the Gocco without having to use bulbs! I'll get to that later.]
3: The bulbs are now screwed onto the print hood and the master has been inserted into the PG window.
4: A quick, heavy press on the lid will cause the bulbs to flash, indicating that the master image has been burned onto the screen.
5: The fun begins: here's my screen after I squeezed paint on it. I made sure to put blocking tape in between the portions where I didn't want color to bleed into each other.
6: The screen is now positioned inside the PG's lid again and we're ready to get it on. Printing via Gocco produces results similar to silkscreen printing except that the process is easier, less messy, and lots of fun though admittedly a bit more costly because of the limited availability of supplies.
7: Tadah, my very first print!
8: Here they all are, waiting to dry. Incidentally, the wooden case is a cassette tape crate given to me ages ago by my brother. I haven't used it in ages and I discovered that it makes a good card-drying rack.
Not so bad for a first print. We've actually been using these tags for the past two years now and I think I'm ready to experiment with layers and different paper patterns and textures for my next printing project.
A LITTLE SIDE NOTE: Don't worry if the prints come out rough or uneven, that is the charm of using a Print Gocco -- no two prints are ever alike. If you want them to come out neat, perfect and uniform, use a desktop printer instead. (:
*I want to give special thanks to Felt Cafe for their excellent PG-5 tutorial which I myself referred to while working on my prints.
Now wasn't that simple? Ready for more? Read on because I have a lot more Gocco goodness in store for you.
Watch tutorial videos. - Step-by-step guides as they happen.
If you'd like to see the Print Gocco in action, watch the following tutorials. The first two videos I linked to below are from the actual VHS (yes, VHS!) video guides the Print Gocco ships with.
As they are no longer being produced, much of the models in the above photo are now pretty hard to find but do check out the following reseller links for more information on where to buy a Gocco press.
*If you already have one, check out the sites below for materials and supplies.
- Print Addict Japan on Etsy
Japan-based Gocco shop. - PRINT GOCCO Systems: Nehoc Australia
PRINT GOCCO Systems homepage - PG-5, PG-11, PG Arts models and previous models detailed - Rakuten
Another Japan-based printing goods shop. - PRINT GOCCO discount SUPPLIES
Print gocco printers, thermal copiers, Provocraft Yudu Screen printers,thermocopiers, gocco inks and supplies at discount, and Yudu inks and supplies at discount. - Etchworld: Print Gocco Screen Printing System
Print Gocco Screen Printing System - Welsh Products
Supplier of Print Gocco machines, kits, and supplies. - Gocco - Paper Source
Gocco supplies at Paper Source. - Save Gocco - Print Gocco | SaveGocco.com
Savegocco.com was created December 10, 2005 and hopes to be an easy-to-use starting point for all things gocco, equipping fans with simple gocco-friendly tools to help promote it's continuation. - Print Gocco Facebook page
Get more information about the Print Gocco and connect with other users and fans.
Find Gocco supplies on eBay - Look for good deals on Gocco equipment here.
Tune in to eBay every now and then and watch out for good deals on Gocco kits and supplies. You never know what you'll find in there.
Watch the Print Gocco commercial. - Subarashi ne?
This Print Gocco commercial aired in Japan in 1990 when Goccos were still in production. It's quite funny in a campy sort of way. Enjoy!
Supplement your Gocco education. - Read up on screen printing and printmaking.
Additional information on the basic techniques of screen printing will definitely help you get your Gocco-ing off the ground.


Now that you've seen what the Gocco is capable of - coupled of course with the efforts involved in using and gathering supplies for it - do you think it's worth saving? Why? Share your thoughts here.
Should Riso start manufacturing the Print Gocco again?
How to keep using your Gocco
... despite the limited availability of equipment.
I mentioned earlier that because of the limited supplies and huge demand for equipment, Gocco users like myself have taken to conserving whatever stock there is left. However, I found the following blog entry where the author details how she is able to use her Gocco without the need for specially made screens and bulbs. What a great find! Here's an excerpt from her entry.
How to keep using your Gocco
The process is based around a product called StencilPro. It is similar to photoEZ which many of you have heard of, but prints at a better quality and has a longer shelf life. Only use the high-res StencilPro version for gocco, all the other products have a mesh grade too low to get good prints.
Step one: Follow the instructions that came with your StencilPro to expose your screen. There are several different ways to expose your screen. I have found that the best method out of the options they offer is to print your image on a transparency and expose your screen in sunlight. You can print the transparency on an inkjet printer or a laser, you are not constricted to using laser like you are with gocco screens. It is nearly as fast as burning a gocco screen, just 30-45 seconds. Rinse your screen and let it dry, a few minutes will do. If you are impatient, I have found that a hairdryer speeds up the process. Read the rest of the tutorial.
Main photo is from Lilac Moon Studio
Thanks for stopping by. Your thoughts on the Print Gocco and this lens are most welcome.


