Let's Make A Pretty Crochet (Or Not!) Windchime Earring Holder!

Easy, Portable and Expandable DIY Storage For All Those Dangly or Lever Back Earrings! (Bracelets & Necklaces Too!)
You know what my trouble is with all the wonderful earring trees and holders out there? Well, honestly I find them to be a pain to use! So they end up in little boxes on my dressing table, like this one! I have more than a little trouble with finger dexterity. Putting on and taking off earrings is tricky enough, without having to repeat the process to put them away! What I need is something simple, fast, and easily accessible. For now, my post earrings will have to wait for another solution, but fortunately they're a small minority of my collection. Today, we're going to fix the lever back, snap bar closure and french wire storage issue, once and for all!
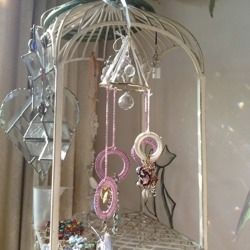
I'll show you how to make the world's easiest earring holder, then we'll complete a "windchime" design holder for all the earring holders! That holder can either be hung up like a traditional windchime, or hung from one side to lie flat against the wall if space is at a premium. It's up to you, but I'll show you the basic concept and then you can let your creativity run wild.
So gather all those little boxes that your earrings are hiding in, and get ready to give them a proper home! You'll be ready to hang them up in no time at all.
Even if you don't crochet at all, you can still follow the non-crochet instructions and make a great hangout for your earrings!
What You Will Need
You Can Pick It All Up Right Here, Or At Your Local Craft Store
Small amount Plymouth 24K Thread in pink
Small amount of Rayon crochet thread in white
(To complete just like mine)
OR DMC #10 Thread
Clover Soft Touch Steel Crochet Hook Size 0
1 Package Boye Cabone Rings 50 mm/ 2"
(I used 2" and 1.5" in my project)
(or use metal or wooden rings, if you prefer)
1- 4" (or desired size) metal or plastic ring for large rail of windchime
Optionally, you can use:
Small amount of any Size 10 Crochet Cotton in desired color
1 steel crochet hook, size 7 or your preferred size
What's the "Catch?"
If it opens up and has a fastener, you can hang it on these rings. Lever back earrings, snap bar earrings, french wires (ok, no catch, but they work anyway!)... bracelets or necklaces with fasteners, etc.
Take Your Jewelry On The Go! - Oh, this is sounding like it could make life easier!
If you'll be traveling, or going out for a special occasion after work, put all your jewelry for each outfit on one or two "blank" cabone rings and just tuck them into your toiletries bag. No more searching the bottom of your purse for that lost earring! That ring also gives you a place to store your daytime jewelry that you just changed out of until you get home!
A Word About Thread Selection...
Those of you who crochet a lot with thread will know what I mean by "hard" crochet thread or soft/fluffy thread. For this project, "harder" thread like DMC Traditions is better. Nylon silky thread would work well too. I decided to go with Plymouth 24K. Soft or fuzzy thread could catch on earrings.
I Think I've Created A Monster... - I've kind of built the first unit of an apartment complex:)
In my imagination, I see finding some type of object with arms like a coat tree, a tie hanger, etc. I'll make several of these smaller "windchime" units and then each one of those can be suspended from a larger ring, which hangs on the arm of the big holder. This could go on forever!
On a smaller scale for now, I plan to add ribbon ties at the joinings to the large top ring to cover the thread endings. Also plan to add some dangly little crystals hanging here and there just for cute. I'll show you later when I get that done!
My Thoughts on Plymouth 24K Yarn
I'll never forget the first time I saw it, in a display at Mangelsen's. It was love at first sight. I knew instantly I'd have to collect every single color of this amazing yarn! (Would you believe years later I'm still trying to complete my collection!)
It feels like silk in your hands. It has an amazingly subtle sheen and a hint of glitter.
They call it yarn, but I've always considered it size 3 crochet thread. I use a size 0 hook with it. Expect to pay $8-$10 for it, worth every cent!
Just A Suggestion...
You might want to make some extra rings attached to a length of 1/8" ribbon, and just tie it onto the brass ring. That way, you can quickly untie one ring of earrings to pop in your travel bag, or to tuck in your handbag for an after-5 earring change!
What Do You Think Of This Design? - Come On, You Can Tell Me!
Do you think one of these would work for you?
Taking Organization Another Step Further...
If you were to use 3-4" brass rings for the "chime" parts, and use a large 8-10" brass macrame ring for the main rail, you could have a nifty scarf storage piece! We'll save that for another lens...
Are You A Jewelry Collector? - Tell us what you think!
Do you like to collect jewelry?

How To Make It
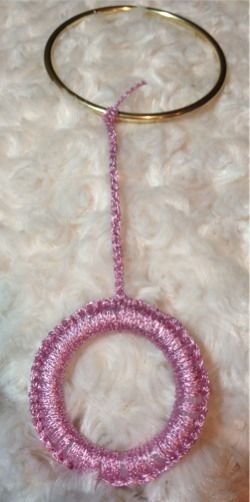
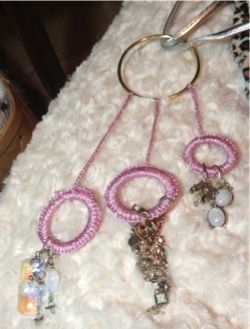
Attach thread to 2" plastic ring with a single crochet. Work enough SC's around the plastic ring to cover it completely without crowding. Join with a slip stitch to first SC. For "to-go" rings, fasten off. Otherwise, chain 40, join with a SC to the large brass ring. Fasten off.
Repeat this process with additional plastic rings. You'll want to stagger them a small distance in length. I made each attachment chain 7-10 chains shorter than the previous one.
TO HANG AS WINDCHIME:
CROCHET VERSION
Arrange attachment chains/rings evenly around ring for balance. Attach thread to tiny ring. Work 25 SC in tiny ring. Join with sl st to first stitch. Now decide the length of upper chain you would like. This is just personal preference. I used 25 chains for mine. So... *CH 25, SC anywhere on brass ring. *CH 25, SC in next stitch on tiny ring and in next 2 SC. CH 25, SC on brass ring. Repeat from * until you have the amount of suspension chains you want. I used five. Complete and fasten off.
(NOTE: I slid a big pink Swarovski crystal onto my thread before doing the next part).
Attaching The Hanger:
Attach crystal anywhere on the outer edge of tiny ring. Pull out a bit of slack thread so the crystal can dangle down freely. CH 4, SC loosely around opposite side of ring. CH 4, SC in or onto hanging hook. (If you wish you can space more chains evenly across the top ring).
NON-CROCHET VERSION:
Wrap each plastic ring with desired thread. Put a tiny drop of glue on the ending wrap, tucking the cut end into the glue and under the adjacent wrap.
Attaching Rings to Large Brass Ring
Cut 5-6 pieces of monofilament (fishing line) or thread you're using. Tie one end to brass ring and the other end to wrapped 2" ring. You'll need to choose the length of your suspension lines. You can start with either the longest or shortest. Just be sure to make each line about 1.5" - 2" (or whatever distance you prefer) longer than the next.
Attaching To Upper Ring:
Cut 5 or 6 pieces 8" long of monofilament (fishing line) or thread you're using. Tie one end to large brass ring, and the other end to tiny upper plastic ring. Make sure you tie knots so that all the suspension lines are of equal length once attached.
BOTH VERSIONS -Â TO MAKE IT TWIRL:
You may want to attach a brass swivel 1" or larger to the topmost hanging hook with a piece of the thread or fishing line. Attach more thread or fishing line to the other end of the swivel and attach the other end of that thread to a large hanging hook or another plastic ring.
One MORE Note:
If you want to have a setup like the photo below, where you can hang the big brass ring up somewhere on a hook, just stop at the point after having attached the plastic rings to the brass ring.
No Crochet Options Too!
You can make this as simple as using plain plastic/wooden rings, string or fishing line, and some type of plastic ring for the top.
I suggest you take crochet thread and wrap the rings, securing the end with a bit of glue, because the thread gives the slippery earrings something to grasp.


 for Jewelry or Armor: A How-To")


