How to Bleed the Brake System on Your Car


After any work has been done on the brakes of your car, the system needs to be bled. What this means is that air that has entered the system must be removed. This is a simple process I will go through step-by-step.
To my lady mechanics, let's remove the fingernails, pull back our hair and get down to business!! You can do this!!

Tools For the Job
The tools you'll need to complete this job are minimal:
- A small wrench to open the bleeder valve. Usually a 5/16" or 9 mm, sometimes a 10 mm. You want the "box" type wrench. It will grap the bleeder valve better and have a far less chance of stripping it.
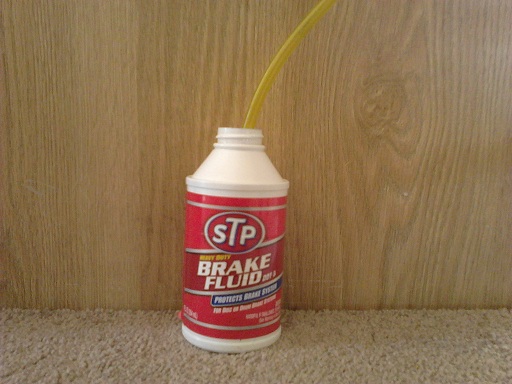
- A length of hose that is preferably "see through". When the brake fluid flows it's very helpful to be able to see it come out rather than only hearing it.
- Brake fluid. Check your manual as to the type of fluid your car requires. "Dot 3" is the standard, but you never know, so check.
Do be careful with the brake fluid. If it comes in contact with the paint on your car it will eat it away before your very eyes and for months afterward. It is very bad for your paint!
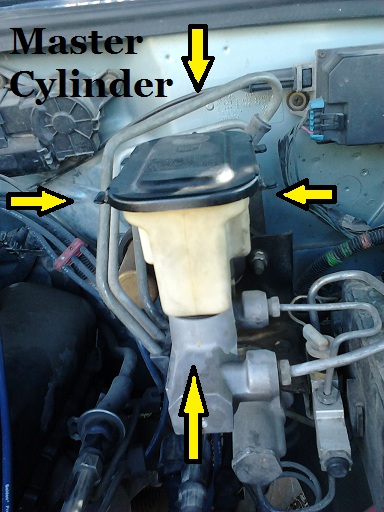
What & Where is the Master Cylinder?
When bleeding the brake system you always want to start at the wheel that is the furthest away from the master cylinder.
The master cylinder is located under the hood, on the driver's side (usually), against the fire wall, with a square, rectangular or circular rubber cap on it. So the furthest wheel away from the master cylinder would be the right rear (if sitting in the drivers seat).
The master cylinder is the device that holds the excess brake fluid for the braking system. It also distributes the fluid evenly between the front and rear system. When your brake light comes on in the dash panel of your car it is this delicate balance in the master cylinder that has become off center and it causes the light to illuminate. If one of the systems was to fail for some unknown reason, the light illuminates and the master cylinder allows the system to provide fluid only to the working side for maximum braking.
Under normal driving conditions the fluid is shared by both front and rear braking systems.
Your going to need an assistant for this job. I use my kids. They love getting into the driver seat and helping Mom with a repair. I have had an adult assist me, but she fell asleep at the wheel, literally. So, find someone you can rely on to stay awake, and press the brake pedal when you tell them to.
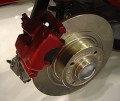
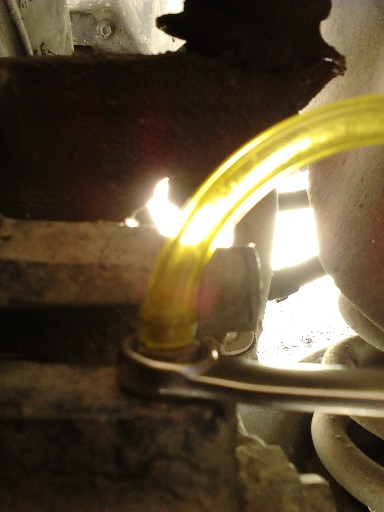
What we're going to do first is locate the "bleeder valve" for the wheel your working on. So, starting at your first brake, if by standard features, you're at the right rear tire (furthest from the master cylinder that is under the hood), locate the "bleeder valve" on the inside of the wheel on top of the brake caliper. Attach the box end of your wrench to the tip of it and slide one end of your "see through" hose onto the end of the valve. This is what you want it to look like:
Up! Down! Up! Down!
Check the master cylinder to make sure there is brake fluid up to the "fill" line. Then go back to your wheel and, with your assistant seated at the ready, turn the wrench a quarter turn and yell out to your assistant, "Down" and your assistant will slowly press the brake to the floor (or as close to the floor as possible). When your assistant has the brake pedal as far to the floor as possible they will shout out, "Down!" at this time you turn the wrench to close the valve. Then you shout out, "Up!" and your assistant slowly lets the brake pedal up at which time he/she shouts out, "Up!". Then again, you open the bleeder valve by turning the wrench a quarter turn and shout out, "Down!" and while the assistant is pressing the pedal down slowly you watch for bubbles to come out through the hose. When your assistant shouts out, "Down!", you close the bleeder valve. Continue this cycle until you do not see any air bubbles come out into the hose when the assistant presses the brake pedal down. If a lot of air comes out of each "down" of the pedal go check the master cylinder to make sure it still has fluid in it. Fill if necessary.
Now move on to the next tire which would be, by standards, the left rear wheel and do this process again. When you've run the process at each wheel you're done. Be sure to check the master cylinder periodically to make sure it stays full of fluid.
Take the car for a test drive, be careful, your brakes will, very well, be much firmer than you're used to or, if not done right, could not be there at all. If your brakes are firm and do not sink to the floor, you're done. If they are squishy or go to the floor, check the system for leaks especially at the caliper and the lines running out from it. There is rubber parts inside the caliper that need periodic replacing so check the caliper closely. You will see the brake fluid wear it is leaking. Also, check the master cylinder, they need replacing sometimes.
CONGRATULATIONS!! YOU JUST BLED YOUR BRAKES!!!!
Don't Let it Go Dry!
When performing this procedure it is important that you don't let the master cylinder go dry. Every time the pedal is pushed and fluid comes through the see-through hose, that is less fluid in the master cylinder.
If it does run dry the procedure must be restarted. If you're on the first brake, then it's no big deal, but when you're on the fourth brake and the master cylinder runs dry, you must go back to the first brake and do it again if you want it done right!