How to Change Your Engine Oil

Engine oil in good condition has properties and additives that benefit your car engine in different ways:
- First, it lubricates internal components
- helps cool internal parts
- decreases friction and wear
- fights rust and corrosion
- keeps internal components clean
Advances in car engine technology have extended motor oil service intervals up to 10,000 miles or more on most modern vehicles. Although these extended schedules have been welcomed, they've also been detrimental to car engine maintenance:
- Some drivers forget about the need for an on time oil change.
- Others postpone the service even more.
- Drivers forget to regularly check for oil level and condition between changes.
- Drivers forget that most vehicles are driven under severe conditions and require a change of oil sooner than the manufacturer suggested intervals.
- Many drives drive around with old, broken down engine oil that has stopped doing its job.
As in the past, the new suggested service schedule applies to ideal driving conditions: Driving your vehicle for 20 minutes or more--almost everyday--at highway speeds, just to bring the oil up to operating temperature so that it can clean components, remove contaminants and moisture, and properly lubricate parts.
When allowed to do its job, oil helps remove moisture, rust, dirt, carbon, acids, metal, and other harmful particles from the system, and provide the necessary protection to engine internal components.
However, few drivers allow engine oil to reach operating temperature or do its job because most drive mainly within the city or use the car mostly for short trips. These driving patterns allow harmful deposits to accumulate rapidly, including moisture. Oil efficiency is reduced.
And some drivers allow themselves to forget about their engine proper lubrication needs, cutting short its service life.
Have you ever seen inside a grossly neglected engine? Take a look at the following video and you'll see what I mean.
Index
|
|---|
I. How Often Do You Need to Change Your Engine Oil?
|
II. Before You Change the Oil Tools You Will Need
|
III. Drain Old Engine Oil
|
IV. Replace the Oil Filter
|
V. Add New Oil
|
VI. Keeping It Simple
|
I. How Often Do You Need to Change Your Engine Oil?
Unfortunately, few vehicles on the road fall within the ideal driving pattern. A typical day behind the wheel for many drivers revolves around frequent stops and short trips under 5000 miles. A bad driving pattern for engine oil and vehicle engines, only outmatched by towing heavy loads and driving on dirt roads. Without proper maintenance, any of these patterns can drastically reduce your engine service life.
For vehicles equipped with it, a service-interval warning light does a good job in alerting a driver when an oil change is required. But even then, you can trust the system only when using the motor oil and filter recommended by the car manufacturer.
Thus, if your driving falls outside the ideal pattern, you want to check your oil condition regularly and make a decision about when to replace it, perhaps sooner than your manufacturer recommended intervals. The more watery the oil feels between your fingertips, the less effective the oil has become.
II. Before You Change the Oil
Changing the oil in your car may not require much work. Yet, each vehicle model has specific requirements such as torque specifications for the oil-pan drain plug, type drain-plug gasket replacement, and the recommended oil, amount, and filter for your specific model.
You can find this information in your vehicle repair manual. If you don't have this manual yet, you can buy an aftermarket copy through Amazon.
Haynes manual include:
- Step-by-step procedures
- Photographs and images
- Systems descriptions
- Diagnostics and troubleshooting guides
- Parts location and replacement instructions
- Electrical diagrams
- Parts and bolts torque specifications
- Maintenance schedule
With your manual, you can do minor and some mayor car repairs, and keep up with your vehicle's maintenance to avoid unnecessary breakdowns.

Tools and Items You Will Need:
|
|---|
Oil filter wrench
|
Large drain pan
|
Box-end wrench or ratchet and 6-pt. socket set
|
Small funnel
|
Safety glasses
|
Old rags
|
Wire brush
|
Old newspaper
|
Jack and jack stands
|
Two wooden blocks
|
New motor oil
|
New oil filter
|
Torque wrench
|

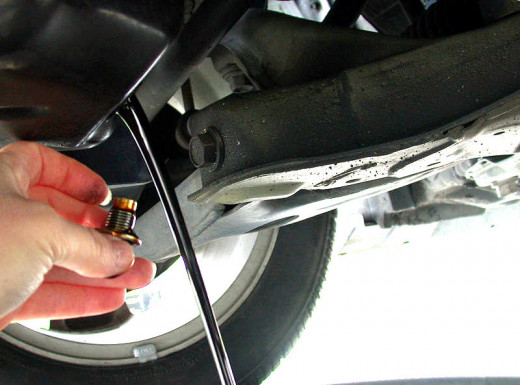
III. Drain Old Engine Oil
Once you've gathered all the tools and items you'll need:
-
If your engine is cool, start the engine and let it idle for about 3 to 5 minutes to warm the oil. This will speed up oil draining and will help the oil pick up debris, sludge and other loose particles and contaminants from the bottom of the oil pan and flush them out.
-
Park your car on a level surface and raise the front wheels using the jack. Position a jack stand on each side under the frame of the vehicle. Then, lower the vehicle to support it on the jack stands.
-
Apply the emergency brakes and chock the rear wheels to keep the vehicle from rolling.
-
Remove the oil dipstick and loosen the oil filler cap to speed up oil drain.
-
Put on your safety glasses and place some old newspaper on the floor under the engine.
-
Position the large drain pan under the engine below the drain plug.
-
Unscrew the drain plug using a six-point wrench or socket of the right size. This will prevent you from rounding off and ruining the bolt.
-
After removing the drain plug, let the oil drain for 20 minutes or more, if possible, to flush as much of the contaminants as possible.
-
Then, clean the threads around the oil pan's threaded hole and drain plug using a rag and a wire brush. This will prevent you from stripping or damaging the threads when installing back the bolt and to true torque the bolt.
-
Install a new drain-plug gasket, if necessary.
-
Replace the drain plug and tighten it to the torque listed in your vehicle service manual using the torque wrench. This will prevent damaging the plug threads and oil leaks.
-
Leave the car on jack stands so that you can replace the oil filter, if necessary. Otherwise, lower your car now.
The following video gives you some information about the lubrication system in your car.

IV. Replace the Oil Filter
Some car owners tend to neglect the oil filter during an oil change. Usually because they installed a quality filter the last time, so they replace it every 2 or 3 oil changes. But remember that even a high quality oil filter has a limited service life. The filter traps harmful particles before they cause engine damage. Thus, abrasive particles eventually clog the filter's media, allowing unfiltered oil to reach the engine by going through the bypass valve.
Always install the filter suggested by your car manufacturer, or another one of better quality, to accommodate flow rate and filtering capacity for your engine. Consult your car owner's manual or service manual.
Replace the oil filter following these steps:
-
Move the drain pan under the oil filter to catch any residual oil remaining in the filter.
-
Unscrew the filter using the filter wrench.
-
Check that the old filter came out with its seal. If not, remove the seal from the filter's mounting base on the engine.
-
Compare the old filter seal diameter with the new one to make sure you have the correct replacement.
-
Remove oil residue, debris and dirt from around the oil filter mounting area using a shop rag.
-
Remove oil and grease from your index finger and use it to apply a light coat of new oil to the seal of the new filter.
-
Install and tighten the new oil filter snugly by hand. Don't use the filter wrench. Follow the instructions on the new filter's package.
-
Replace the oil dipstick.
-
Lower your vehicle off the jack stands, if you haven't done so, yet.

V. Add New Oil
For good lubrication and system pressure, choose the motor oil recommended by your car manufacturer. On low quality oils, viscosity breaks down in a short period, accelerating sludge and varnish buildup. Other quality oils may not have the additives necessary for your engine.
Use a high-quality oil with the right viscosity and an API (American Petroleum Institute) standard that meets or exceeds the manufacturer specs for your vehicle.
If you own an import, you may need to follow a different standard. Asian vehicle models go with the ILSAC (International Lubricant Specification Advisory Committee) standard; European models follow the ACEA standard.
Consult your car owner's manual or vehicle repair handbook for the recommended oil for your specific engine.
-
Clean the oil filter cap and around that area. And then proceed to remove the oil filler cap from the engine.
-
Clean around the oil filler hole to prevent dirt from falling into the engine.
-
Add the correct oil and amount using a small funnel.
-
Replace the oil filler cap.
-
Wait about 5 minutes and check the oil level. If necessary, add more oil until the level reaches the Full mark on the dipstick.
-
Start the engine. Let it idle for a few minutes and check for oil leaks around the oil drain plug and filter.
-
Turn off the engine.
-
Wait for about 5 to 10 minutes to allow the oil to settle at the bottom of the engine. Then, check the oil level again. Add more oil if needed.
Watch the next video for some visual clues about changing the engine oil in your car.
VI. Keeping It Simple
Changing your car's oil is perhaps the single most important maintenance task you can do to extend the service life of the engine. And this task only requires a few simple tools and a few minutes. And you can keep it simple by following the right mechanical procedure every time when working on your car, and choosing the correct oil and filter replacements. This will help you avoid expensive repairs later on. Keep this guide handy and use it for your next oil change.
How much do you know about engine lubrication systems?
view quiz statisticsThis article is accurate and true to the best of the author’s knowledge. Content is for informational or entertainment purposes only and does not substitute for personal counsel or professional advice in business, financial, legal, or technical matters.
© 2015 Dan Ferrell


")


