Leather craft

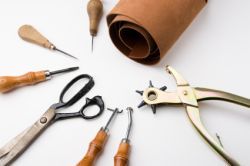
Tools used to make leather bags
How to make leather products
Recently leather products has occupied a big place in the global market,it is not a new craft, since ancient times leather remains strong flexible thing in common use .Here is the procedure to make leather products.
Cutting and Cleaning of the leather :(leather used :--sheep or calf leather etc)
- Before cutting the leather make a template or cut the leather in an exact size you require ,when you cut the leather always allow an extra margin of 1/4 inch for smaller and 1/2 inch for bigger articles .This margin will latter help you to makeup while tying or pasting of the flaps.
- Place the required leather on the hard surface ,dip a ball of wool or a piece of sponge into a weak oxalic acid solution which is mixed with water or Methylated spirit squeeze it and firmly and evenly wipe the top smooth surface of the leather to remove the dirt and grease ,let it dry in shade.
- TRANSFER OF THE DESIGN& MODELING OF THE LEATHER
- Trace a design on the leather or draw it directly with a pencil ,This is a crucial stage in this craft .After the tracing is done moisten the leather surface once again with water and cotton wool ,do not damp it too much.
- use a modeler(tool to engrave the design) the flat bent side and emboss the design ,while embossing the design if the leather seems to be dry dampen it again .this will finally give you a raised design.
COLORING :
- To make the color, mix the dry powder color of the leather (available in the market)with a little mentholated spirit (the colors available in the market are red ,green ,crimson,pink, orange, and brown etc.)
- Always remember to apply lighter colors first on the leather and follow it with darker shades either use a brush or a cotton balls to apply the color on the leather surface ,be careful while coloring as you cannot redo or do corrections of colors once applied .
- After coloring is finished we need to cut off extra margin and get all the flaps according set to the required size .fix up the flaps with rubber solution or any other gum this will keep the flaps in place while stitching .
- after fixing with the rubber solution use a puncher and make holes for lacing or stitching the sides and the ends .
- while punching hole at the edge of the leather leave 1/8 inch margin so that the holes could be made properly without cutting the ends of the leather .
- cut thin strips of leather to wind the edges after completing the bag you may color the strips as you require and polish it with the smoother side of the paper weight by rubbing it vigorously. .
- the next step is winding the lace onto the holes like a snake winds the trunk of the tree by passing it into the holes ,keep equal distance between the holes while winding the leather tape and when you get to the corners pass the lace twice and then press it always keep the corners rounded to ease the winding of the tape .
- we can put buttons with the button machine or even stitch the chain on the mouth of the bag .
- POLISHING:
- Take a Glass paper weight ,press firmly and rub up and down or side ways to polish the leather do not rub the highlighted design .the leather become glossy, latter use a wax polish to glaze the highlighted design with a thin cotton cloth wrapped around the tip of the finger .
- finally rub a dry clean cloth wrapped like a ball over the entire ready bag to give it a complete finish .
- the bag is ready to use..


 to write in Company leaving drinks invite email to office Colleagues and friends -Farewell invite Template")