Microsoft Excel Tips And Tricks: Increase Productivity With Easy Standardized Headers And Footers


Microsoft Excel Tips And Tricks Increase Productivity
If you work with Microsoft Excel on a regular basis, you may have run into this problem. It’s late and you are almost out of time on a big project. You have spreadsheet draft printouts all over your desk, trying to get every last detail and calculation right. You realize you’ve finally got it just the way you want, you have the perfect printout in your hand… but you’re not sure which file it came from, or whether it is the latest version! Now what? Another version of this scenario has your boss coming to you with a one-off report you made for them 3 months ago and asking for you to update it for the current month. You know you created this report, but you have no idea what it was called, or where you saved the file!
Having invested many, many salaried overtime hours (aka free) in becoming proficient in Microsoft Excel, because I knew it could make my job easier and make me more productive, I have learned many Excel tips and tricks that will easily improve productivity. The first one of these, which I always teach in any Microsoft Excel class I am conducting, is to use standardized headers and footers. You may think to yourself that this is not a big deal, but I have saved myself considerable stress and trouble on numerous occasions by creating standardized headers and footers for each new spreadsheet.
What is your Excel experience?
Microsoft Excel Headers and Footers Tips And Tricks
These are the kinds of Excel tips and tricks that will lead to increased productivity for you. I am including various screen shots of the Excel headers and footers process. For simplicity, I have put screen shots of all the relevant buttons in one image, titled Microsoft Excel Headers & Footers Buttons.
Follow these simple steps to create standardized headers and footers every time you create a new Microsoft Excel spreadsheet. These headers and footers will tell you what you named the file, where it is saved on your computer or network, the date and time you printed the report in your hand, what page number you printed -of how many pages in the print range, and which tab or sheet your printout came from.

Once you have saved your new file for the first time, be sure to name your tabs appropriately. Leaving tabs named “sheet one” and so on just opens the door to confusion. Once your tabs are named appropriately, click into the Page Setup menu.
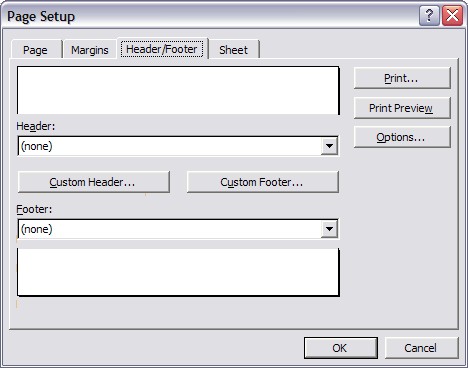
Now, click on the tab at the top labeled “Header/Footer”. (See the top button in the “Microsoft Excel Headers & Footers Buttons” image.) Once in the “Header/Footer” menu, you will see two sections provided for establishing your desired headers and footers. See the image below.

Clicking on the button labeled “Custom Header…” will open the dialogue box for creating the header for your spreadsheet. Once in the Header window, you will use the two buttons for File Name and Sheet Name (sheet name = tab name). (See the fourth button down in the “Microsoft Excel Headers & Footers Buttons” image, which is actually two buttons side by side, labeled “File name, sheet name buttons:”.)
First click into the blank section in the center of the bottom of the dialogue box labeled “Center section:”. Once there, click the File Name button once. Then click into the right blank section, labeled “Right section:” and click the Sheet Name button once. The window should look as the image below:
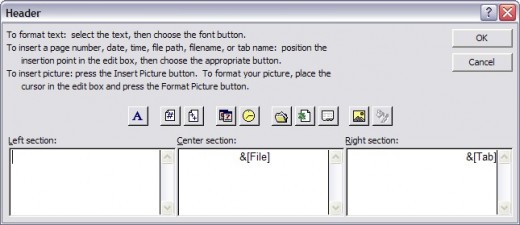
Once your window looks like the image above, click on the “OK” button to save the header changes and return to the “Headers/Footers” tab of the page setup dialogue.
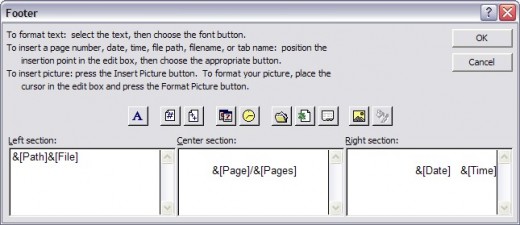
Click on the “Custom Footer…” button to open a similar dialogue window for creating your footer. In the footer window, start by clicking in the “Left section:”. Once your cursor is blinking in that section, click the “Path” button once. The “Path” button is the 5th button down in the “Microsoft Excel Headers & Footers Buttons” image, labeled “File Path button”. Then click the return, or enter, button once. This establishes a second line in your footer, as described below.
Next click into the “Center section:” and hit the return, or enter, button once. Because file paths can become very long sometimes, it is best if the footer has the Path and File information on one line, and the rest of the information on the next line below. Next, click the Page # button once, followed by clicking the “/” button once, and then click the # of pages button once. These buttons are shown in the “Microsoft Excel Headers & Footers Buttons” image as the two buttons side by side in the 6th row down, labeled “Page # and # of Pages button”. This will give you page number and number of pages in your footer in a format looking like this: 3/9.
Now click into the “Right section:” and hit the return, or enter, button once. Next click the “Date” button once, hit the space bar three times, and then click the Time button once. These buttons are shown in the “Microsoft Excel Headers & Footers Buttons” image, as the two buttons at the bottom. Once you have the footer setup completed, it should look like the image below.

Once you have completed the footer setup, click the “OK” button to return to the Page Setup Headers/Footers window. Now that you have setup both the headers and footers, the window should look like the image to the right. You can see now that it gives you a preview of what the printed reports will look like with your new standardized headers and footers. (Click on the image to see it full size).
Now click the “OK” button to finish with your page setup and
return to your spreadsheet. Once there, you can use the print preview button to
see just how slick and informative your new headers and footers are! You have just learned some new Microsoft Excel Tips and Tricks that will easily increase your productivity any time you are using Microsoft Excel.


I hope these Microsoft Excel tips and tricks are helpful for you. Standardized Microsoft Excel headers and footers are a simple and easy way to increase your spreadsheet productivity while simplifying your work.
Scroll to the bottom for a selection of top selling Microsoft Excel books from Amazon.com.
HubPages is a great way to improve your writing, learn lots of new things, and even make money by writing online. It's free to join, and free to earn! Start with the HubPages Tour if you like, no obligation.
Debt Elimination: The Snowball Debt Reduction Payment Plan
- Becoming Debt Free: The Debt Reduction Snowball Payment Plan
The snowball payment plan for debt reduction is a simple tool for becoming debt free. Includes a detailed, easy to follow example that shows how you can be debt free sooner than you thought. - Debt Reduction to Debt Free: How To Find Cash to Payoff Debt with the Snowball Payment Plan
I recently posted a hub called Becoming Debt Free: The Debt Reduction Snowball Payment Plan. This article will help you find the extra cash you need to payoff debt your debt faster.
Top Selling Microsoft Excel Books At Amazon.com

Related

Working With Microsoft Office Excel 2003, Things You Need to Know

How to create, configure and use Form Controls and ActiveX Controls Spin Buttons in Excel 2007 and Excel 2010

“Dying Light” Essential Tips and Tricks

How to Win RollerCoaster Tycoon Games: Tycoon Tips and Tricks

How-To Photoshop Tutorial: Glossy Buttons