A New Way to Teach Your Child to Write in Cursive

Our Journey through Manuscript
I home school both of my children, and this forces me to think more outside the box when it comes to their education.
My daughter showed a small interest in manuscript when she was 3. She showed me how she could "sign" her name in a restaurant one day and I was quite impressed. At this early age, she was able to recognize the way I would string my letters together when writing. Surprisingly, all my efforts to teach her more were met with refusal, so I left it alone.
It did however spark a deep interest for my then 5 year old son. He was taken with the pretty loops and speed at which I could write and wanted to learn. I had already discovered that those boring, repetitive, worksheets that have our children write the letters over and over and over did not work for him at all. So I knew this was not the route to go to teach him manuscript.
While brainstorming this problem, the realization of just how simple manuscript really is hit me. And that is when I created this flash card packet. My husband was amazed and told me I had to share it, because to him it was revolutionary to traditional manuscript teachings. I hope you find it just as revolutionary as we did.
What you Need
- 1 package 3x6 index cards
- 1 package 4x6 index cards
- 3 different colored markers
- 1 ball point pen


Making Your Flashcards
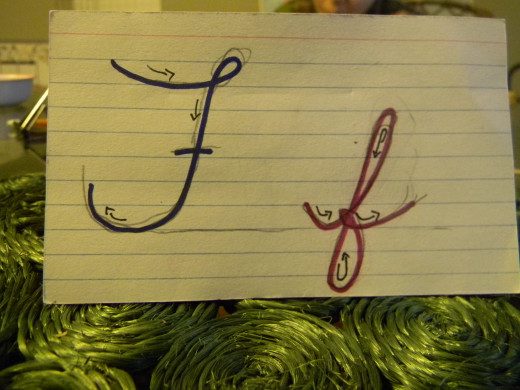
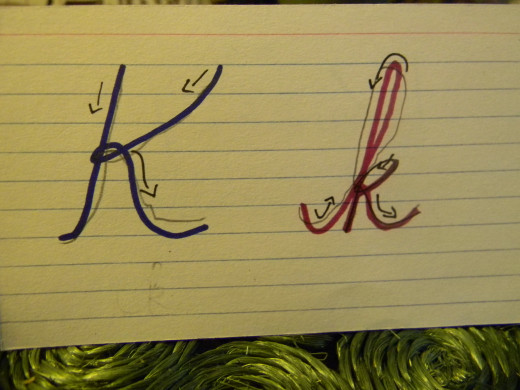
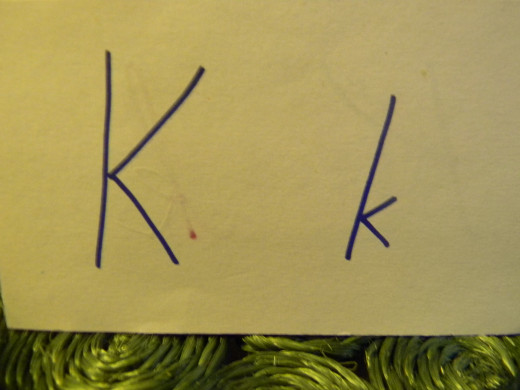
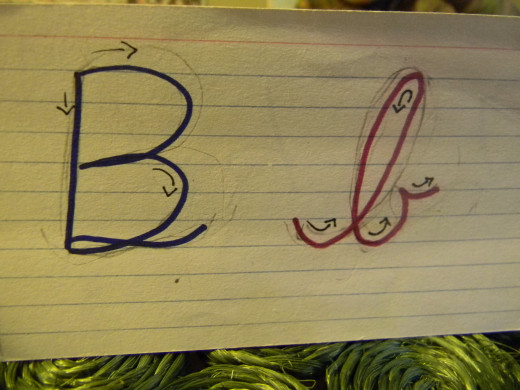
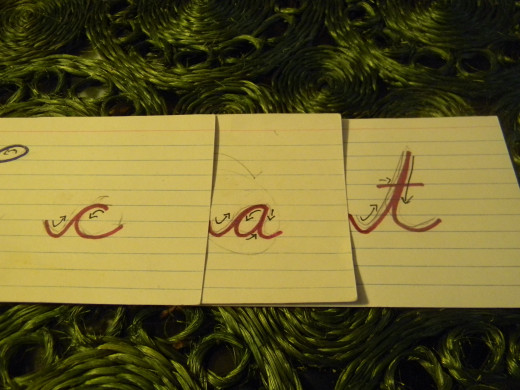
- The first thing you need to do is to make all 26 letters of the Alphabet, both capital and lower case on the blank side of the card. Do this in print.
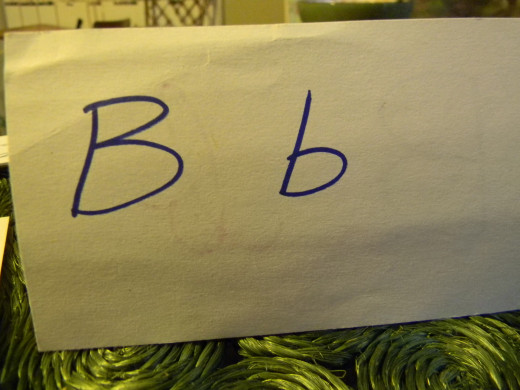
- On the lined side of the card, make the manuscript version of each letter. Both capital and lower case. You want to make sure that your letters are large enough for small detail to be easy to see, and so that your child can trace over the top of them if they need to.
- It is helpful if the capital and lowercase are two different colors.
- I added small arrows to help my son know what directions to move his pencil.
This step may seem pointless, since I did say earlier that my method was different than traditional. While this step may seem traditional, what we do with these flashcards is not traditional. That part comes later.
Making the Larger Flashcards
This is the fun part. This is the part that made my husband stop and think. He said, "I never saw it that way before. They should try this in public school."
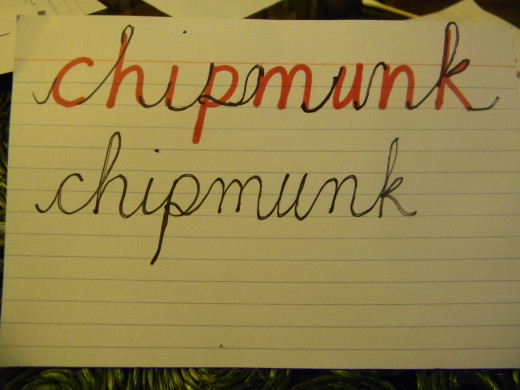
- Write a simple word in one color marker. Something like cat, dog, peas, ball, etc. Make the letters nice and big, and leave a tiny bit more space than normal between each letter.
- Using the other nice contrasting color, start linking the letter together just like you would in cursive.
- Below each word, in a 3rd color, write the word completely in manuscript. It should look like this when you are done. Make as many as you feel your child needs.
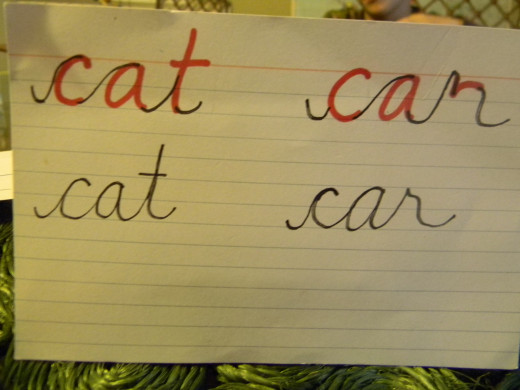
We found that this step was the most helpful. It really takes those confusing letters and brings them to a whole new level in the child's mind. Letters like a cursive S no longer seem so scary and intimidating when you can see that it is still just an S.
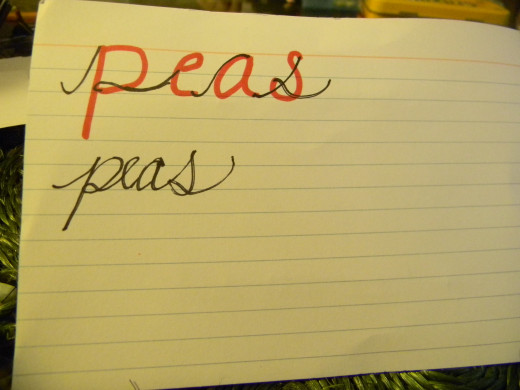
You can also do longer words, just for fun.
Again, seeing the words put together like this really helps take the intimidation factor down a few notches. The letter M and N suddenly make sense in a way they might not have before. To us it may seem logical that they extra hump is the connecting line, but this might not be the case for your child.
I think sometimes we sell our children short. We break things down into smaller pieces, thinking it is easier for them to grasp. And with a lot of things, this might be the case. But I believe there are times when we take it too far. This is one of those things. Seeing the whole mechanism work together is actually what makes it work.
How to Use your Alphabet Flashcards
Back to the individual letter flash cards we made earlier.
These are very helpful when your child needs a little bit of traditional tracing and tracing again and tracing again.
But we also found was helpful, was to string them together so my son to could do it himself.

Doing it in this manner gave my son more control over his own learning. It allowed him to put letters together himself, see how they would look, and continue to look at them while writing.
This is in no way a quick fix, but it is different, and can be very fun.
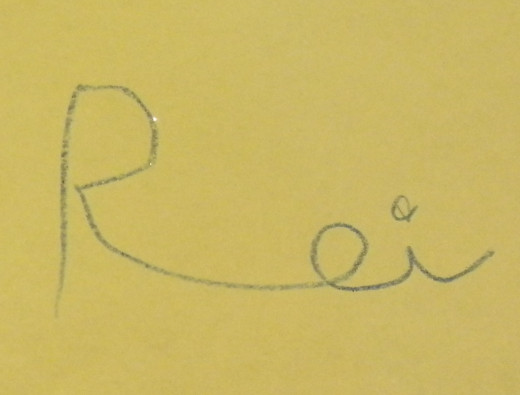
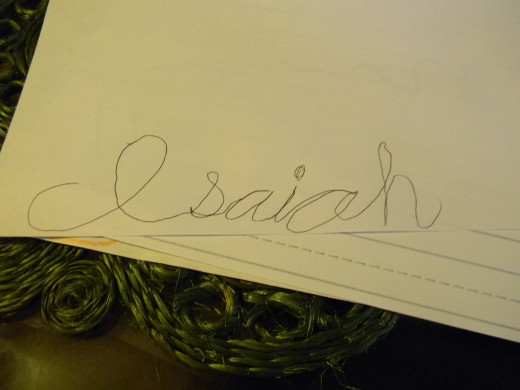
You might be asking yourself what would be a good place to start. I say, start with their name. It will give them a great sense of pride when they can "sign" their name on worksheets and cards. This is what my kids found the most fulfilling: being able to add their signature to the bottom of birthday cards we sent out to family members. It made them feel all grown up.
A Few Helpful Tips
A few tips to help make this process smooth and more enjoyable for you and your child.
- Patience, patience, patience. For both of you. This is a very different way of writing. Especially if your child has a firm grasp on print. Print is block letters with definite ends to each letter. Manuscript is flowing and free with no stopping between letters. This part can be a harder transition than learning to form the letters.
- Allow the child space to try and try and fail, and try again in his/her own way. As an adult, you were taught a very rigid set way to cursive and you had to practice a letter repeatedly until your form was correct. This method moves away from that. Their form will be messy, and that is okay. Their writing will smooth out as they practice and their hand develops new muscle memory.
- Teach your child what they want to learn. If your son/daughter is a bit of an over achiever and wants to learn a long 7 letter word first, let them. What they are interested in is what will be easiest for them to learn and retain.


