Formatting Pages

FORMATTING PAGES
MARGINS
Margins – manage the amount of white spaces along the edges of the printed page.
- Top margin – specifies the amount of blank spaces at the top of the page.
- Bottom margin – specifies the amount of blank spaces at the bottom of the page.
- Left margin – specifies the amount of blank spaces at the left of the page.
- Right margin – specifies the amount of blank spaces at the right of the page.
- Gutter – specifies an amount of blank spaces at the left/top edge of the page in addition to the left/top margin. This is useful to allow extra space for binding or ring holes at the edge.
The default settings of margins for documents are:
Margin
Setting (in inches)
Left-1.25 inch
Right-1.25 inch
Top-1inch
Bottom-1inch
Steps in setting up margins:
- Click File
- Choose Page Set-up
- Click Margins Tab.
- Specify values for the margins
- Click OK button.
Steps in setting up the paper size:
- Click File
- Choose Page Set-up
- Click Paper Size Tab.
- Set the size of the paper using the arrow-up or arrow down button located on the right side of the box. You may also click inside the box then type the box then type the desired size.
- Click OK button.
Changing the paper orientation:
- Click File
- Choose Page Set-up
- Click Margins Tab.
- Click Portrait or landscape depending on what you want
- Click OK button.
PAGE BORDERS
You may also add a border around an entire page or pages in your document. The steps are:
- Select format then Borders and Shading.
- Select the Page Border tab.
- Choose the Border Setting and Style that you want to use.
- Click apply to drop down list and select either apply to whole document, this section, this section first page only or this section all except first page.
- Whole Document – puts a border around each page in the document.
- This Section – puts a border around each page in the current section of the document.
- This Section-First Page only – puts a border around the first page of the current section.
- This section – All except first page – puts a border on each page of the current section except the first page.
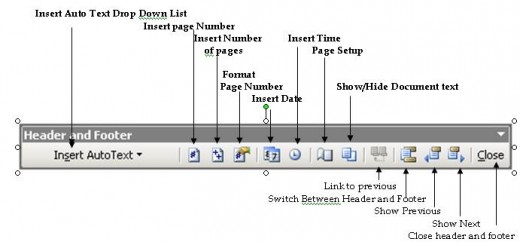
HEADER AND FOOTER
You can also insert information that you want to be repeated on every page or part of the document using the header and footer.
Headers reside the top margin of the page while Footers reside inside the bottom margin. Headers are typically used to hold on formation such as date or draft number that appears on the top of the page. Footers are typically used to hold on information such as page number.
Steps in setting up header or footer are:
- Select view then Header and Footer.
- Type in the information into the header area. Click the Switch between Header and Footer located in the Header and Footer Toolbar if you want to insert information into the footer area.
- You can add the page number, number of pages, time, date and other elements using the appropriate buttons on the header and footer toolbar.
- Use the necessary buttons on the word formatting toolbar if you need to align or format the text.
- Click close button if you are finish working with header and footer. This will return you to your document text.
INSERTING PAGE NUMBER
Steps in adding page numbers in your document:
- Select Insert then Page Numbers
- Select the position of your page numbers using the position drop down list. You can choose top of page(header) or Bottom Page(Footer).
- You can select the alignment of the page using the alignment drop down box.
- Click the format button to select the format for your page numbers.
- Choose the format for your page numbers using the number format dialog box.
- Click the start at option button to have the page numbering start on a number specified using the accompanying spinner box.
- Click OK button to accept the page number format settings and close dialog box.
- Click OK button to accept the page number settings and close the dialog box.
WATERMARKS
Watermarks –are useful for documents that you print and share with others. You can use logo, picture, or text as your watermark.
Washout Effect – makes the image appear lighter in the background.
Steps in inserting picture watermark:
1. Select Format then Background and then Printed Watermark.
2. Click the picture watermark option.
3. Click select picture to display the insert picture dialog box. Select the picture file you want to use and click Insert to insert the picture.
4. You can also select the washout option to make the picture translucent.
5. Use scale drop down list or type in a value to resize the image.
6. Click OK Button.
Steps in inserting text watermarks:
1. Open the printed watermark dialog box
2. Select the text Watermark option
3. Select the watermark text you want by using the text drop-down list. You can also type the desired watermark text directory into the text field.
4. Change any other options you want such as font, size, color, or layout position.
5. Click OK to accept the settings and close the dialog box.
Steps in removing watermark in your document are:
1. Open the printed watermark dialog box.
2. Select the No watermark option
3. Click OK button.
")