How to Create Music Within Manuscripts (Part II of series)

There is more than one way to create music in a manuscript of text, or verbal material. In Part I of this series, a process was explained for inserting music into texts of written material, whereby the printed music is treated as a picture and inserted, resized, and moved around as needed within a document made up primarily of words. It is probably the process that will be used the most often.
Occasionally a teacher may wish to create their own music staff on a printed page - either the staff lines only, or a staff complete with clefs, bar lines, notes and rests. One process for doing that will be explained here. This process will likely be employed mostly with younger students who need larger and clearer samples of the elements of music notation or in situations where certain notes or other elements of notation need to be enlarged for emphasis or clarity, for comparison or contrast. But in the process described here, each element of notation may be a separate entity and may move around within the manuscript, independent of the other elements, unless all are locked in place. For that reason, and because of the fact that this method can be rather demanding and tedious, it is not practical to use this process if many notes are required.
In a Word document, create a five-line musical staff by using the underline key and holding it down for continuous repetition until five lines are formed. As each (visible, printed) line reaches the end of one line (the invisible line of spaces in the document), it will automatically jump down to create a next line. If you have not altered the parameters (defaults) of the file in any way, the spacing will probably look something like this:
_____________________________________________________________________________________________________________________________________________________________________________________________________________________________________________________________________________________________________________________________________
It probably goes without saying, but you can change the margins of your document, if you want the staff to be wider. You could also rearrange the document so that the page is set up in landscape layout, that is, horizontally. If you make any changes after you first create the five-line staff, this staff will change too, since it is actually only one line. If you wish, you can always use “Enter” to move from one line (of spaces) to the next line, and that will preserve the printed lines’ lengths if you change margins or the layout of the page. You can also use "Enter" to make the printed lines of the staff shorter than the width of the page, something like this:
________________________________
________________________________
________________________________
________________________________
________________________________
Font and Symbol Selection

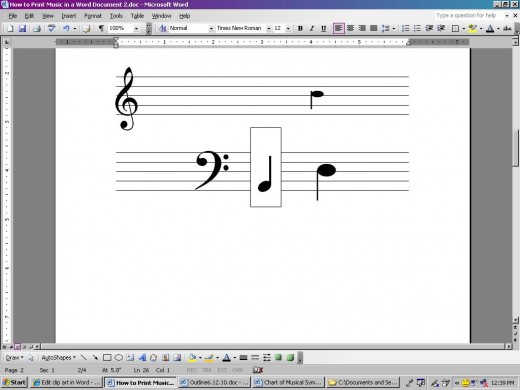
Now you may add a clef or clefs. From another article, "How to Insert Music Symbols Into Texts," you may see that the clefs are available in the “WP Typographic Symbol” font. You may not be able to find that font among the type fonts on your toolbar; but if you follow the command path Insert>Symbol to open up the Symbol Dialogue Box, you can probably find the WP Typographic Symbol collection there. But don’t insert the clef just yet, please.
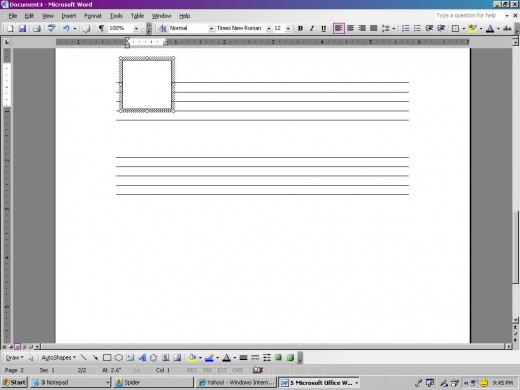
In order to place the clefs in their appropriate places on the staves and move them around where you want them, they probably should be inserted via text boxes. So, select commands Insert>Text Box; after clicking, place the cursor near where you want the clef to be and click. Don’t worry for now if it’s not close enough.
Now open the Symbol Dialogue Box (“Insert>Symbol”) and select WP Typographic Symbols as the font (top left). Locate the clef you want on the chart, highlight/click on it, and then click “insert” and “close.” The clef will show up in the manuscript wherever you left the cursor, which may not be in the text box. But you can simply cut and paste the symbol, just like text. Place it in the text box now.
Treble Clef in Text Box
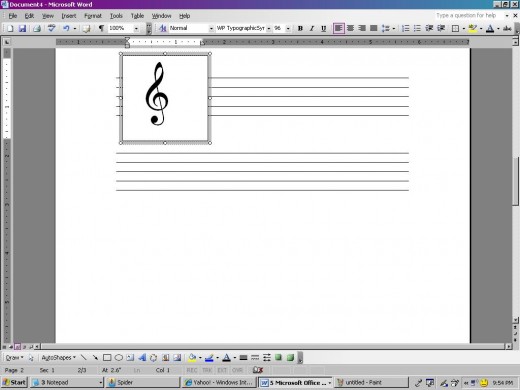
Now that the clef is in the text box, it needs to be enlarged to an appropriate size. You can experiment, if you wish, but I’ll tell you that the font size I am using for this demonstration is 96 points. Select/highlight the clef and go to the font selection box on the toolbar; when you scroll down, you probably will only get up to 72 points. If you highlight the digits (whatever they are, they don’t have to be as high as 72), you can type in 96 or another number, then Enter, and you will have selected the font size that you want. It may happen at this point that the clef will disappear, because the text box may not be big enough. Don’t worry. Place the cursor on the border of the text box and left click. This will create a fuzzy, dotted border around the solid border of the text box. Now move the cursor to one corner of the box, left-click, hold, and pull the corner to enlarge the box until you can see all of the clef in it.
If you wish, at this point you can move the text box closer to its final position, or you can wait. To move it, left-click on the border and hold, while you move the cursor and box with it to its new location, then release.
The text box is covering up some of the lines of the staff, and it has a border around it. Both of these problems are easy to solve. Again, select the text box by clicking on it until the dotted fuzzy border appears. Now, on the toolbar, go to Format>Text Box, and in the Dialogue Box select the tab that says “Colors and Lines.” Open the selection menu for “Fill” and select “No Fill”; then open the selection menu that says “Line” and select “No Line.” When you go back into your manuscript, you will see that the box is now transparent, showing the clef lines through it, and the borders of the box have disappeared. But the box is still there! That means that it (and the clef) can still be moved or resized. Since you can’t see the outlines of the box, you may need to know how to find it, if you wish to move the box. Move your cursor around the area where you think the text box border probably would be; when the cursor finds a place where the border has one of its sizing circles, the cursor will change from an “I-beam” style cursor to a four-pointed black arrow that can be moved around by a larger, white, open arrow. Left-click, and you will be able to see the box’s fuzzy border again (not the solid line border). You can resize the box and move it around until it reaches the best spot on the staff. The box can also be moved by selecting it to make its outline visible (as described above) and then using the arrows on the computer keyboard (between the QWERTY keys and the numbers) to cause the box to move right, left, up, or down.
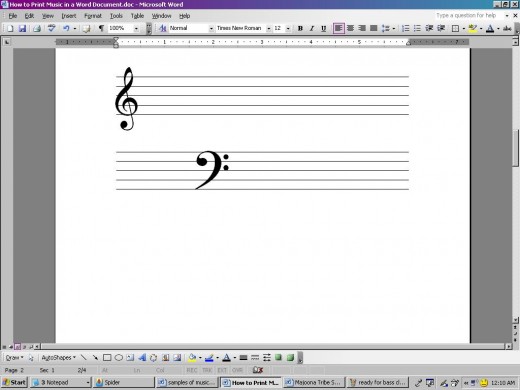
Treble and bass clefs, notes, accidentals, and fermatas can all be inserted by using the same process.
Bass Clef Added
It may happen to you, as it has to me, that it will be difficult to locate the clef as precisely as you like. You can do something about that, if it is important to you. Highlight/select the lines of the staff (first make sure the cursor is not inside the text box), then on the toolbar select Format>Paragraph. In the right middle box “Line Spacing,” select “Exactly.” The “At” box will probably say 12 pt. Whether it does or not, this is the number you want to change to make the lines of the staff slightly farther apart. One good spacing might be 15 pt, but here I would suggest you experiment to find the size you like best. Small changes will push the lines apart just a little, and you should be able to find the right spacing that will look best for you. You should also note at this point that the spacing that works best for the clefs (in their resized state) may not work as well for any notes that you want to place on the staff. Ultimately, it is the spacing that affects the notes that should be most important; therefore, you might wish to leave the spacing of the lines until you have finished with any notes you want to locate.
As with many processes in various computer programs, there is more than one way to take care of several of these previously listed steps. It is not necessary to follow the exact steps I have outlined, if you find a way that works better for you. One alternative that I will mention here is the matter of making the text box transparent. When you take care of the formatting details of the text box, in order to lose the outline and to allow the lines of the staff to show behind the clef, you can either select “No Fill” as the fill option (as I described above), or you can select the drop-down menu for transparency, directly below the fill option menu; slide the bar to the far right to select 100% transparency. In the various times I have used these two methods of making a box clear, I have come to prefer the “No Fill” option, but I can’t explain why that is so.
Another method of locating the music symbols is slightly different. That is, if you are working with notes that were originally created as pictures, rather than symbols that have been resized, then you can place them (the pictures) behind the lines of the staff, and not have to worry about fill of a text box. Just be aware that when a picture is placed behind text of any kind (by selecting Format Picture> Layout>Behind Text), it can be very easy to “lose” the edges of the picture. To avoid that problem, you might want to hold on to the border of the box – but not the fill – until you are sure it is in its final position.
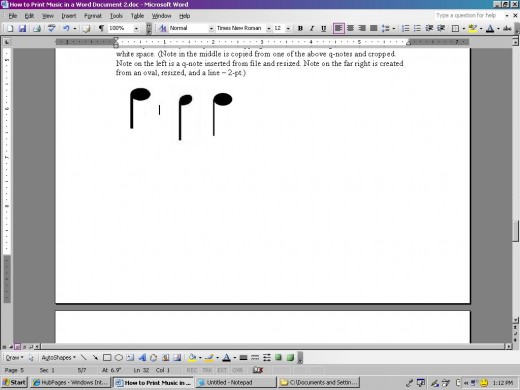
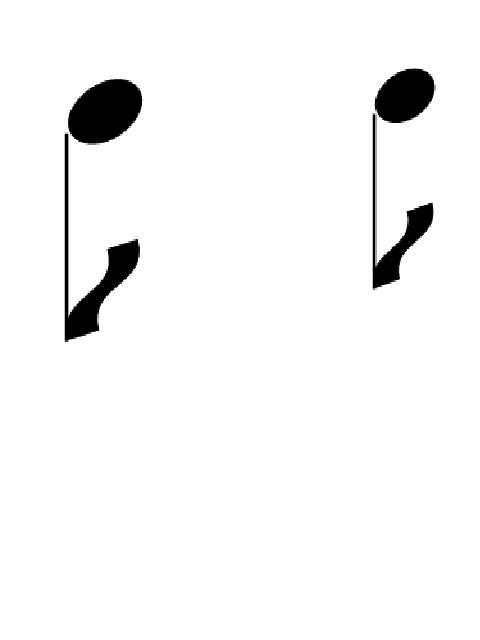
Three Styles of a Quarter Note
Now we come to one of the sticky parts of creating your own music in texts: stem direction of notes on the staff. For the most part, when the note-head is on or above the middle (third) line of the staff, we want to have the stem on the left side of the note-head and pointing downward. Music publishers and printers actually have somewhat complicated rules about stem direction, influenced by such factors as how many note-heads are on the stem (for a chord) and how many individual note-heads are on each of several lines or spaces, in the case of beamed notes (for eighth and smaller note values).
In any case, you may wish occasionally to use notes with downward pointing stems. If you have inserted the note in a text box as I have described, you may learn that when a text box is rotated, as it can be, the text inside will retain its original orientation. Even if you go to the format menu and select “text direction” to change the note’s direction, the options do not include turning the note around 180º. One solution to this problem might be to use home-made notes as explained in the article How to Create Your Own Music Symbols because, being pictures (not symbols), they can be rotated 180º just as other pictures can be. If there is a great deal of white space around these home-made notes, the excess white space could displace other symbols. But a symbol that has been saved as a picture can be cropped like any other picture, just as was described in Part I of this series, How to Insert Music into Manuscripts.
Various Quarter Notes on Staff
Another option is to create your own notes within your current document, using AutoShapes – inserting an oval (which can be reshaped, resized, re-angled, and filled with black color) for the note-head and a line (which can be drawn to the right size, located where you want it, and formatted to 2 points for a thickness in proportion to the note-head) for the stem. You can even add a flag for an eighth note by inserting, adjusting, and filling one of the AutoShapes from the group “Stars and Banners,” if you want to invest the required time with only modest success.
Once you have the various components of the note compiled as you wish, select all of them. Do this by holding down the Shift key while left-clicking on the various pieces of the ensemble. When all pieces have been selected, right-click, and on the selection menu find “Grouping”; select the Group option. Now the various elements will stay together, so that you can move them as one group to their final destination and also resize them as a group. (A word to the wise: resize a group slowly!) You can also copy the entire group as a whole and paste it in other locations.
Eighth Notes Made from AutoShapes
Final Words of Advice
- The larger the staff and symbols, the easier it is to line them up precisely.
- It may be most beneficial to create your music sample in a fairly large size, save it as a picture or as a Group, and then resize it to a smaller size that will fit the application you want.
- To maintain uniformity of note size and other details, after you have created a note exactly as you like it, simply copy and paste it to other locations, rather than inserting a second or third time and resizing again.
- If you are locating a text box behind other text (or behind a staff), retain the border around the text box until the contents are placed as precisely as you want them. Once you hide the border, it may be very difficult to find it again for any kind of adjustment you want to make.
- If you must resize a Group, do it slowly.
- Become good friends with the "Undo" button on your toolbar; it may be much easier to backtrack a step or two and revise from a previous version of your work than to start all over again from scratch.
As you have read through this, you may well have concluded that this method of creating music within a manuscript can be very time-consuming and exacting, with not very much result to show for the effort, and therefore is likely to be of use in very limited circumstances. Those limited circumstances might include 1) not having appropriate music notation software; 2) not having access to a scanner or digital camera at the time when it’s needed; 3) wanting to focus on a very small portion of music; 4) wanting to create high-quality, personally designed bits of music that can be used for many students or for many years.
With a final warning not to let frustration overwhelm the creative process, go have fun and make some music!
Some Resources for Teachers Available from Amazon

Becoming more serious about composing? Check these out!
More About Music Writing, Printing, and Publishing
- How to Insert Music Symbols into Text
Musicians and music teachers occasionally need to include music symbols in the written material they prepare on a computer word processor. It can be frustrating when the symbols are not easy to find, as I... - How To Create Your Own Music Symbols for Texts
If you thought the previous article on inserting music symbols into manuscripts was overly simple, you will probably not need or want this step-by-step procedure for creating your own symbols. I am assuming... - Music Teaching Jobs
Keeping, or finding, the music teacher job you want, can be very tough in this economy. And


