How to Make A Sitting Cat from Plastic Bottle Waste.

Here is another hub which I hope can help find a solution to your plastic bottle wastes. You can change them into a cute decoration : A Sitting Cat.
Read this hub and follow the instruction how to make it. I hope you like it.

Materials and tools needed for this craft are :
- Three used plastic bottles.
- Scissors
- Cutter
- Small brush
- Paper glue
- Thin/tissue paper
- Color paper
- Thin carton
Since it involves cutter and knife in the work, children should be given careful assistance in using those sharp tools.

The Procedures.
Always work with clean used bottle wastes.
1. Be ready with 3 clean used plastic bottles. In making this Sitting Cat, I use two small size (300 ml) and one medium size (600 ml) bottles.
The first small bottle (bottle 1) for the cat's body
The second small bottle (bottle 2) for head and legs
The medium-size bottle (bottle 3) for the cat's hips and tail.


The Head.
2. Cut the bottle 1 on the neck (around 6 cm below the mouth of the bottle). Get rid the bottle thread off too. We will use this part as the cat's head (Fig 2). Keep the rest (the lower part) of bottle 1 for the legs later.
Cover the ex-thread hole with thin carton. Use some sellotape to hold the cover (Fig 3).
Now we can put the head part over bottle 1 and secure it with sellotape (Fig. 4)


The Legs.
3. From the rest of bottle 2, get rid the base off and cut it longitudinally into 2 parts to make two front legs (Fig 5). We don't need to make back legs since the cat hides its back legs when sitting.
To make front legs, roll the longitudinal cuts and bind them using some sellotape. Put them at the leg positions, you also need to secure the legs using some sellotape to keep them in position firmly. Look at Fig 4 for the the leg position.

Give attention to the cat's hips which widen when it sits. So, using the upper tip of bottle no. 3, divide it into 2 equal parts and place each on the lower right and left to make hips. Secure them with some sellotape too. (Fig 6)

The Tail.
4. The tail can be made from bottle no 3.
Make another longitudinal cut, roll and secure it with some sellotape. Look at Fig 6 for the tail and its position on the cat's back bottom (Fig 7).

The Feet.
5. The cat's feet can be made in simple ways from some thin carton. Cut 4 cat-foot-like shapes and to give toe accent, you can put different color of paper on every toe.
The Face
6. The eyes :
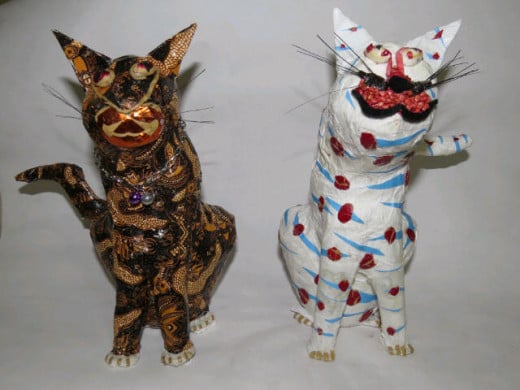
To make eyes you can use small marbles or seeds in proportional sizes . For the batik cat I use sour-sop seeds, and small seashells for the white cat. Put them on the right locations at the face and also give eyebrows which go down to the nose.
7. The nose and mouth:
They are located near each other. I give them black and red colors using some color paper and black felt. The lower lip is drawn inclining to give smiling face.
Don't forget to give some mustaches around the right and left nose, with those mustaches a cat is proud to be a cat, right ?.

Layering the body, applying colors and ornaments.
8. Cover the whole body with some layers of white thin paper. To glue the paper onto the cat's body, you can use diluted glue in composition 1:3 (white glue : water). Using a small brush you can apply the glue to stick the torn white thin paper onto the whole body for 2-3 layers.
After the layering is sufficient, let it stay for one day to dry.
The cat's body can be colored and ornamented in any colors and using any ornaments you like.
This project let you explore your ideas and creativity in making a sitting cat figurine. With limited skills and creativity I have, my main purpose is just want to share this creation with you.
I hope you like this hub and find it useful .


