How to build a wall

How to build a wall
A wall made from bricks and mortar is not difficult to do as long as you take your time and study other walls before you make a start. Did I know how to build a wall before I started? No! I looked at my neighbours walls and saw how the lines of mortar between the bricks was of the same thickness all the way along. Then I looked on the internet for 'how to' videos, found one on how to build a wall and copied the techniques. If you are careful and start slowly, getting the cement to the right consistency, making sure the bricks are staggered, it will soon become easy. Do you want a wall of red brick or cement blocks? Maybe you want decorative stone? There are a number of possibilities. Whichever you choose you will soon learn how to build a wall.
laying my own bricks
I've been building walls and laying my own bricks for many years and believe me I'm not a bricklayer, I'm an engineer. The first wall I built was my parents front garden wall. It was red brick and the frost had got under it and it had collapsed. I decided that I could do it and my Dad said,' If you think you can do it, go ahead.' I was a student at the time so I watched builders making walls and I went to the library and got a book on bricklaying. Firstly I removed all the rubble from the collapsed wall and cleared the site. From the book on how to build a wall, I dug out a trench a foot deep using a length of string as a straight edge. Position the string in a line where you want the front of the bricks to line up. Tie the string around a brick and lay it down at the place where you want your first brick to lay. Stretch the string until the line is straight then weigh down the far end of the string with a brick. Dig out the foundation. You now have a trench with a nice straight front. Mix up concrete using three parts sand, two parts gravel and one part cement. Thoroughly mix these together either by hand as I did, or hire a cement mixer for a few days. When its mixed, add water to form a nice sloppy concrete. Fill the trench with your concrete so it comes just below ground level. Smooth it out and lay a length of timber on top and level it with a spirit level. Once you have a fairly level surface remove the length ot timber and leave the concrete for 24 hours to harden. This is the footing for your brick wall. All your bricks will rest on this and the concrete will distribute the weight of the brickwork over its area. If rain threatens, cover the trench with plastic and weigh down the corners with bricks. Next day you can start to lay bricks. Mix up cement this time without gravel. Three sand to one cement is a very strong mortar. It needs to be firm enough to hold brick without it sinking. Lay the line of string again at the front edge of the wall and take your first trowel full of mortar and smooth it over the concrete bed so you have about a half inch of mortar to lay your bricks on. Make a bed of mortar to take the first half dozen or so bricks. Lay the first brick on the cement and use a spirit level to get it flat. Tap the brick with the handle of the trowel to bed it down. Cover one end of the next brick with mortar and lay it next to the first one, sqashing gently so that the mortar binds them together. Now move the length of string up to the front edge of the first brick and stand a weight on it to hold it rigid. Go to the far end of the wall and lay a brick there with the same half inch of mortar under it. Position the string on the edge of this brick and weigh it down, taking care not to squash any mortar out with your weight. You now have a nice straight edge to work to and you can start to lay bricks, taking your time to make sure that they are flat and straight. There is a tool you can buy which will ensure that you get the same thickness of mortar in every row of bricks you lay. It's called a brickie's mate but with a little practice you can do without it. Once the first line of bricks is down, the bricks in the second line will need to be staggered so that whole bricks cover the joins in the first layer, to give the wall rigidity and strength, and to present a nice looking wall. Start the second row with a half brick. You can either mark the brick all around its girth and snap the brick in two, by hitting it sharply with your trowel or you can hire an angle grinder and cut the brick cleanly. Either way, by using a half brick you will get the joints of all the first row covered. Proceed with care and you should end up with a good, solid wall which will last many years.
When I built my parents wall, the 'know it all' neighbour came and watched what I was doing occasionally. I overheard him telling his wife,'The next hard frost and that wall will be down again,' Well that wall is still standing and it's been there for nearly forty years.
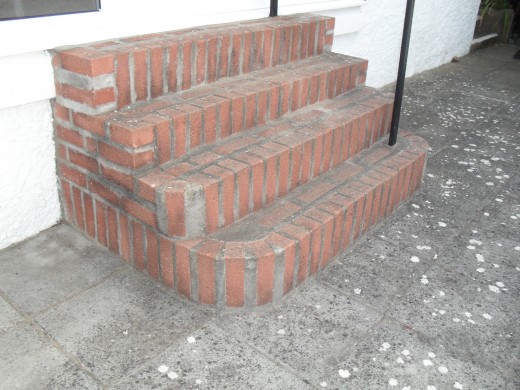
When the old steps leading from my veranda to the patio crumbled with age, I built new steps with red brick, after I'd asked a builder to quote me a price for doing the job. He left and never came back with a price so it was down to me. Okay its not a brilliant job but it looks reasonable, its still good after more than ten years and it cost peanuts.
I built my workshop from concrete blocks with a few red bricks to make it a bit more pleasing on the eye. The same principles apply as for the wall. Just make sure the corners are square. Use a set square at 90degrees on each corner. I built the right hand side four inches taller than the left hand side to allow the roof to drain off in rainy weather. These techniques all came from my original idea of how to build a wall.
Do it, you know you can.
The free eBook of How to build a wall is available here.
My Steps

Retaining wall

How to build a Rose Arbour
- How to build a Rose Arbour
How to build a rose arbour-When our rotten rose arbour collapsed I knew I would have to build a new one, but did I know how to build a rose arbour? No, so I looked at photographs in magazines and chose a simple square design. I bought 4inch by 3inch