How to Make Visual Aid Supports in Classrooms Affordably - Surround Students in Visuals for Success.


Seeing is understanding. So, make visual aids.
This lens affords teachers multiple ways to implement visual aids into all areas of instruction from classroom management to assessment of skills, integrating technology into instruction and cross curriculum connections made simple. Best of all, it can be done without breaking the bank.
Oh, I'm sorry. Were you thinking the school would be providing such materials?
Welcome to education, you adorable newbie.
If you have had the distinct privilege of shopping for teacher supplies recently, you know things can get pricey, fast. Teachers aren't in the business for the money. We would all be employed elsewhere were that the case.
Use the tips and tricks accumulated by a veteran special needs teacher to not only increase student retention, but also impress the boss while going easy on the wallet.

Good teachers know that it's not easy to reach students.
They know how easy and fast it is to have them one second, and then, poof... gone! The student's attention has left the building. Even the most gifted, organized and talented teachers face this dilemma. What is a super teacher to do? Take advantage of the situation. The human mind misses nothing, though recall can be a problem. Surrounding students with visual images of important vocabulary, concepts, events and so on increases retention.


The best way to implement visuals affordably is to make your own.
Stop worrying. It's easy to get professional looking, durable results.
Rule number one for all super Teachers - Don't reinvent the wheel!
Get in the habit of doing it once and presenting it in such a way that the visual will last over time.
This requires minimal equipment that will necessitate an initial investment. It more than pays for itself in the first week of school, if done properly. Better, it's highly adaptable once you get the hang of the process.

Materials needed: - To pay now and be done or pay and pay and pay, in so many painful ways? That is the question.
Before you start adding, remember, chances are high you can get some of this from the school. Honestly, not much, but every little bit helps. You should minimally have access to the internet accessible computer, printer, paper, and a cutter. Buy materials in bulk during end of summer sales to save big time bucks.
- A decent laminating machine
- laminating sheets.
- A variety of scissors
- glue sticks/tape
- cutting board with measurements
- construction paper
- internet accessible computer and printer
- printing paper
- Imagination
- Desire

You can't have enough of this stuff on hand.
Teachers and students alike go through supplies like I go through cupcakes. Keep plenty on hand.


Important Safety Tip -
When in doubt, take it out.
Pull down lever cutters should not be kept in rooms for a variety of safety, insurance and legal reasons. They are typically located in the teacher's lounge or the library.
If you have lockable cabinets in your room, you might consider getting written permission to keep the cutter there from an administrator. It will save time. If that is the case, keep it locked up when students are in the room. Safer cutters that are permissible to leave out can be purchased for minimal amounts.

How to use visuals for classroom management.
Routine proceedures that are backed up graphically and posted are priceless.
Classroom management can be a nightmare for any teacher. It doesn't have to be. Students come to expect the same routines every day. Use that to your advantage. Go in from day one with routines in mind to put students on the good foot.
Use visuals to be a constant reminder of what is expected in routine classroom procedures. This concept can be applied from the simplest task to much more complicated chaining of desired behaviors.

Simple visuals effective for classroom management.
Keep it short and sweet.
* Sign in sheets - Equate this to future employment to make real world connections. Require students to sign in daily. Post the visual outlining sign in procedures over the sign in station.
TIP: Always remind students how things benefit them. Be honest. Tell them you are human. The sign in sheet not only gets them used to being responsible for accounting for time, but also works as a redundancy system in case of attendance record error. Take it to the super teacher level by using the explanation as a introduction to the academic vocabulary term "redundancy system." Have a visual already made and start a word wall.
* Classroom rules - Keep it to no more than five. This works great as a visual. It is an inarguable reminder of expectations. Teachers further benefit from the distinct pleasure of being able to shut down many an argument before escalation by simply not engaging. Instead of saying anything, point to the visual and move on with the lesson. It works.
A lack of procedural guidelines for the following seemingly simple things can make any lesson run less than smoothly.
1. Pencil sharpening during verbal instruction or classroom discussion - Again, don't say a word, just smile and point to the visual. When done over time, you will see a marked reduction in verbiage not conducive to your hard planned lessons.
2. Bathroom pass acquisition - Try a simple honor system with a visual backup. Have passes with your name and room number on them hanging by the visual. Instruct students as to your expectations at the beginning of the semester. Give a friendly warning in advance that the privilege can be revoked if abused and follow through if needed. Let them quietly and discreetly slip out with a pass for calls of nature while the rest of the class continues learning.
3. Asking questions
4. Lining up
5. Emergency drill procedures
6. Computer usage policies


How to make visuals
Fast, easy, professional
Let's go through an example mentioned above. You can get as fancy as you want, but for the purposes of illustration, let's keep it simple.
Making the visual for classroom rules:
1. Turn on the laminator - It takes about five minutes to heat up.
2. Print the rules in large font. It should be easily read from the furthest point from where it will be displayed.
3. Cut out rules. Glue onto colored construction paper cut out to the size desired creating a nice matting.
4. Make any headers or cartoon bubble art inserts you want to add. Bubble art inserts catch student attention.
5. Place carefully in laminator pouch. Be sure to get out any wrinkles before sending through the machine.
6. Insert closed side first.
Extra tips - Use some color. Keep in mind when selecting colors, too many scattered about gets confusing. Pick a theme and stick to it. If you have students on the autism spectrum you may wish to avoid yellow. It has been known to be highly distracting for some of them.
Super teacher tip - Take visuals a step further. Let's say one of the rules is to have supplies. By the words, insert pictures or clip art of paper, pencil and book.
Always have both words and pictures.

The essentials - The super teacher's tool kit


Using visuals for more complicated chaining.
It works!
Chaining is the simple concept of one skill building upon the next in a step by step process. The same principle works for visuals.
Consider placing a chain above the board in your room to remind students of the daily work they are expected to produce. When affixing to the wall, use a strip of Velcro. This will allow you to quickly and easily reorder or insert new expectations into the chain to accommodate various lesson types. Be sure to pair text with pictures regardless of reading levels.
Example:
1.) Sign in
2.) Seated with supplies
3.) Produce writing from given prompt
4.) Turn in homework.
5.) Introduction of objective
6.) Questions and discussion
7.) Assessment - worksheet, quiz, short writing
8.) Homework assignment
9.) Dismissal at the bell
A similar chain can be produced on a smaller scale. For those students requiring more structure, consider doing a small visual chain and placing on the student's desk. The student can check off things as they are completed affording them more control over learning while taking care of all the "What's next?" questions.
This is an example of a task chain for a functional level student.
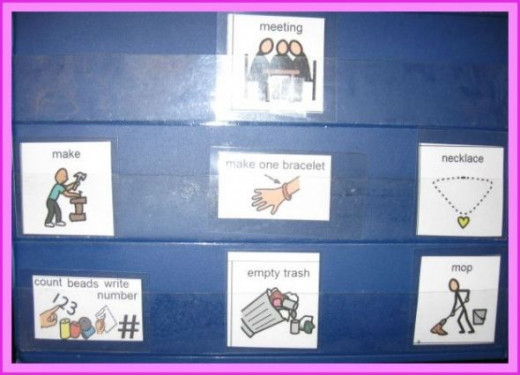
As the task was completed, the student removed the card and turned it in for a reward.
Image credit; Vix

Using visuals for assessment purposes.
Let students express themselves. They just might surprise you.
Students get quickly bored with the same old worksheets and paper based instructional modalities presented. Allow them to make their own visuals as part of skill assessment. For example, after completing a unit on a story, to access student understanding of the order of events, have them create a cartoon strip. They will love it and you will quickly see if they have the order right. Display the finished products.
Another way to use visuals for assessment is to have students create word walls that are graphically supported. When introducing new vocabulary, have the students make the visuals. The teacher not only can access learning quickly, but the word wall helps students retain new vocabulary and master spelling through constant exposure.

Visuals are essential for assessment of non-readers.
If they can't read the question, they can't answer it.
For some special needs students, visually supported testing and/or physical task tracking may be the only way to access skills. For functional level classes, visuals are a must.
Some simple visual assessment ideas:
* Water mixing - This can be as simple as asking the student which is safe and then presenting them with a picture of cold and a picture of hot both paired with a picture of water running out of a faucet.
* Household safety - Use a visual of common household chemicals and common household beverages. Mix them up. Have students put a smiley face on what is safe to drink and a "ick" face on chemicals. Use real pictures for this, not clip-art.
* "Who you gonna call?" - I'm sorry. That line will never again be usable. Thanks, "Ghost-busters."
A simple visual assessment of skills relating to the utilization of emergency services could be one that presents an image of an emergency, then, provides three picture choices as to the appropriate emergency service to call in that situation. For example, show a picture of a house fire. Beneath it, show pictures of parents, hospital and the fire department. Be sure to include 911 in your visual for the fire department.

Velcro is better than sliced bread ever thought about being.
I have found over the years, Velcro is far better than anything else for affixing visuals to walls, desks, appliances, anything. There is nothing more frustrating than coming in at 6:00am just to find all of your visuals on the floor because tape and Tickytack just don't cut it over time.
Using strips of Velcro allows teachers to quickly set up detailed visual chains that could take hours otherwise.


Using visuals to integrate technology into your lessons is fun.
Students and administrators alike love it.
This is the easiest thing in the world because the students are doing the work.
As mentioned, have them create word walls. Let them hop on the computer. Between dictionary.com and Google images, they can quickly create a professional looking presentation.
IDEA mandated that technology be integrated into teaching. We have been racing to keep up ever since.
Most schools have classroom computers now, though not enough.
If you're in the situation of only having one or two student computers, divide students into groups and do timed station rotations allowing each group "x" amount of time on the computer while other groups are working at various stations.
Consider allowing students to use their cell phones to look up words. Be sure you have a visual outlining expectations of cell phone usage in class. You might want to make one to display when it is OK for students to use phones and another to display when it is not. Keeping the OK or not visual located in the same place will quickly get students used to looking to the visual instead of interrupting your lesson to ask permission.

Using visuals to make connections across curriculums.
This can be a ton of fun.
Let's consider a few examples.
Example 1 -
An English class is reading "Romeo and Juliet." Put up some visuals of William Shakespeare with a short biography. Put up a timeline of real events going on during the time the story was set. Make a "parking lot" that looks like a balcony. Parking lots are simply a board students place sticky notes on about questions, thoughts, comments, anything they don't understand or want to know more about.
Parking lots work well for those students who may be too shy to raise their hands or speak up.
Example 2 -
A math class is learning the Pythagorean Theorem. Put up a visual detailing where Pythagoras lived. Give a short biography and provide a simple map to tie into Social Studies concepts. Again, post a timeline of true events happening around the time he lived. Have students create a visual detailing ten interesting factoids about Pythagoras for extra credit.


Liven up the learning.
Ah, such sweet sorrow,
boring walls today and tomorrow.
Bring on the fun with walls of words.
Plain Jane white is for the birds!
Teacher links - - More information on why visuals are the way to go.


Free posters for teachers. - Posters are visual aids too.
In the past, it was though that surrounding functional level students in visual stimuli was overwhelming. This is often not the case.
Tip: If it is the case for some, especially those on the autism spectrum, utilize a few rings and a dowel rod. You can hang multiple visual aids and only show the one you want at the time. I like to have four to six of these at one time. If doing a lesson on bugs, just flip them all to the posters on bugs. It takes very little time to set up, but saves a ton of time later. Rolling clothes racks work really well for this, too. They can be stored easily between a filing cabinet and the wall. Just pull it out when in use and roll away when not.
- Free classroom posters for teachers or home educators
Over a 200 free posters for teachers. - EPA government posters
Super resource full of printable lessons, visuals, tons of stuff already compiled. - Free teacher resources including some great math visuals.
Nicely presented page, easy to navigate.

Please, do not copy whole or in part. All writing contained herein is my own original creation.


