6 Photography Techniques to Learn From

1.Negative space

It is true that each photographer without regards to their techniques or level of expertise takes photos that although may seem like many others in the end represents the photographer's own unique style of how the scene is seen.
Each photograph in a sense is a representation of your own very personal style and how you apply your skills.
We are always learning from others and the easiest way of learning a photographic style or technique is to see it in action as it were.
By looking at a series of photographs and learning what technique were employed to make them come to life, you can begin to formulate your own way of approaching and "looking" at a scene.
2.Long exposure

For soft shots, especially if they feature moving subjects like a waterfall or river scene, it is best to use a long exposure setting of about 1 second or longer.
The camera needs to be held in place with no movement whatsoever and thus requires the use of a tripod or other suitable support. You also need to pay attention to the f-stop or aperture.
I have often found it better to set the speed and the aperture manually to get the desired effect.
A slow shutter speed captures the moving water as if it were a cloud. When shown next to the rest of the elements withing the since like rocks, the shore and so on it gives the shot a feeling of peacefulness, tranquility and makes the overall scene appear "softer".
By adding catch-lights to portraits you are sure to bring the portrait to life as only catch-lights (white dots that reflect on the eyes of the subject) can.
Often these appear naturally, especially if the subject is in subdued light facing towards a much brighter light source like a model standing indoor while facing an open door or window.
However a simple catch-light will do the trick and this can often be a reflected flash burst or even a reflector placed close to the subject's head.
By far though, the best results are obtained with a highlight designed for this specific purpose. But don't despair, making a homemade catch-light is easier than you think.
Negative space is best categorized as any amount of the scene that is featureless (has nothing in it except maybe a solid color like the sky).
When you want to include a small subject alongside a larger one, if the smaller subject is moving, then it will probably become lost withing the larger picture.
If you see an insect hovering around a flower and you want to include portions of both, a fast shutter speed is then required in order to freeze the movement and show the insect in sharp detail.
Choose really fast speeds like anything higher than 500.
Choose the negative space by shifting your stance or even moving around.
Here it is better to use a large aperture since the rather fast speed will require as much light as possible to enter the film or sensor plane.
A flash might be needed but this depends on the amount of available light so judge the scene accordingly.
3.Catch lights

4. Zoom lenses

Did you understand the concepts/techniques and how they work?
5.Wide angle
")
Using long lenses to compress the details withing the scene. To put it simply, when you use a longer focal length, like a 200mm or higher, it makes the distance between objects in the frame appear to be less.
It makes the background appear closer to the foreground, and in essence it compresses the space in the image.
It can make clouds, mountain ranges and so on look larger and it does the same for people too.
The opposite is then true for wide angle lenses; they make the details withing the scene appear to be farther away from each other than they really are.
If you take a wide angle shot, 20mm or less, of a group of stairs while you are looking down towards the bottom, the railings or steps appear to be farther away from each other.
This is mostly apparent with the details that are closer to the lens but these same details then appear to get closer together the further they are from the lens. This works best when you purposely include elements that are close to the "lens edge" or as seen through the viewfinder.
If you use long elements like lines, streets, railings or anything resembling a line, then they can be used as guiding lines leading the eye of the viewer to a chosen focus point.
6.Silhouettes
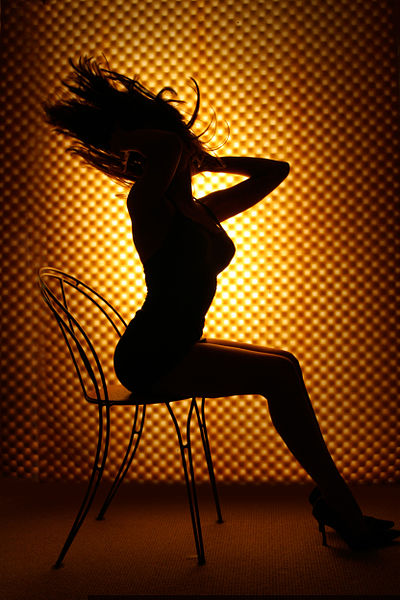
Silhouettes add drama to the scene but the trick is to focus and pre set the settings for the light source and not for the subjects.
If taking a shot of someone in the beach against the setting Sun, the sunlight, even if going down, will overpower the meter and the photo will be overdeveloped.
For silhouette shots it is better to always use the full manual settings; that means setting the speed and the aperture manually and leaving nothing on auto mode.
The good thing about doing silhouettes is that it's just as easy to do outdoors as it is in the studio.
- 77 photography techniques, tips and tricks for taking pictures of anything | Digital Camera World
Learn new photography techniques with this essential photographer's resource. This list covers some of the most popular types of photography.
© 2015 Luis E Gonzalez


