5 Ways to Tune Your Acoustic Guitar
Made by Pluto

Before We Begin...
So, you've just started playing the acoustic guitar? That's wonderful! Does playing A minor and E major sound good?
Well, the first thing that you need to learn is how you can tune a guitar. Of course, there are simple, old-school ways that some of us grew up with.
Now, there are several gadgets and apps that can help you with this too. No matter which way suits you, it doesn't matter.
What does, is that you tune the guitar to the perfect pitch before you begin.
Interestingly, when you start off, you won't be able to tune your guitar by ear - that comes with years of playing. Even then, there's always a chance of it not being tuned properly, so you have to take the help of the aforementioned widgets at your disposal today.
Speaking of tuning itself, there are a number of types of tuning that you can use when playing your guitar. Some of them include standard, dropped or open tunings. Now, given that you've just begun, it makes sense to learn how to tune your 6-stringed guitar using the 'standard tuning'.
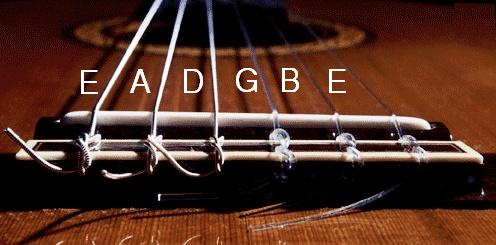
Usually, the notes include E-A-D-G-B-E where the 1st string at the bottom is E, 2nd is B until the 6th string at the top is E. It goes without saying that you need to use the keys located on the headstock to adjust the tuning of each string.
Once you have figured out which key works for which string, then you can begin. Let's look at 5 ways by which you can tune your guitar:
Fender - That's Love!

Using a Conventional Clip-On Tuner
There are a number of guitar tuners that are available but the one that has fascinated me most is the clip-on guitar tuner.
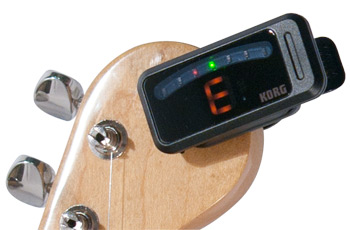
You can find a number of brands that sell these little beauties and for which you don't even need to be trained by ear as to the right tuning of each string. First things first, place the clip-on to the headstock and pick a string. You'll see lights on the tuner, usually red in color.
As you adjust the tension of the 1st string and it reaches E, you'll find that single light on your clip-on tuner reaches the center which is green in color with the note mentioned as well. This means that the string has been tuned to perfection! Now, replicate this for all the strings right from the bottom to the top.
Best part: all you have to do is wait adjust the tension of the string until that 'green' light appears. That's it!
The experience described above is when using one of the older Korg tuners but there are a number of brands these days that I'm not aware of.
This is really the simplest way to tune a guitar. You don't even need to know how each string sounds when tuned perfectly.
Here's an interesting article that lists 10 clip-on guitar tuners that you might fancy buying.
The Korg Clip-On Tuner
Using Other Strings (and Frets) on the Guitar
Given that some of us started playing the guitar in our teens, we were still in the analog age. Sometimes, we used a piano or keyboards to get the right pitch or we used other guitars that were already tuned.
That's just how it was! So, this method was really the starting point for some of us, and getting it right was absolutely necessary because you had to match the sound of the tuned guitar or piano by adjusting the tension of the strings on the guitar you wished to tune.
At first, it seemed difficult but it got easier over time with practice. How I see it is you can use a piano to play each of the standard tuning notes for each string and tune accordingly. Doing this with a tuned guitar is preferred because you could play the same strings of both guitar to see if they match perfectly or not.
The other approach that some of us took was to just tune the 1st string. After that, we would hold down a note on the next string and used the tuned string to get that tuning right.
One example of this was to hold down the note on the fifth fret of the second string and alter its tuning until it sounded exactly the same as the 1st string. You'd do this for every string and compare it to the previous tuned string. The only exception was the third string where you would hold down the note on the fourth string.
One big advantage of using such an approach is that you not only train your ear to match sounds but you don't need any other implements apart from the guitar itself. It's pretty simple and efficient that way.
Yet it all depends on how you can match these sounds and make the adjustments accordingly.
Guitar Tuning - The Fifth Fret Method
Using an Online Tuner
This method is also pretty simple to use given that you just need to match the sounds of each string to what you hear from the online tuner.
It's similar to the previous tip but only easier given that there are a number of websites and apps that will help you tune your guitar perfectly.
Some examples of these websites include:
1: Gieson Guitar Tuner
2: Pro Guitar Tuner
3: 8 Notes Guitar Tuner
If you're more of a smartphone user, here are 2 of them that you can download at the Google Play Store and use:
I'm not going to explain how to use these any further. It's for you to play around and find out which one suits your needs best! Have fun!
The Classical Guitar

Using Harmonics on Certain Frets
This one is a bit difficult especially for beginners since it requires you to know how to play harmonics.
When playing intervals or chords, you have to hold down notes with your fingers firmly. Harmonics, on the other hands, requires you to touch certain frets of a string very lightly to produce a light but beautiful sound.
It's something that can understand if you watch a couple of videos on YouTube and practice it on your own. But it sure does take time to learn how to play harmonics but definitely worth the effort.
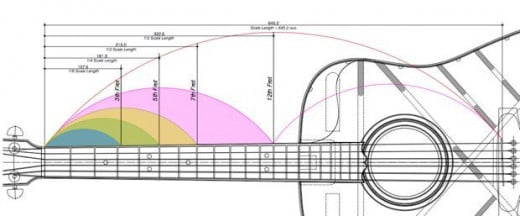
Moreover, you can tune all the strings using harmonics as you progress. But for starters, play the harmonics of the 7th fret of the 6th (topmost) string. Now, simply pick the 'open' 2 string. If the sounds match, then your 2 string is tuned. Of course, you have to be sure that your 6th string has been tuned perfectly by using any of the earlier methods.
Given that it only covers one string, it is an excellent way to check whether your guitar has been tuned by one of the earlier methods. Let's say you used an online tuner to tune all the strings. You can now use this method to check if the second string and the 6th string are in tune.
Guitar Harmonics Diagram
Using Trained Ears (which comes with experience)
This section is not so much about a method of tuning but something that you will notice as you continue to play guitar.
In my experience, there are certain chords that I've played for years now. It doesn't take very long for me to find out if that chord is sounding 'right' or not.
Also, the more you keep tuning your guitar manually, the more you will get used to the various notes of each open string when picked.
As mentioned earlier, the more you practice, the more trained your ear becomes! You just have to keep at it.
There's just one thing you should keep in mind: ensure that you confirm the tuning of at least one string by any of the previous methods described and then tune the other strings. This is despite being able to play complex chords and songs.
It's better safe than sorry! It can be very embarrassing to tune a guitar at F instead of E, only to discover it later. Worse still, it adds too much tension to your strings. Just play it safe and always use a tuner as much as possible.
So, to reiterate, at least get one string tuned perfectly and then based on that note, you can tune the other strings as well.
Standard Tuning For Guitar Strings
