A Blues Guitar Lesson For Beginners

If you have just recently started out learning to play the guitar and are looking for a little inspiration to help you on your way, then this free blues guitar lesson might be just what you need. In this article, I cover the basic structure of a 12-bar blues pattern in A, some simple instructions on how to construct a solo, and a few little techniques that you can drop into your solos, just to spice them up a little!
By practising the techniques explained in this article, you should see your blues guitar playing improve to a level where you can at least feel confident enough to perform in front of your friends or to jam with other musicians.
The 12-Bar Blues Pattern
Okay, we're going to start with a little bit of music theory (but not too much!). The basic 12-bar blues pattern is based around the major scale, and consists of 12 bars in 4/4 time. If you don't understand those terms, don't worry, all will be explained!
The pattern itself includes three main chords, the root (I), the fourth (IV) and the fifth (V). For example, blues in the key of C would be based around C (I - the root), F (IV - the fourth note in the major scale) and G (V - the fifth note in the major scale). Blues in E would be based around E, A and B. Blues in A would follow the same pattern using A, D and E.
In case you're not clear what “12 bars in 4/4 time” means, it's just another way of saying that if you count to 4 twelve times, you will be back where you started.
So here's the pattern:
I / / / I / / / I / / / I7 / / /
IV / / / IV7 / / / I / / / I7 / / /
V7 / / / IV7 / / / I / / / V7 / / /
To make this pattern work in any key, just substitute the I, IV and V for the actual root, fourth and fifth chords of that key's major scale. If you don't understand that yet, just keep reading, all will become clear!
Note: wherever you see a 7 in the pattern above, you can play the 7th version of the chord.
12-Bar Blues in A
Enough theory! Who wants boring theory in their blues guitar lessons? Let's play guitar! Here are the chords you will need to play a simple 12-bar blues sequence in A:
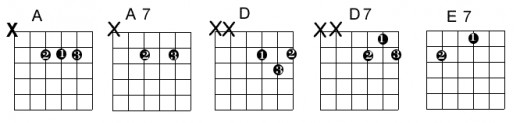
If you follow the 12-bar pattern described above, the sequence is:
  A  / / /   A  / / /   A / / /   A7 / / /
  D  / / /   D7 / / /   A / / /   A7 / / /
  E7 / / /   D7 / / /   A / / /   E7 / / /
Try to play with a “shuffle” feel, so that each count is split into three (ONE-and-a TWO-and-a THREE-and-a FOUR-and-a). This will make your playing feel more “bluesy” and less stilted.
Basic Blues Soloing
Now that you're able to play a basic blues sequence, it's time to move on to some soloing on lead guitar! The great thing about blues solos is that they don't have to be complex and they don't have to contain lots of notes played quickly. If you can play some simple lines but play them with feeling, you will sound infinitely better than some hot-shot axeman shredding for all he's worth! However, in order to solo effectively, you need to learn a little bit more theory.
The Blues Scale
The blues scale (also known as the minor pentatonic scales) is a simple five-note scale, made up of the root, the flattened third, the fourth, the fifth and the flattened seventh, notated thus:
I, IIIb, IV, V, VIIb
So for the scale of A major, the notes in the blues scale would be
A, C, D, E, G and A. Here are the positions of those notes on the
guitar neck (note that the V indicates the fifth fret and that the circled notes indicate the root note, in this case A)
Try recording your 12-bar blues pattern in A and then playing these notes individually over the recording. Whatever order you play them in, you will hear that these notes go well together with the pattern and somehow “work”.
Blues soloing is all about improvisation so feel free to experiment, you may come up with a killer riff!
Passing Notes, Bends, Hammers, Pull-Offs and Slides
Once you've been improvising for a little while, you can start to make your solos a bit more interesting by dropping in various techniques like passing notes, bends, hammers, pull-offs and slides.
To explain passing notes, we need a little bit more theory. The gaps between the IIIb & the IV, the IV & the V, and the VIIb & the I are all whole tones. On the guitar, this means they are two frets apart. A passing note is a note played briefly on the fret in between those two frets. This splits that whole tone gap into two semitones. Try inserting a few here and there to hear the effect on your solo.
String bending is a technique that can bring a lot of feel into your blues soloing. It can work particularly well when used on the IV note. To use this technique, just play the note and then bend the string upwards to raise the note. The more you bend, the more the note raises. Aim for a semitone bend at first, then try bending a whole tone.
Hammering-on, pulling-off and sliding are all additional ways of playing an additional note with your left hand without having to pluck the string again with your right-hand. To hammer-on, play the first note with your first finger (left hand) on one fret, then hammer your third finger on to the same string, two frets above. A pull-off is the same thing in reverse, play the first note with your third finger on one fret, then pull that finger off, making sure your first finger is already placed on the same string, two frets below. For a slide, first play the note, then slide your finger up two frets, without removing it from the string.
Conclusion
If you follow this simple blues guitar lesson online and practice the techniques I've laid out, you should be able to play along with many blues classics in the key of A. And if you apply these principles to blues pieces in other keys, you should be well on your way to being a blues guitar player. Good luck!


