ArtsAutosBooksBusinessEducationEntertainmentFamilyFashionFoodGamesGenderHealthHolidaysHomeHubPagesPersonal FinancePetsPoliticsReligionSportsTechnologyTravel

Cool and Easy Photoshop Effects

Updated on January 23, 2015

Lighting Effects

In this day and age of ever improving technology, editing your photos can be just as easy and fun as taking them in the first place. Even the "photographically challenged" can end up with some great results by using Adobe Photoshop Elements, an affordable and (relatively) simple to use photo editing software. Here are some of my favorite, cool, and easy Photoshop effects.

In this photo, I wanted to brighten up the shadow crossing the subject's face. I also thought that the rather ugly t-shirt graphics were too eyecatching, so I wanted to de-emphasize that a bit. I used Photoshop Lighting Effects to accomplish both. To use the Lighting Effects feature, simply open your photo in the "Full-Edit" mode.

  1. Click on the "effects" or "fx" button, usually on the right side of the screen.
  2. Select "Show All." This will list your effect options in alphabetical order. You may have to hover over the pictured choices to see the names.
  3. Scroll down to the "L" s to find "Lighting Effects" then double-click to select.
  4. Now you will see a pop-up box with "style" as one of the first choices. Click to see your choices in the drop-down box.
  5. I chose "Crossing Down" in this photo, but there are at least 15 choices available. You can just play with the different options to see what you like. Remember that you can always undo anything, so don't be afraid to experiment.
  6. The pop-up box also has options for light types, properties and texture. You can change these to your liking or let Photoshop make suggestions. You can also drag and drop the location of the light source and see it all it the preview screen.
  7. Make sure to save a copy of your final project in addition to your original photo. It is a good idea to title them accurately so that you can remember which is which.

Photoshop Lighting Effects

Natural Light
Natural Light | Source
"Crossing Down" Light

Using Artistic Effects

To use the Artistic Effects feature, open your photo in the Full-Edit mode of Photoshop.

  1. Select "Filters," usually on the right side of the screen
  2. Now you will see a drop-down box with many choices. Click on the "Artistic" button.
  3. Now there will be several more choices with self explanatory names like: pastel, colored pencil, brush strokes, etc. Again, don't be afraid to experiment.
  4. Once you have chosen the style you want, you will be able to choose things like the size of the brush strokes, or brightness of the colored pencils...get creative and have fun here!


Stylize with Artistic Effects

Unedited photo
Unedited photo | Source
Photo stylized with "Brush Strokes"

Photo Aging Effects

For a nostalgic feel to your image (which I especially like for pictures of children,) there are several photo effects to make the picture look old, tattered, sunbleached, etc. To use the Photo Effects, first open you picture in the "Full-Edit" mode.

  1. Click on the "Photo Effects" button on the right side of the screen.
  2. Click on the drop-down panel to see the choices.
  3. Click on "Vintage Photo" which will then lead you to a few sub-categories such as "old paper" and "cracked glass."
  4. There are also options to change your photo to black and white, sepia or to make edges look tattered.

Photo Effects

Unedited photo with natural lighting
Photo changed to look old by using Photo Effects "Old Photo" and "Sun Aged" for filters.

Healing Brush Tool

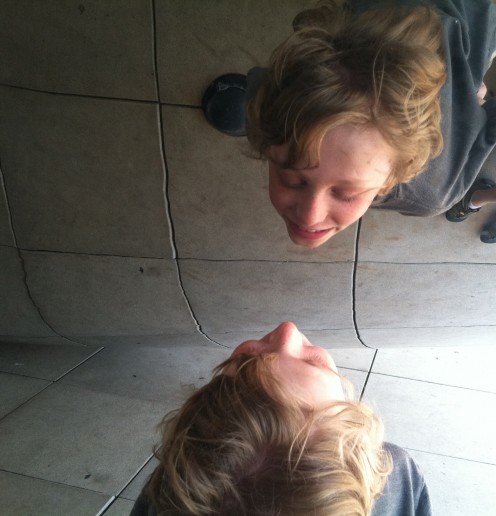
Here is a nice photo, but wouldn't it be even better if you could get rid of those feet on the right and/or that black object on the left? Using the Healing Brush tool is one of my favorite ways to touch up those little annoying details in an otherwise cool photo. Again, open your photo in the "Full-Edit" mode.


  1. On the left of your photo image is an icon that looks like a bandage called the "Healing Brush Tool". Double-click on the icon.
  2. Across the top of the screen, you will now see the word "brush" with a number next to it. This is how you choose your brush size. Click on it to control the size of the area you are editing.
  3. I usually use the zoom tool here as well so that I can get a close-up, detailed area to work with. You will have to adjust your brush size after you zoom in.
  4. Now choose an area of the photo that is the color, texture, pattern, etc., that you would like to use. In this case, I chose the tiles in the background. Alt+Click on that area.
  5. Now click and drag your brush to "paint" over the areas you are trying to remove.

Healing Brush Tool

Source
Use the "Healing Brush" tool to perfect your photo!

Brightness and Contrast

When it comes to brightness and contrast, Photoshop could not make it any easier. You do not even need to go into the "Full-Edit" mode for this one. Just open your photo in Photoshop, then:

  1. Choose the "Fix" tab in the upper right side of the screen.
  2. Under "fix," you will see the options "Quick-fix," "Full-Edit," and "Guided-Edit." Choose "Quick-fix."
  3. Now, you will see "Lighting," Color," and "Sharpen."
  4. Slide the bars to adjust to your liking.
  5. That's it...easy! Don't forget to save your changes.

Brightness and Contrast

Photo of a rescued eagle before using Brightness and Contrast...
Photo of a rescued eagle before using Brightness and Contrast... | Source
and after.
and after.

Quick Selection Tool

The "Quick Selection Tool" is a great tool for cutting out an object in a photo and then completely changing the background, without having to go, painstakingly, around the edges with the "Eraser" or "Healing Brush" tool.

  1. Click onto the "Quick Selection" tool found to the left of the photo. It looks like a wand. (Not to be confused with the "Magic Wand" tool.)
  2. Using the tool, select and highlight the area you want to cut out. You will get a glowing dotted line around the perimeter of the area that has been selected. You can keep adding more to the area.
  3. Now, right-click on the highlighted area and choose "select inverse" from the drop-down choices. Now the back ground is highlighted instead.
  4. Left click on the background (anywhere) and choose "fill selection" from the drop-down menu.
  5. Now you will get a pop-up box in which you can choose the color of your "fill" or new background. Also, you can change the blending and opacity with this tool.

Quick Selection Tool

Pretty wings but ugly background...
Pretty wings but ugly background... | Source
...with Photoshop, you can select the good and change the parts you don't like.
...with Photoshop, you can select the good and change the parts you don't like. | Source
working

This website uses cookies

As a user in the EEA, your approval is needed on a few things. To provide a better website experience, hubpages.com uses cookies (and other similar technologies) and may collect, process, and share personal data. Please choose which areas of our service you consent to our doing so.

For more information on managing or withdrawing consents and how we handle data, visit our Privacy Policy at: https://corp.maven.io/privacy-policy

Show Details
Necessary
HubPages Device IDThis is used to identify particular browsers or devices when the access the service, and is used for security reasons.
LoginThis is necessary to sign in to the HubPages Service.
Google RecaptchaThis is used to prevent bots and spam. (Privacy Policy)
AkismetThis is used to detect comment spam. (Privacy Policy)
HubPages Google AnalyticsThis is used to provide data on traffic to our website, all personally identifyable data is anonymized. (Privacy Policy)
HubPages Traffic PixelThis is used to collect data on traffic to articles and other pages on our site. Unless you are signed in to a HubPages account, all personally identifiable information is anonymized.
Amazon Web ServicesThis is a cloud services platform that we used to host our service. (Privacy Policy)
CloudflareThis is a cloud CDN service that we use to efficiently deliver files required for our service to operate such as javascript, cascading style sheets, images, and videos. (Privacy Policy)
Google Hosted LibrariesJavascript software libraries such as jQuery are loaded at endpoints on the googleapis.com or gstatic.com domains, for performance and efficiency reasons. (Privacy Policy)
Features
Google Custom SearchThis is feature allows you to search the site. (Privacy Policy)
Google MapsSome articles have Google Maps embedded in them. (Privacy Policy)
Google ChartsThis is used to display charts and graphs on articles and the author center. (Privacy Policy)
Google AdSense Host APIThis service allows you to sign up for or associate a Google AdSense account with HubPages, so that you can earn money from ads on your articles. No data is shared unless you engage with this feature. (Privacy Policy)
Google YouTubeSome articles have YouTube videos embedded in them. (Privacy Policy)
VimeoSome articles have Vimeo videos embedded in them. (Privacy Policy)
PaypalThis is used for a registered author who enrolls in the HubPages Earnings program and requests to be paid via PayPal. No data is shared with Paypal unless you engage with this feature. (Privacy Policy)
Facebook LoginYou can use this to streamline signing up for, or signing in to your Hubpages account. No data is shared with Facebook unless you engage with this feature. (Privacy Policy)
MavenThis supports the Maven widget and search functionality. (Privacy Policy)
Marketing
Google AdSenseThis is an ad network. (Privacy Policy)
Google DoubleClickGoogle provides ad serving technology and runs an ad network. (Privacy Policy)
Index ExchangeThis is an ad network. (Privacy Policy)
SovrnThis is an ad network. (Privacy Policy)
Facebook AdsThis is an ad network. (Privacy Policy)
Amazon Unified Ad MarketplaceThis is an ad network. (Privacy Policy)
AppNexusThis is an ad network. (Privacy Policy)
OpenxThis is an ad network. (Privacy Policy)
Rubicon ProjectThis is an ad network. (Privacy Policy)
TripleLiftThis is an ad network. (Privacy Policy)
Say MediaWe partner with Say Media to deliver ad campaigns on our sites. (Privacy Policy)
Remarketing PixelsWe may use remarketing pixels from advertising networks such as Google AdWords, Bing Ads, and Facebook in order to advertise the HubPages Service to people that have visited our sites.
Conversion Tracking PixelsWe may use conversion tracking pixels from advertising networks such as Google AdWords, Bing Ads, and Facebook in order to identify when an advertisement has successfully resulted in the desired action, such as signing up for the HubPages Service or publishing an article on the HubPages Service.
Statistics
Author Google AnalyticsThis is used to provide traffic data and reports to the authors of articles on the HubPages Service. (Privacy Policy)
ComscoreComScore is a media measurement and analytics company providing marketing data and analytics to enterprises, media and advertising agencies, and publishers. Non-consent will result in ComScore only processing obfuscated personal data. (Privacy Policy)
Amazon Tracking PixelSome articles display amazon products as part of the Amazon Affiliate program, this pixel provides traffic statistics for those products (Privacy Policy)
ClickscoThis is a data management platform studying reader behavior (Privacy Policy)