Build an Electric Guitar

Guitar kits are a great way to get started in guitar building. You can get all the parts from one place, Instructions are included, and you'll need minimal tools. Electric guitar kits are probably one of the easiest to build. Most of the parts are bolt together, and they're pre-primed which means they're ready to paint. Some of them even have snap together electronics which means you don't even need to do any soldering. If you're looking for guitar kits to build, you can buy the Saga Guitar kits on eBay for around $100 for the Stratocaster or Telecaster model.
These guitar making kits come with the bodies and necks pre-primed and pretty much ready to paint guitars. You can use spray cans to paint them, automotive paint is used by many people with good results. The neck head is blank so you can cut out your own headstock shape. The electronics are snap together, you don't even have to solder them. They're easy to customize by adding aftermarket parts, if you do this though you may need some woodworking tools to get everything to fit. I customized my Telecaster guitar kit with a new bridge, knobs, tuners, pickguard (scratchguard if you're from the U.K.) and jack plate. Doing this made me have to do some modifications, the bridge I used was not as high as the stock bridge, so I had to rout the neck pocket. The Saga guitars seem to be some of the best guitar kits, as well as cheap guitar kits.
The Saga Telecaster Guitar Kit.

The Saga Guitar Kit
So, here's my build your own guitar kit. It was a Telecaster style and it came with everything I needed, but I decided to upgrade some of the components not because they were low quality but because I wanted to get gold components and a gold pickguard. The guitar kit came in a surprisingly small box, about the length of a neck and the width of a guitar body, everything was intact and packaged nicely. You can get Les Paul guitar kits or whatever style you like.
I got all of the guitar parts from Guitar Fetish. Everything else I used was the kit guitar parts. The Guitar Fetsish parts were all good quality components at a good price too. Their stock seems to rotate regularly so you might not be able to find the same exact components I did, but you can find them at other places on the net. I obviously spend more on my guitar, but if you'd bought just the kit the components are just fine. In fact some of them were actually better quality than the stock replacements! So lets take a quick look at how I put the guitar together and how the non-stock parts caused any extra modification. Here's what I replaced in the kit:
- Tuners
- Bridge
- Control cover
- Knobs
- Output jack
- Pickguard
Building the Electric Guitar


Building an Electric Guitar
Ok, lets start with the guitar body. If you get a kit and try this put it together before you paint it! My bridge and pickguard holes didn't line up and the neck pocket need some tweaking. More on that later. It was made up of laminated wood, mine was pretty well matched. It came presealed with a very thick sealer, but very smooth and ready to paint. Part of the sealer dripped into the output jack hole that had to be removed before the jack would fit. I took all the electric components of the silver plate and put it on my gold one. The knobs just pulled off. My new knobs had a set screw so they couldn't accidentally slip off.
Then I put the neck into the neck pocket and put two tuners in the first and last holes and attached strings to them I then attached the strings to the bridge and lined the strings up so they were equal to each edge of the neck. This is a common way to see if your bridge is lined up straight with the neck. I then marked the holes and drilled them.
Next I laid the pickguard where it belonged and tried the bridge again. It fit on the bridge end but not on the neck end. I needed to remove a little material so it would butt flush with the neck but not have to be squeezed in. A couple of the screw holes lined up, but most didn't. I filled the holes that didn't match and weren't covered by the pickguard. I then drilled or redrilled all the holes I needed to make it fit.
Fitting the Guitar Neck


Building the Guitar Neck
After I put the neck in the pocket and got the strings on I noticed they were resting on the neck - too low. So I figured I'll just raise the action by adjusting the bridge. So I screwed the guitar neck on and noticed that the screw holes didn't exactly line up with the back plate. I filled those holes and redrilled them.
With the neck screwed on properly and the bridge action adjusted as high as it would go the strings still touched the neck. Remember the original bridge was really thick? If I had used it the strings would've been higher and there would've been no problem.
So what to do? the only thing to do was put some sort of shim under the bridge to make it sit higher or rout the neck pocket deeper. That's what I decided to do. I clamped a couple of boards down as a template and ran a straight bit around it taking off about an 8th of an inch - the thickness of the original bridge. I then cleaned it up a little with a chisel. Everything worked perfectly and the action was just right with a little adjustment.
Finishing the Neck
Click thumbnail to view full-size


Finishing the Guitar Neck
I checked the tuners for depth, they looked good. What didn't look good was the mounting holes. The holes in the stock guitar neck were too small so I was going to have to enlarge them. Most people's thoughts would be, no problem just drill them out. Don't do it! A drill bit can wander, and you'll never know if you have it completely centered. The solution is to use a reamer. It's a conical shaped tool with cutting edges and a T-handle. Because it is conical it self centers. It cuts wood pretty quick working first from the front then the back. After about 15 minutes all the tuners fit.
The last thing to do was cut out the peg head shape. I chose a standard Telecaster shape, I got the template from the MIMF forum. I printed it out a couple of times enlarged a little bit to see which one fit better. I chose one that worked traced it out and cut it.
I intended to cut it by hand with my coping saw but the blade broke right off the bat. So I used my jig saw which had a thicker blade so I couldn't match the tight curves. I came at it from a couple of different angles. It looked like a real hack job. But, with a wood file (know as a rasp) and a little elbow grease it was looking like a 'Tele neck.
Saga Guitar Telecaster Kit
Saga Guitar Kit Strat

Assembled Guitar Kit

Putting the Guitar Together
Ok, so now everything is done it's time to put all the parts together, including the electronics, plug it in and play it to see if everything works. The time to work out the kinks is before you finish it. I intended to finish the guitar black, but I kind of like the way it looks natural. So far, I've just left it like this. I'll probably go ahead and paint it in the future. If you want to put together your own guitar kit, check eBay and you can get the same one I did.
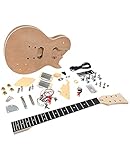
Saga Guitar LP Kit
Saga Guitar Kit LP
Guitar Links
- Guitar Effects Pedals
If you play electric guitar, whether you're a beginner or novice, you want to rock out right? Of course you do, that's why you bought an electric guitar. You can use the distortion on your amp, but for some... - Acoustic Guitar Tuner
If you're learning to play guitar, or even if you're a seasoned musician, you'll need something to help tune your instrument. An electronic tuner for acoustic guitar can be useful, not only can you tune with... - Guitar Kits, Guitar Parts and Supplies
Here's where I got my gold tuners, bridge, etc. - All about building and repairing guitars.
Need help? Here's where to go: online discussions and interactive courses on acoustic guitar building, electric guitar making, archtop guitar building, bass guitar building, and guitar repair. - Guitar Parts and Guitar Kits
Guitar parts vs. guitar kits what comes with each and why you might want to take one approach over the other.


