How to Build Your Own Custom Guitar


There are many benefits to building your own custom electric guitar rather than purchasing one from your local music store. Customization allows you as the musician to control the sound of your guitar, the style, and the design. It can also provide you with a way to own a guitar your budget may not otherwise permit.
Two years ago, my partner decided to built himself a custom guitar, something he'd wanted to do for many many years. With me and our son across the country helping my mother recover from surgery, he finally had the time to begin the project. As a die hard fan of Eddie Van Halen, he chose to replicate the popular Bumblebee aka the Charvel Hybrid VH2, a guitar that typically retails for $899.00. And thus his research into guitar building commenced. The project in total - between ordering supplies, researching optimal do-it-yourself painting techniques and all the parts, pieces, and how to install them - took him about six months to complete.
Tackling a project like this for the first time is a daunting task. This guitar essentially consumed our lives for the entirety of the project, and though I was pretty hands off, I remember watching countless how to videos, planning paint strategies, discussing product choices, and a lot of trials and errors.
When we were doing our research, a blog such as this did not exist, and so we were left putting bits and pieces of information picked up from various sources together. That is why I've decided to write up this little how to reference guide for any other hopeful luthiers out there wanting to test their own hands at building a custom guitar. There is an abundance of information to process when building a guitar from scratch, so much that in order to cover it all I would actually need to write a book. That being the case, if this how to doesn't cover each and every step you're searching for, it will at least serve as a starting point for references to other sources of information on this topic.
Step 1: Choose Your Guitar
When you're out shopping for a guitar in the music stores, you're typically given the opportunity to play before you purchase. You may see a guitar hanging on the rack that looks great, exactly the image you have in your head, but you test it out and the sound is too muddy or too punchy. This is the number one advantage of the custom built guitar, is getting the look and the sound you want.
But, how do you know which choices to make in order to get that exact sound you want and then pick a style to compliment? Well, you start with your wood choice, because the wood selected will have a direct effect on the tone of your guitar. Some choices include, but are not limited to:
- Alder - lightweight with a full sound.
- Ash - there are two kinds - Northern Ash which is a dense and heavy option and Swamp Ash, or Southern Soft Ash, which is a very popular choice because it is lightweight and has a warm tone.
- Basswood - lightweight with a warm tone and good mids.
- Mahogany - medium to heavyweight with a warm and full tone.
- Rosewood - very heavy with a warm tone.
Helpful Links About Wood Choices
- Ultimate Guitar Guide: Tone Woods | Guitar Columns @ Ultimate-Guitar.Com
A guitar's wood is one of the last steps to creating that ideal tone you've been looking for. Different woods give off different sounds, which add to your guitar's ambience, tone, durability, and ability to age with time.

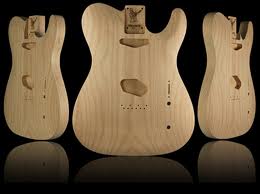
Choose Your Body Style
Choosing your wood and your body style essentially go hand-in-hand. In reality, the decision is based a great deal on personal preference. Not all wood choices will compliment a particular body style and vice versa. So, if you find yourself with your heart set more on a specific body style then make sure to choose the best complimentary wood. If you are more interested in sound, choose your wood first and then pick the best compatible style.
Some popular styles are:
- Stratocaster
- Telecaster
- Star
- V-R or V-K

Choose Your Neck
Your choice of neck is yet another aspect of what will determine the final guitar style. Again, you have your wood options which will affect the overall tone of the guitar, but you also have to choose between a bolt-in neck, a bolt-on neck, a set neck, or a neck-through.
These are rather self-explanatory. A "bolt-in" literally bolts in to the back of the guitar. A "bolt-on"is attached to a flange that protrudes out from the back of the guitar. A "set neck" is glued into place. And, a "neck-through" is constructed from a piece of wood or laminate that extends through the entire body of the guitar.
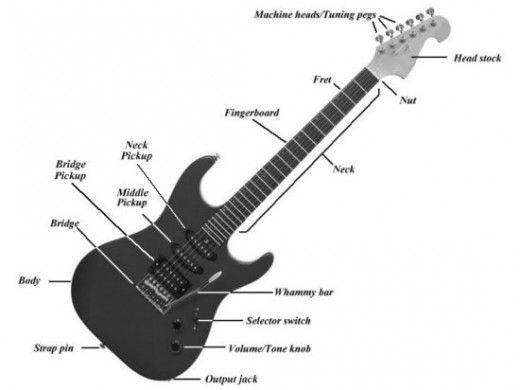
There are also the headstock, the part of the neck furthest from the body where the mechanical assemblies traditionally used to wind strings are located, styles to consider as well.
Another very important factor in your neck decision, the size of your hands. This will weigh heavily on your choice of neck profile, the shape of the back of the neck. This is a feature that depends solely on your personal preference. If you don't know which shape is the best fit for your fingers, I recommend trying out the different shapes until you find the most comfortable variation.
Helpful Links For Choosing a Neck
- Warmoth Custom Guitar Parts - Guitar Necks Page
Custom Guitar and Bass Necks and Bodies, Pickups, Bridges, Tuners, and Pickguards at Warmoth - The Original Custom Guitar Shop! - Fender Neck Profiles | Fender News & Tech Talk | Fender Guitar
- Electric Guitar Buying Guide
Where do you stand?
Who's the best guitar player in rock-n-roll history?
Choose Your Fretboard
The fretboard, or fingerboard, is the thin piece of wood fixed to the front of the neck. Just as with most components to your guitar, the wood choice will affect the tone.
The most common woods used for fretboards are:
- Rosewood - most popular for the warm and full tone it produces.
- Maple - fretboards to be attached to a different wood variety do not come in Maple; the only way to have a Maple fretboard is to have a one-piece Maple neck. It is a dense wood which creates a very bright and crisp tone.
- Ebony - another dense wood, it provides a snappy yet smooth sound. Its natural oils coupled with its density make it a blend of some of the qualities of both Rosewood and Maple as well.
For most, the choice of fretboard comes down to personal preference just as so many other options on a guitar. One other element to consider is the option of a scalloped fretboard. This is the preferred fretboard choice of the great Yngwie Malmsteen, and is generally best for only those players out there with a light touch.
Helpful Links About Fretboards
- Fretboard Tone Wood Guide | Andertons Blog
Our guide to the most common fretboard tone woods: the tonal and visual differences between Maple, Ebony and Rosewood fretboards (also called fingerboards)

Choose Your Pickup Configuration
A pickup is the device located in the cavity directly above the bridge. However, it is worth mentioning there are guitars with two pickups and even three. Typically, guitars with two have a bridge pickup and a second neck pickup; and guitars with three have another pickup in between these two. The pickup is what captures the vibrations of the strings and converts them into an electrical signal for amplification, recording, or broadcasting.
There are generally two choices in pickups: a dual coil, or humbucker, and a single coil. Dual coil pickups are often referred to as humbuckers because they are said to "buck the hum" of the strings. Though they are used in a wide variety of guitars, an early humbucker pickup was used in a Gibson Les Paul, and therefore they're often heavily associated with Gibson guitars.
Your decision between the two should largely be based on your preferred sound. If you use a lot of distortion when playing, you're likely to notice the hum more than a musician who plays clean, and therefore you'll probably want a humbucker. Clean players and players who don't mind the hum and the squeaks at loud volumes may prefer a single coil, especially if it's what will fit best with your chosen body style. Guitar Center describes humbuckers as offering a fat and beefy, mid-range sound while single coils are more bright and punchy.
Some solid body guitars, such as Fender Stratocasters, usually come with cavities for single coil pickups. Installing a humbucker on a guitar body such as this will require additional routing to the cavity, something that could easily cause an irreversible mistake and destroy the body. If you happen to have a solid body guitar with a cavity for a single coil, but you want the cancel the hum, stacked humbuckers are designed to solve just this problem. By vertically stacking the humbuckers, these pickups can easily fit into these single coil cavities.
Another option to consider is an active pickup which will require a battery pack to be installed on the guitar as well. Active pickups are well suited for artists looking for a consistent tone without compromising the quality when the amp is turned up. The downside, obviously, is the need to replace the battery, but for some this may be worth it in order to achieve their desired sound.
Helpful Links About Pickups
- Cage Match: Single Coils vs. Humbuckers | Seymour Duncan Blog
- Choosing Pickups In Unusual Wood Combinations | Seymour Duncan Blog
- Active Vs Passive Pickups | Guitar Columns @ Ultimate-Guitar.Com
A beginner's look to the market of active and passive pickups, their intended range and their hit's and misses. / Guitar and bass articles at Ultimate-Guitar.Com
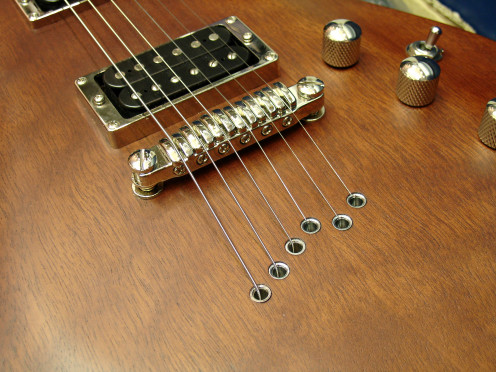
Choose Your Bridge
The primary function of the bridge is to anchor the strings to the guitar. However, the individual bridges will achieve this anchoring differently and this will affect the overall sound and functionality of the guitar.
Essentially the choice is between tremolos, or vibrato, and non-tremolos . Tremolos offer more control over the string tension, and are necessary if you want to have a whammy bar. The non-tremolos anchor the strings, but do not offer any control over the string's tension. The Floyd Rose tremolo is a locking tremolo favored by most electric guitar players who use alternate tunings. These are often quite expensive and very difficult when it comes to changing strings. So, if you're not concerned with detuning your guitar, no need to spend the extra money.
For some comparative notes on the common types of bridges please reference the table below.
Comparing Bridges
Locking Tremelo
| Non-Locking Tremelo
| Non-Tremelo
| Floyd Rose
|
|---|---|---|---|
Moderate Tuning Stability
| Difficult to Keep in Tune
| Great Tuning Stability
| Great Tuning Stability
|
Great Alternate Tuning
| Moderate Alternate Tuning Stbility
| Poor Alternate Tuning
| Best for Alternate Tuning
|
Difficult String Changing
| Easy String Changing
| Easy String Changing
| Difficult String Changing
|
Helpful Links About Bridges
- MusicRadar Basics: types of guitar bridge | MusicRadar Basics: types of guitar bridge | Guitar Lesso
MusicRadar Basics is brought to you in association with Blackstar Amplification, Epiphone, Rockschool and Dunlop. MusicRadar Basics: electri - Choosing The Right Electric Guitar Bridge Type For Your Guitar
Confused about the advantages and disadvantages of different electric guitar bridges? Our guide clears up the confusion!
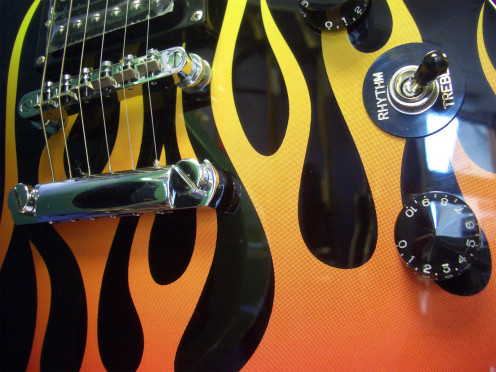
Choose Your Controls
The selection of your switches, volume & tone knobs, and input jack will largely be based on the body you chose and, of course, personal preference.
Switching systems allow you to choose your pickup configuration by setting which pickups you'll play with. Some options are:
- Single toggle
- Three way
- Five way
Some options for volume & tone knobs are:
- Direct route from the pickup to the volume (will always be one pickup and one knob).
- Two volume knobs and two tone knobs (this configuration is typical with the Les Paul).
With input jacks, you have the option of upgrading to a Switchcraft which will have thicker wiring and help achieve a better tone.
Helpful Links About Controls
- The ABCs Of Guitar Switches
If you are really into guitar modding, there is no way around learning how switches work.
Guitar Kits
For those of you who, like my partner, are interested in building a custom guitar, but not necessarily completely from scratch, there are places to buy guitar kits. Kits usually come with an unfinished body and neck and everything you need to put the guitar together. These are perfect for musicians who want a degree of customization without putting in as much work.
Keep it Simple, Order a Kit
- Guitar Kits - Ed Roman Guitars
Kit guitars, ed roman guitars - Guitar Kits - Guitar bodies and kits from BYOGuitar
Guitar Kits
Step 2: Choose Your Design
Whether you've chosen to build your guitar completely from scratch, to start with a kit, or you're stripping down a guitar previously owned and revamping the look, you'll need to choose your design. This is completely 100% based on your personal preference. This is your area to have total creative control over your project, so have fun with it.
Some things to keep in mind while choosing a design:
- The porosity of your wood and the finish you choose - a very porous wood will require more paint as it will soak into the unfinished wood and will need multiple coats.
- What methods you want to use - airbrushing, paint guns, and/or spray paint.
- The degree of difficulty - if you're a master at airbrushing then you're likely to have the skills to pull off the most intricate of designs. However, if you're artistic skills are limited to stick figures, you might want to choose something more simple.
Depending on the methods you choose, if you need some guidance and tips, YouTube is an invaluable resource. There are videos on choosing paint, taping off a design, how to paint with spray paint, how to airbrush, and how to finish and polish the guitar once you're done. I've provided a few here, but for more just browse around YouTube. If you've picked a popular design to copy, you're likely to find a video with steps for your choice specifically.
Note: Before painting you will want to make sure everything fits together by doing a test assembly. For instructions on assembly and a helpful video, see the next step.
Video Guide to Choosing Paint
Spray Paint Demo
Wet Sanding and Polishing
Names of Parts of Guitar
Step 3: Assembly of the Body and Neck
Once your guitar is painted and/or finished to your preference, you're ready to put it all together. If you bought a kit, you should have everything you need except tools. You may want to purchase an upgraded wiring kit which will help eliminate hum produced by thin wiring. And, if you don't already have them, purchase a set of tuning keys.
Tools likely to be needed:
- Soldering iron
- Screw drivers
- Drill (for bolting on the neck)
- Allen wrenches
If you are installing a Floyd Rose pickup, your first step is to install the locking nut on to the headstock of your neck.
For bolt-on and bolt-in necks, attach them now. Use c-clamps to attach the neck to the body while keeping the body as level as possible. Before tightening down the clamps, insert a towel on both sides so as not to damage your brand new paint job. Tighten your screws down a quarter at a time for even tightening.
Now it is time to assemble the body. All steps will be unique to the guitar, but here is a list of the steps:
- Start with your pickup assembly.
- Install switches and volume & tone knobs.
- Install bridge.
- Install input jack.
- Install tuning keys on headstock.
At this point, make sure everything on the guitar is tight: your neck is secured tightly, wiring is in tightly, knobs and jacks are secure, because after this you'll be putting on your strings.
Just as with painting, there are countless YouTube videos out there about building guitars, so if you find yourself in a bind turn to these for a visual guide. Make sure to search for videos specific to assembling your guitar's style.
Building a Guitar Kit
Step 4: Set-up
This is the step where you'll install your strings, set up intonation, and adjust your truss rod. The steps for these will change again depending on your bridge. I've included another helpful video featuring Joe Walsh giving instructions on setting up a guitar. The video featured here is the first of a six part video tutorial, so to find the others, visit YouTube and search for "Joe Walsh Setting Up A Guitar." If he doesn't cover a step you need help on, there are many more tutorials on YouTube as well.
Joe Walsh Setting up a Guitar
Step 5: Backplate and Knobs
The final step in this process is to install the backplate(s) and your knobs. You'll want to wait until after you're done setting up your guitar for this, because you may need to make minor adjustments along the way. If you chose an active pickup for your guitar, you can install the battery now as well.
Conclusion
Once this is all done, you're now the proud owner of your own custom guitar. There's no better education about the inner workings of the guitar than building one yourself. If you're trying to develop your own sound and tone for your music, this experience will be priceless, even if the supplies cost more than you bargained for.
A lot of credit for writing this blog must be given to my partner, Paul Licato. His experience with building his own custom guitar and his knowledge provided the backbone for my research. Please, if you feel we've missed a step or provided incorrect information, leave comments that may be helpful to others looking to build their own guitar.
Related

How to Sound Like the Edge of U2 for Under $1,000

Top 5 Best Electric Guitars for Beginners

How to Memorize the Notes on the Guitar Neck

How to Improvise on the Guitar - Extending Pentatonics out of the Box

My Personal Experience of Premium Violin Strings Sets Used Over More Than a Decade of Playing
 Bands of All Time")

