Piano Lessons For Beginners: Lesson Seven


Welcome to Beginners Lesson Seven!
In this lesson, you'll be using two different hand positions in the right hand.
This is your first song in the key of F major. There's also a spot where you have to do some tricky fingering. On top of that, there are lots of accidentals (flats, sharps and naturals) and the two hands are playing their own rhythms. But don't worry – you’ll be working through it step by step so it won't be as difficult as it seems.
C Hand Position
To get started playing this arrangement, you'll need to place your right hand in the Middle C position. Nothing new there, so that's an easy way to get going. Make sure you still remember how to find Middle C on your piano or keyboard (see picture below for help).

Got it? Then move on to Step 2.
F Hand Position
Place your left hand in the F position -- on the note F below middle C. That's easy enough to do, but also creates a slight problem. You'll notice that with your right hand in the Middle C position, and your left hand in the F position, both thumbs have to share the note Middle C. Don't let that freak you out, though: it happens a lot in piano music. Just relax and let your fingers work it out.
Hint: It's only really important for the first line of music.

Let's Start Playing!
Okay, now it’s time to play the song.
Here's the notation for the first four bars (below). Notice the repeat sign at the end of the line, which means you should play the whole line twice.
Before you do, though, it's a good idea to practice each of the hands separately. The right hand plays the melody in a simple quarter-note rhythm, but the left hand is playing 2-note chords in a different rhythm. Sometimes -- as in bars 2 and 4 -- the rhythm of the left hand is the same as the right, but you should practice them separately until you can play each part and its rhythm perfectly and comfortably.
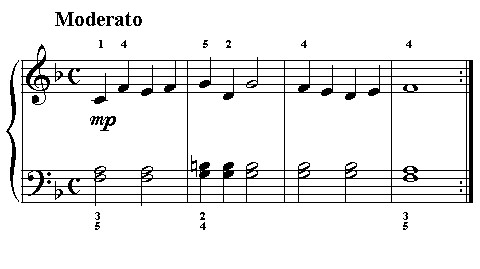
Notice the B natural in bar 2 of the left hand. Remember to play B flats in bar 3, as that's what the key signature tells you to do. The natural only lasts for that one bar, and then after that you play what's in the key signature (B flats) unless the changes are written in.
Hint: To add some variety to your playing, play the first line at a slightly different dynamic level (i.e. softer or louder) the second time round.
Line Two Setup
On the next line you have to move your right hand UP to the F position. That's F above Middle C, so that now both hands should be in F positions. The red dot in the picture below shows where F above middle C is located on the keyboard.

Playing Line Two
Here's the music for the second line. The right hand plays only three notes on this line, so that should be a piece of cake. The left hand does a bit of moving round, though, so be careful.
You can see the right hand melody has 3 notes in it, F, G and A. But the hard work on this line is in the left hand.
Practice the left hand on its own, watching out for;
- the C sharp in the second bar
- the B flat (part of the key signature) in he third bar
- the D flat in the third bar
The left hand finishes with the same two-note chord (F & C) that it starts with. Have a go at it now.
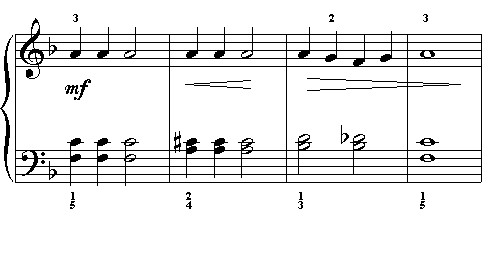
Notice that there is a crescendo and a diminuendo on this line. The crescendo mark is like an elongated “greater than” sign, and it means to get gradually louder. The diminuendo mark is the same sign turned round, like a “less than” symbol, and it means to get gradually quieter.
To make these dynamic changes a natural part of the song, play them every time you practice, even when you practice hands separately.
Hint: D flat and C sharp are really just two versions of the same note, also known as enharmonic notes (different note names for the same key).
On The Last Leg
At the beginning of the third and final line, both hands are still in F positions. The left hand for this line should be easy enough, as it's almost the same as line 1. Watch out for the F#, though!
The right hand moves around a bit, however, so you have to practice this carefully. Notice that the right hand starts out in the F position, but in the second bar you have to stretch down to play the note D. Then you need to replace finger 2 on the note G with finger 4. It's a very good idea to practice playing the second bar on this line with the right hand on its own a few times, until it feels comfortable and natural.

You Made It!
The final two bars are the same as the last two bars on line 1, but this time the right hand is playing the notes with different fingerings. This shouldn't cause you too many problems if you managed to get finger 4 on the G as mentioned earlier.
Good luck, and remember to have fun!
P.S. The name of this song is "Aura Lee' and you can see it, hear it, and print out the full score by following this link.
If you enjoyed this hub, please feel free to check out Lessons One to Six.


")
