Theatre Lighting Design: A 7-part Hub Series -- Part 5: Hang and Focus
Hub Series Table of Contents
Introduction
Welcome to part 5 of the series where I will be talking about the most technical aspect of lighting design. It's during this phase where you finally get to put your hands (or the hands of your techs) on the instruments themselves and start to make the vision a reality. Up until now, everything has been conceptual. Now it's time to play. But don't be misled; this 'play' is a lot of hard work, especially if you only have a matter of a few hours to get everything done (and that's usually the case). For the purpose of this article, we will assume you have a Master Electrician and a small crew of technicians on the most basic level.
By this time, the LD has already given all his/her paperwork to the Assistant Lighting Designer (ALD) or Master Electrician (ME), usually the latter (see previous articles for abbreviation definitions from here forward). On the day of Hang/Focus, it is up to the Master Electrician to designate duties to the technicians. In fact, the Lighting Designer usually need not even be present for the process if s/he did his/her job right with the paperwork. Personally, I like to be present – not to micro-manage, but to watch the process and lend an extra set of hands, but especially to be present in case the ME has any questions. Typically, the ME will assign the cut sheet to a technician who takes the sheet, matches the appropriate gels with the appropriate frames, and organizes them for the focus portion of the day. The process is often different in terms of touring shows as the gels and frames are commonly left in their respective instruments, replaced only when necessary. For the sake of this series, we are focusing specifically on non-tour houses. The next step typically involves the ME grabbing the plot and channel hookup, a scale rule, and a measuring tape. S/He then marks out the areas on the stage (1, 2, 3, etc.) and is ready to start the hang. S/He assigns a tech a crescent wrench and a ladder (or if lucky, a power-lift).
Photometrics
This should have been covered in Paperwork, but I'm a slacker. The reason it should have been covered in paperwork is because it is information you need to know before you can decide where to put specific instruments and which instruments to select appropriate to the space... so I guess it could have been more explained under the Instruments article, now that I think about it. Anyway, those are done and now we're here. So... photometrics.
Photometrics encompasses all the statistics and mathematics of light and its sources. You need to know how to calculate candlepower (candela) or lumens (two different measurements of light), size of light pool at a given distance, the effect of each instrument, etc. First, let's define candlepower and lumens. As I stated, they are both measurements of light intensity. However, candlepower is the measurement of the peak intensity at the brightest spot in the light beam. Candlepower takes into account not only the light, but the result of the reflector and refractor(s) as well. It is all this into one peak point.
Lumens is the measurement of the entire light output. To better explain, it is the measurement of the light intensity from the source, ignoring beam focus.
There is no direct correlation between the two. You can have higher lumens than candlepower and vice versa.
Knowing this, you can now apply the “inverse square law” to determine intensity at your target area based on the type of instrument in use. Note, however, that if using a color filter, this will alter the light output. When using the swatch book for gels, there is a graph and a percentage to show you how much light you will lose by using each gel color. Rosco 80, for example, is extremely dark blue and will eat a lot of your intensity.
There is one more term you need to know, and this is possibly the most important – Foot Candle. You can look up the definition but if you're not familiar, your head may implode so I am going to simplify it for you. Knowing the definition of lumen and of candlepower, we can apply that to the definition of foot candle. A foot candle is the light intensity of an object one foot away from the hypothetical source given that such a source is one candle in a 1-foot radius sphere. Let's simplify that even more... a foot candle is the light intensity at your target area. Period. It is the measurement of light that you want to take while standing on the stage. It is important to note, also, that the foot candle has become obsolete. However, it is still used in American theatre and is very valuable to the designer.
So why did you need to know the other two definitions if all you really need to worry about is “foot candle”? Because if you're not familiar with the instruments you're using, if given the other, you can use the inverse square law to figure out the approximate intensity in foot candles at your target (or at least what it SHOULD be... but a light meter is always handy).
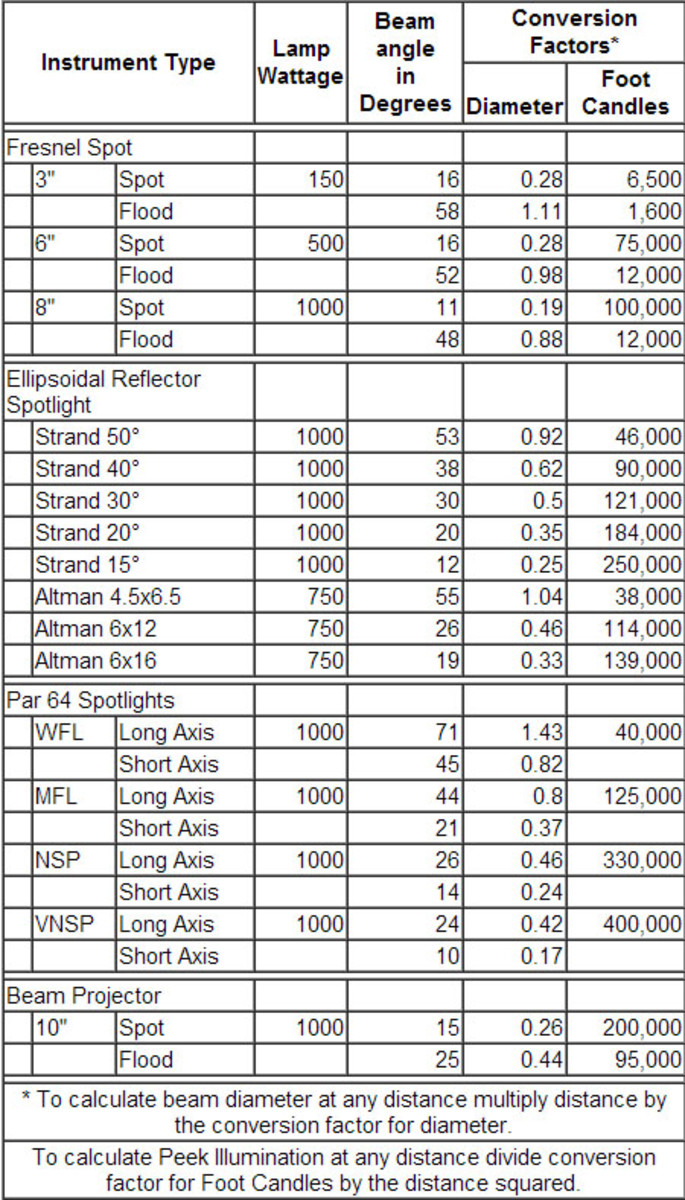
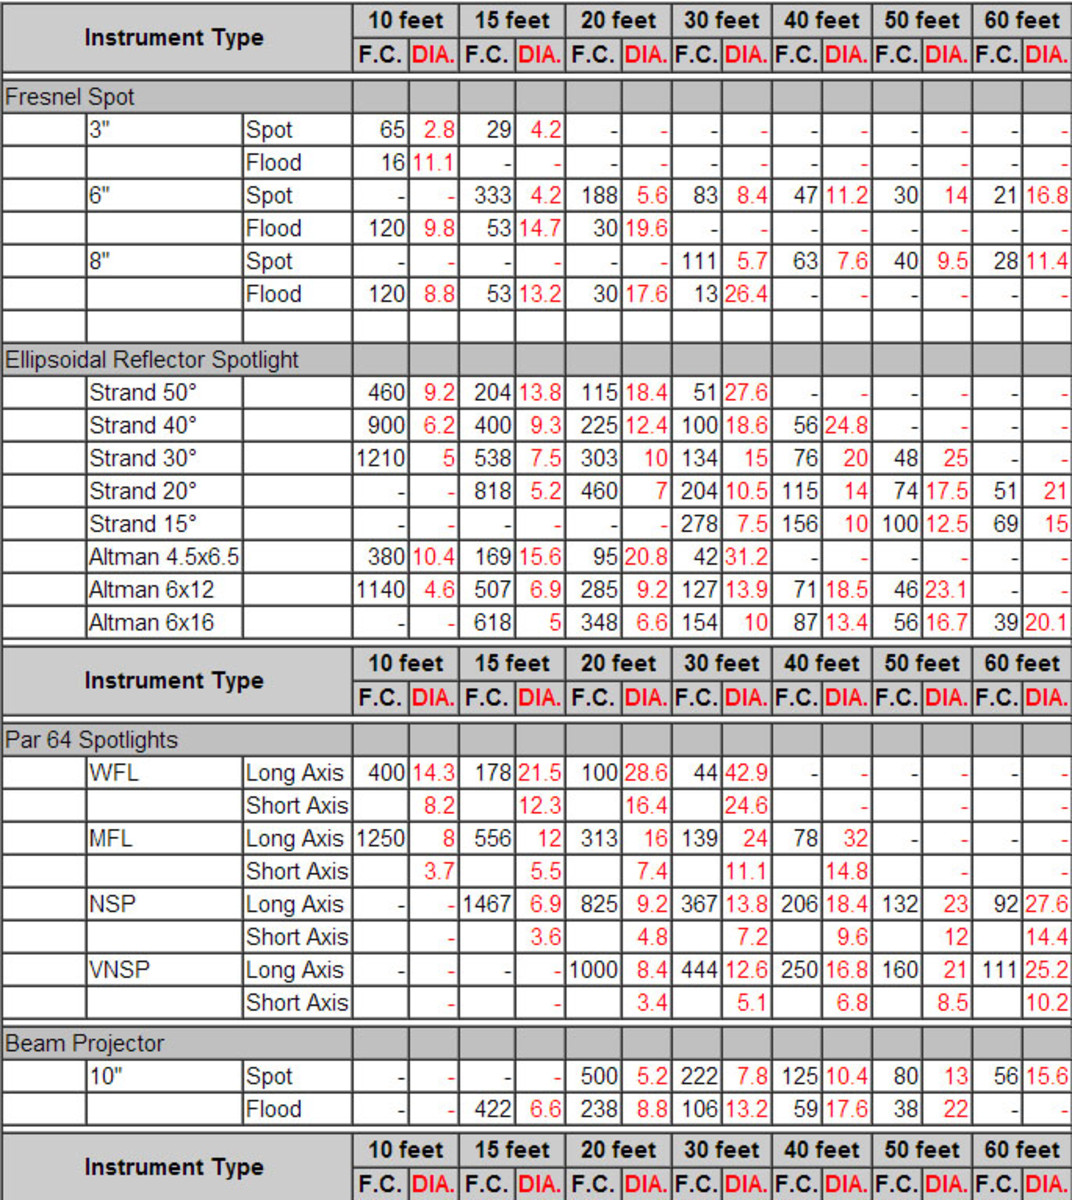
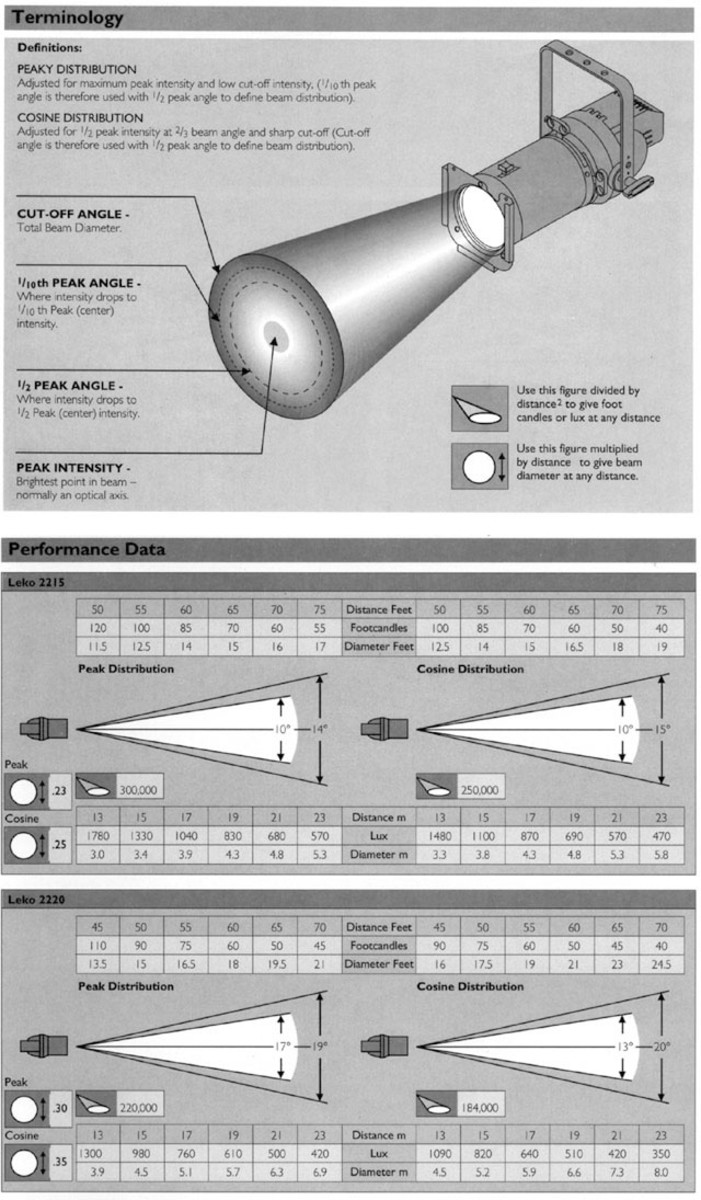
With some simple math, you can also determine the size of the light pool depending on the instrument in use. Let's go over an example using the charts below:
Note the footnote: To calculate beam diameter at any distance, multiply distance by the conversion factor for diameter.
Using that information, for a 50º hung 23 feet away from the target area, we can conclude that the light pool on the stage will be approximately 21.16 feet in diameter. There are a couple things to keep in mind here. First, this is not a practical situation. A 50º at that throw distance will be too dim to be useful. Also, the diameter given is if the light is being angled directly onto the target. However, if you're using it for anything other than a down light (unless focusing on a vertical plane), it will keystone and the light pool will become an ellipse rather than a circle. The diameter will, of course, expand along the throw plane.
For that same example, using the conversion factor for foot candles, we can see that the light, by the time it hits the stage, will only be about 87 foot candles over a 21 foot pool of light.
At the bottom of that chart, there is your formula for deciding light intensity.
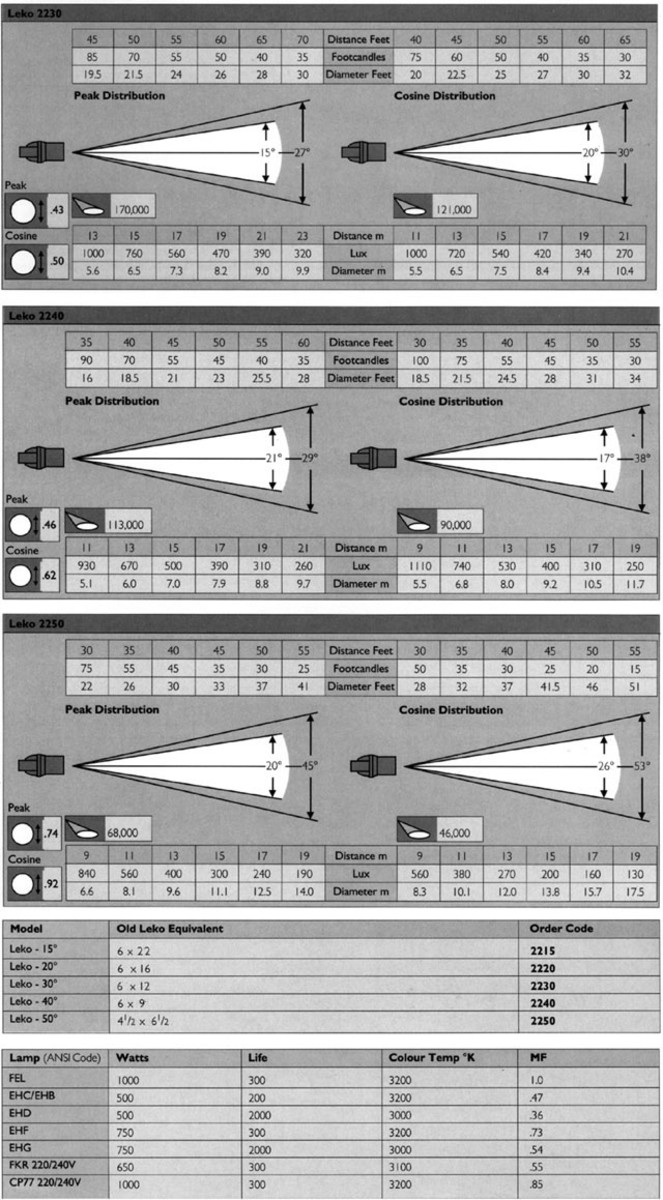
The second chart is a cheat sheet for given angles. When the exact size isn't necessary, you can use this chart to approximate depending on your instrument type.
Photometrics can get very confusing if you don't use the formulas regularly. In fact, I have the cheat sheets in the figures below hanging on my wall to remind me.
The Hang
Ok. Onto the hang. The hang is (surprise) hanging the instruments on the grid or pipes, preparing them for focusing. Using the light plot, the Master Electrician informs the techs where to place the instruments on each pipe and they must be hung according to the designer's specifications, down to the inch. While some wiggle room is allowed here, not much. Depending on the angle of the light, an inch of movement can make a difference in the output. Remember all the math the designer has done up to this point to figure out exactly where to hang the instruments.
Once the instrument is hung, it is up to the tech to “pre-focus”. Pre-focusing simply entails pointing the instrument in the general direction the light is to be thrown, opening all the shutters where applicable, and plugging the instrument into the appropriate circuit. If no circuit was specified on the light plot, then the tech can (usually) plug the instrument into the nearest circuit and inform the Master Electrician who will then record the circuit number onto the plot, the channel hook up, and the instrument schedule. This happens with every instrument in the plot until all instruments are hung, pre-focused, and circuited. Once all that is complete, it's time to get everything prepared for the focus phase; gather the gels and make sure they're all in the appropriate frames as well as any accessories that are indicated on the plot. If there is a fly system in the theatre, it is at the end of the hang where the battens are raised to their trim height and where the teasers, legs, and other soft goods are put into place, ready for focus.
One thing I didn't mention is the cable schedule. This is important but for the sake of the article, only worth a mention and description. The designer should have, in the paperwork while working on the plot, determined where the circuits are and what, if any instruments are going to require extension cable. The cable schedule shows the Master Electrician where and what length of cable will be needed to complete the run so s/he can have that prepared prior to the hang. If the designer is uncertain of circuit numbers or exact placement (due to poor floor plans – it happens... a lot), then it is up to the Master Electrician to look over the plot and determine, based on the space, what will be needed to implement the hang. Part of the tech's job during the process of the hang is to “dress the cable.” This means to tie it neatly to the pipes and make sure everything is organized and “clean” and that the cable runs are not all twisted together and crossing each other.
During the hang, if the circuits are pre-determined and if the designer doesn't hand that responsibility off to the board operator, is a good time for the designer to begin patching the board (if s/he isn't needed during the hang/focus process). More on patching the board below.
Patching the Board
Before I get into this I want to explain that there are two rules of thought here. One is that you focus before you patch, the other is that you patch before you focus. Neither is incorrect. I am of the thought that you patch before you focus because it makes it easier to know to what you are focusing and you can catch any patch issues during the focus process. It's really a matter of designer preference (or Master Electrician preference in many cases).
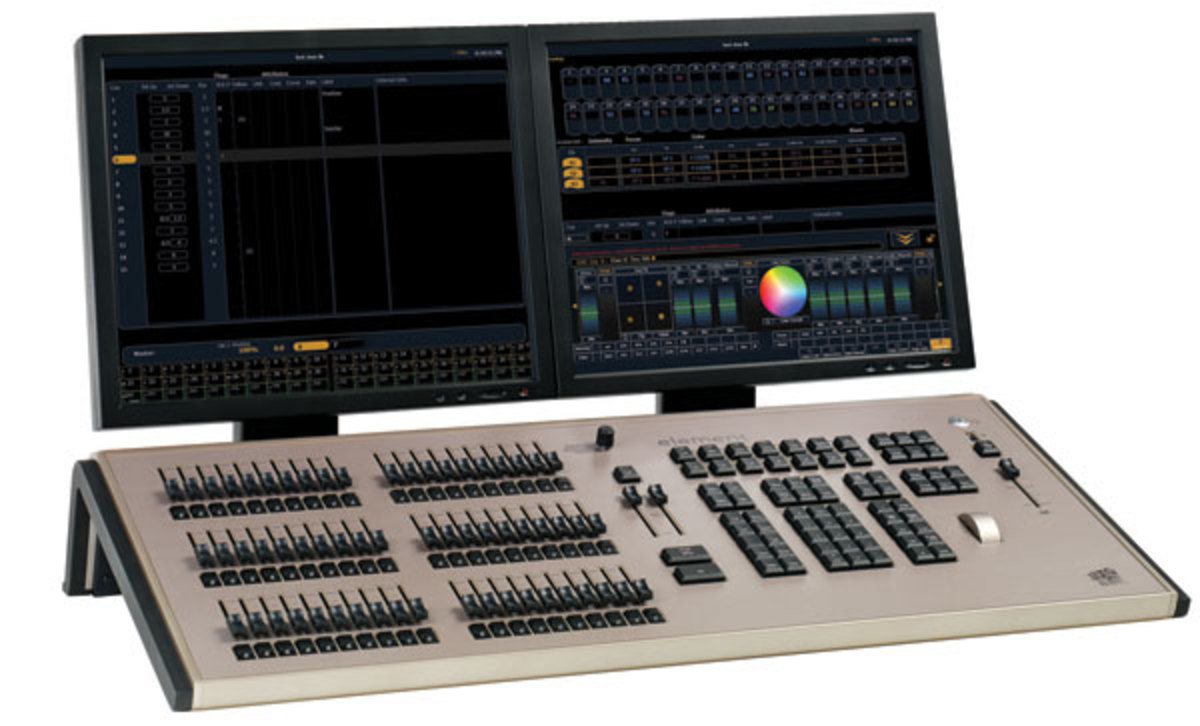
Let me begin by briefly explaining the light board. While there are many types of boards, ranging from your basic A/B slider boards (aka 2-scene preset) to your high end boards that control moving lights, sound, and video. In this article, I will be referring to a type of board in the middle, the standard digital control console, many of which also can control moving lights nowadays. These boards typically consist of a Master (full control of lights up/lights down), a black out button, submasters (sliders to which you can designate groups of lights or use them as channel sliders), a number pad, a keyboard (usually peripherally), and a ton of other buttons for quick selections and settings.
Ok... now onto actually patching the board. On the console, there is a button that says “Patch.” Once you go into that, the screen changes to list all your circuits and channels. Patching the board is simple. The purpose is to enter various circuits to be used into their designated channels (see paperwork article). So, for example, if the instrument designated as channel 1 is plugged into circuit 22, then you would enter dimmer 22 into channel 1. Now, whenever you bring up channel 1, it brings up dimmer 22. The reasons why you would do this, again, is explained in the paperwork article. Note: You can assign multiple dimmers into the same channel, but you can not assign multiple channels to the same dimmer.
Sometimes it's necessary to profile the board. This is necessary when the light intensity doesn't follow the assigned curve shown in the board. From time to time, you will come across a board where you bring up (for example) dimmer 22 and it doesn't even come on until 20% intensity or it hits full at 60% (again, the numbers are arbitrary). When this occurs, you have to go into the profiler and alter the intensity curve within the board to make it match, as close as possible, to your desired intent; so that 0 is 0, 50 is 50, full is full, etc.
Once the board is patched, go through each channel and make sure they are properly assigned, and then it's time to move on to the focus.
The Focus
Ok. Now you have the instruments hung, the gels and accessories gathered and ready, and the board patched. Time to get the tech back on the ladder, the ME on stage, the board operator at the board, and turn off all the lights. The master electrician, now onstage with the channel hook up, will call out to the board operator one channel at a time. As the ME calls out the channel, the board operator brings up that light and the tech begins the focus process. Where the tech previously pre-focused, this is where the detail work comes in. The ME shows the tech where the light needs to hit, what shutter cuts to make, if any, and the tech responds in kind. Once the light is properly oriented, the ME will call out “drop color” at which point the tech then inserts the gel. If there are any accessories to go into the instrument (iris, donut, etc.), the ME will call for the accessory and then a final tweak of the instrument to refine the focus will be made before moving on to the next channel.
This process occurs until all instruments are properly focused. One more channel check is done to ensure that everything is in its place, and then the board is saved to an external storage (disk, USB, etc.), awaiting the time for the writing of cues.
The Focus section seems short, but it's a long and sometimes arduous process. During this time, the designer can really get a feel for what these lights are going to look like. Some tweaking may be needed right away, some additional instruments may need to be added, some other light controlling accessories (top hat, donut, barn doors) may be needed. All these things will be noticeable at this phase and can (and should) be remedied as soon as possible.
In Closing
The hang/focus is typically considered one process; they go together but they are two distinctly separate phases. It's during this period that the show really begins to come into visual perspective. Efficiency and organization is paramount during this process as there is a lot to get done, usually in a very short amount of time. The most important part comes after the process... hit the pub with the crew, it's been a long day!
