Understanding Photographic White Balance


"White balance (WB) is the process of removing unrealistic color casts, so that objects which appear white in person are rendered white in your photo. Proper camera white balance has to take into account the "color temperature" of a light source, which refers to the relative warmth or coolness of white light.
Our eyes are very good at judging what is white under different light sources, but digital cameras often have great difficulty with auto white balance (AWB) — and can create unsightly blue, orange, or even green color casts. Understanding digital white balance can help you avoid these color casts, thereby improving your photos under a wider range of lighting conditions." http://www.cambridgeincolour.com/
The human eyes have a markedly advantage over even the most sophisticated and expensive camera ever made.
Our eyes adjust to changing light conditions within seconds. This is something that digital or film cameras cannot do.
If you come upon a nice snow covered tree in a snow covered field you see what is actually there; nice white trees and nice white snow covered fields all in a pure white color.
Yet if you snap a picture of this scene you are likely to end up with trees that have a yellowish tint and so does the snowy field.
The same is true if you take a picture of a white rabbit sitting on a snow covered field. One if not both of these subjects will appear yellowish or maybe even greyish.
Your camera's white balance is used to solve this problem. It is easy to set and can really bring out the most whitest of whites in any scene (it can also be used to bring a true black color to life).
Before and after color/white balance correction

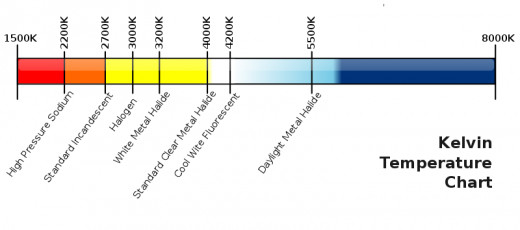
Photographers describe different types of light conditions using a system of measurement called color temperature. The scale used for this measure is done using the Kelvin scale. You have probably noticed that when you go buy a light bulb at your local hardware store it tells you what the light temperature is in kelvin with daylight often being around 5,500K.
To correct color tints that may show up you need to set the color balance in your camera to closely match that of the ambient light conditions. In order words to match the color temperature that is falling on the subject.
Set the color balance too high and you will get a yellowish tint. Too low and the tint will appear bluish.
Look at the light source and take into account the time of day. Bright sunlight is usually around 5500K while dusk or dawn is much lower.
Study and learn to recognize the differences in color temperatures during various times of day and weather conditions and set the sensors in you DSLR to match.
Dawn is often called the golden hour by most photographers. Images taken at this time of day are naturally yellowish but you can still capture pure white subjects if you set the color temperature in your camera to about 2,000K.
The same is true for light conditions during dusk. The light temperature at this time is also around 2,000K.
This does not apply to indoor shots, including studio shots. Here you have to take into account the color temperatures of the light bulbs that you are using and set the sensor accordingly.
Photograph of a lily, both as shot and manually white-balanced. On the left is a digital photo as it came from the camera with no further adjustment to color.

Do you understand the importance of adjusting the white balance in your DSLR?
Regular incandescent light bulbs labeled soft white emit about 2,700K while bright white/cool white is around 3500K – 4100K.
Tungsten-halogen has a color temperature of around 3200K and regular household fluorescents are usually around 4500K.
For the best most natural looking images like what your eyes may see adjust the color balance of the DSLR sensor to match that of the light emitted by each particular light fixture.
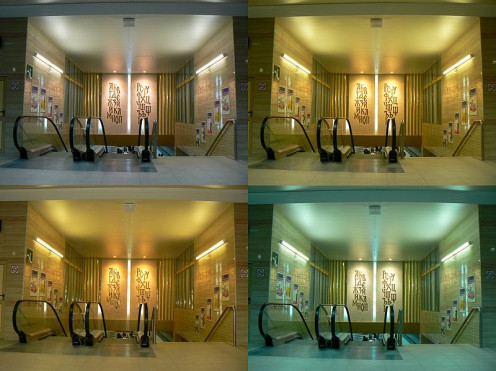
The image illustrates the differences in the white balance setting. Up left: auto WB, up right: sun, down left: flash, down right: wolfram bulb

However, if you are unable or not really sure how to set the white balance correctly or if you set it too high or too low thus casting a color tint on the image Photoshop and many other digital editing software programs can easily change it back to what it was supposed to be in the first place.
It is best to always do any corrections in camera but it is great to be able to fix any errors with a digital program.
I have included three videos to show how to do this as well as explaining what white balance really is.
Another way to compensate when you cannot set the white balance correctly is to bracket your shots. Bracketing is a technique of taking several shots of the same subject or scene using different camera settings with each shot.
For example take one shot using a large f-stop, the consecutive shots using different f-stop in increments of one stop per shot.
The same can be done by varying the shutter speeds and increasing the speed with each additional shot or a combination of f-stop and shutter speeds.
"The photographer chooses to take one picture at a given exposure, one or more brighter, and one or more darker, in order to select the most satisfactory image." Wikipedia
You need to see various samples and read up on the technique before trying to bracket your shots so that you do not take unnecessary ones.
Series of images demonstrating a 3 image focus bracket. Notice how sharp the details get

Knowing how to properly set the white balance in your digital camera (DSLR) is one of the keys to be able to turn out great looking images no matter what light conditions you are faced with.
And knowing how white balance/color correction works can also lead to you experiment for more creative results. It is all up to you and how creative you want to be.
Maybe you may want to purposely increase the yellowish tint or accentuate a bluish tint. Try different alternatives and combinations. Bending the rules sometimes produces the best results!
- White balance explained: how cameras correct the color of different types of light | Digital Camera
White balance explained: in this tutorial we illustrate how white balance works and how to fine-tune your settings for accurate colors.
© 2015 Luis E Gonzalez