How to Fix Broken Cassette Tapes
Welcome!
Thanks for visiting my lens on repairing broken cassette tapes. I must admit, I had concerns about the number of people who'd actually know what a cassette tape was, but I thought it would be a worthwhile endeavor nonetheless. Hopefully you'll find the information here useful and entertaining.
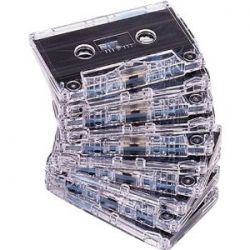
(Photo source: Amazon.com)
What's a Cassette Tape?
How the mightty have fallen. Once the dominant format for the music industry, cassette tapes are for the most part considered relics now, with few people under the age of 25 even knowing what they are. (The one exception to this might be in the dictation niche, where many still use microcassettes, but that is not likely to last in the current age of all things digital.) For the uninitiated, a cassette tape - sometimes referred to simply as a "cassette" or "tape" - is a sound recording made and preserved on magnetic tape. This tape is housed in a plastic frame (the cassette), wherein it is wound between two spools or reels.
Broken Cassette Tape Repair, Part I
For those who made a habit of collecting cassettes in their heyday (which was just about everyone back then), you may well discover that Father Time - in addition to ordinary wear-and-tear - has sucked some of the pizzazz out of your tapes. In short, sooner or later you will find that the actual audiotape in your cassette has snapped, so that now you can no longer listen to the music recorded on it. However, there is a simple solution for this dilemma. It's not perfect - few things in life are - but it will exponentially enhance your ability to continue to enjoying music via cassette. To conduct the fix I'm suggesting, you'll need the following tools: tweezers, scotch tape and scissors.
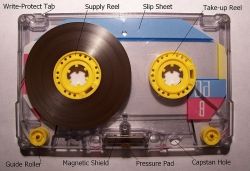
First of all, per the diagram on this lens, the cassette has an open end, and also has a central opening where the pressure pad is located. (The pressure pad is a small piece of cloth-like material.) This is the area where the recording tape is actually visible and accessible, and also the spot where - if you're lucky - the break in the tape usually occurs. (See Part II of this Lens below to find out what needs to happen if you get an unlucky break.) If that is the case, you should see the two snapped ends of the tape near this region of the cassette. Using tweezers, pull roughly half an inch of tape on each side of the two snapped portions through the center opening of the cassette where the pressure pad sits. (You can pull out a little bit more of the tape if necessary, but you really don't need much to work with.)
Binding the Snapped Recording Tape (Part I, Cont.)
Pull the two snapped tape-ends towards one another, and bind them together using a small piece of scotch tape. In my opinion, the easiest way to do this is to just bring the two broken ends together and simply fold the tape over them. (For those having trouble visualizing this, try to imagine the scotch tape as a slice of bread, which you are folding over into a half-sandwich. (Think of recording tape as the meat.)
When you fold it over, do no tbe surprised if the scotch tape is wider than the recording tape. This is fine; using a pair of scissors, simply cut off the excess scotch tape on either side, effectively making the recording tape and the scotch tape roughly the same width. With respect to the length of the scotch tape, your objective is to make it as short as possible. Why? Because the scotch tape is actually covering up part of the recording tape, with the effect being that no audible music will be heard on any portion of the recording tape that is so covered. (Not to mention the fcat that scotch tape, being less flexible than the recording tape, can interfere with cassette's playback ability if too much of it is applied.) Lastly, you should turn one of the spools - the spoked wheels on the cassette - until the recording tape is returned to its customary playing position. Congrats! The cassette tape is now repaired and you can enjoy your music once again. FYI: Because of the presence of the scotch tape, there will be a minute "dead" area of sound when any cassette player gets to that portion of the recording tape. As previously noted, it's a workable solution, not a perfect one, but it should extend the life of your cassette tapes for a bit.
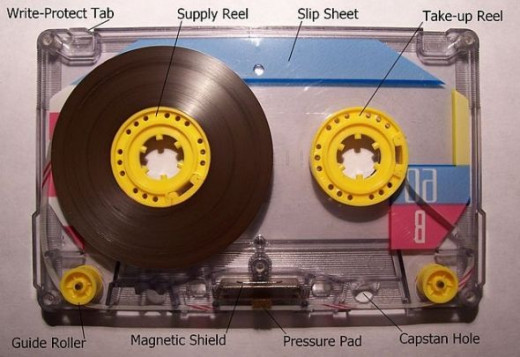
Cassette Interior and Parts - (Source: Wikipedia; Author: Mathwiz593)
Broken Cassette Tape Repair, Part II
If you're unlucky, you may find that one of the recording tape's broken ends is actually wound around its respective spool in the cassette's interior. (If you're a particularly unlucky individual, it may be that both ends are wrapped around their respective spools.) In this scenario, you can not access the recording tape externally so you will have to open up the cassette in order to get to it. To do so, you will need a phillips screwdriver (small head) in addition to the previous items required for cassette tape repair.
First of foremost, a cursory examination of the tape will reveal that the cassette case itself is actually comprised of two mirrored halves. Moreover, four tiny screws in the corners of the cassette actually hold these halves together. Lay the cassette case down on a flat, stable surface such that the the four screws are actually facing up. Taking as much care as possible, remove the screws. (As always, when dealing with screws, please note specifically where you place them, as they are quite small and can vanish with ease.) As the screws come out, you may notice the two halves of the cassette separating of their own accord. This is fine. If they don't separate, you may have to apply a little elbow grease. Irrespective of how it happens, you need to take great care in separating the two halves of the cassette case. Setting the top half of the cassette to the side; you should now have a birdseye view of the cassette interior, per the image above.
With respect to the interior, you are solely concerned with the two spools in the middle of the cassette (each of which is expected to have some quantity of recording tape wrapped around it) and the two rollers that reside in the corners near the open end of the cassette (there should be one in close proximity to each spool). Inspecting the recording tape on the two spools, locate the two broken ends. This should be fairly straightforward in that the broken ends usually slant out and away from the spool. We come now to the problematic part of this equation, and all of the care and concern you've exerted up until this moment in time was to prevent one specific event from occurring:
Important!
You absolutely, positively do not, under any circumstances or for any reason whatsoever, want the recording tape to begin unraveling on either spool. If it does, they will hold the Summer Olympis in Antarctica before you ever get it wrapped perfectly back around the spool again. It just can't be done. (That's different from saying that you'll never get it wrapped around the spool again, or that the cassette's playing days are over. It's just a monstrous and herculean task, and - as previously stated - you'll never get it wrapped back around the spool perfectly again.)
Reconnecting the Snapped Recording Tape (Part II, Cont.)
Making use of the tweezers, if necessary, guide the broken ends of the recording tape and around their respective rollers and towards the center of what will be the open end of the cassette case - near the pressure pad - when the two cassette halves are reconnected. As with the prior instructions, you'll need maybe half an inch of recording tape to work with on each side of the broken tape. Make certain that this length of tape is accessible through the center opening. Carefully rejoin the two halves of the cassette case and screw them together again.
From this juncture forward, simply follow the same directions noted above in Part I: Bring the two broken ends towards one another and tape them with the scotch tape. Trim away any excess scotch tape extending beyond the width of the recording tape, and you're done (except for turnng the spoked wheel on the spools to put the recording tape back into its standard playing position). As stated in Part I, you can anticipate there being a small "dead" area of sound when the portion with the scotch tape is fed through a cassette player. Still, you'll have your music cassette back in playing condition, which is better than it was before. Moreover, you can apply this same repair concept to fixing 8-track tapes.


