DIY Baby Leggings – Create Great Baby Fashion at Home
Creating DIY clothing for a baby is a great way to practice sewing and craft skills, and it could even be an opening to a small home-based income. Parents who learn how to make baby leggings will have complete freedom over the materials that they choose and will be able to create leggings that might not otherwise be available on the market. DIY baby leggings can also be the perfect way to save some money on buying baby clothes, and it’s perfect for any parent who is seeing that their expensive sewing machine is not being put to good use.
These simple instructions will help any parent to create leggings from an existing pair of store-bought leggings, or a commercial pattern may be used if there’s one available.
Getting Started – Materials and Equipment
If you don't have a pattern, you can use a pair of existing leggings to use as the base guide/pattern.
Materials
- Fat Quarter Fabric of choice, For babies up to 6 months
- 12" 2" Elastic, For the waist
- Sewing Scissors
- A bunch Pins/Clips
- Sewing Machine
- Thread, To match fabric
- Cutting Mat
Creating DIY Baby Leggings
These steps should be followed carefully and slowly until you feel confident. As you make more leggings, the process will become simpler and will require less time.
Instructions
- Lay out the chosen leggings material on a cutting board or solid surface. Take the pattern pants and turn them inside out, and then lay them on top of your fabric. You can use pins to loosely secure the leggings to the material. Taking sewing scissors, cut around the pants, following the shape closely. Leave 1” for the bottom hem of the legs, and at least 2.5” for the waist area. The amount of material left for the waist area will depend on the size of the elastic that you use. Then leave up to ½” for the seams around the edges. (Excess on the seams can later be removed.) Follow this step for two pieces of material.
- Take the two pieces of material and turn them outside in. Fold over the leg opening hem, as well as around the belt. Use pins around the edges of the material to hold everything together. Using a sewing machine, stitch all seams. Remember to leave the legs open, as well as the top where the elastic will be inserted. A zig zag pattern on a sewing machine is best for sewing the seams. Sewing machines with advanced patterns can be used to create stronger seams that will resist fraying or tearing.
- Fold the hems at the bottom of the legs, and sew them secure. The leggings will start to take shape now, and the only step left is to insert the elastic band and perform some finishing touches.
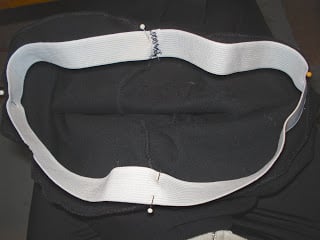
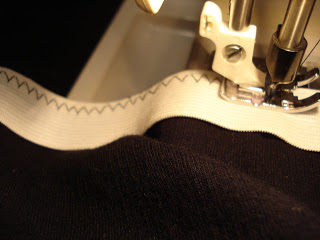
- The extra material around the waist can be folded over a piece of 2” thick elastic band. The band will need to be measured to the baby’s waist, with an additional 1” of allowance. When measuring around the baby’s waist, the elastic should be pulled slightly to ensure that the fit is snug, but not so tight that it would cause discomfort. When the elastic is measured and cut, use 1” of overlap and sew the elastic together so that it is one continuous belt. This can now be placed around the top of the leggings, with the additional material folded over and then sewn into place.
- The leggings are now completed, with just some finishing cutting required. Check all seams and ensure that they are complete, and check the quality of the hem and the elastic waist. Excess material on the inside of the seams can be cut, while being careful not to get to close to the stitching. The leggings can now be turned inside out to reveal a complete pair of DIY baby leggings.
Tips for Creating a Perfect Pair of DIY Baby Leggings
There is a moderate skill level required for these leggings, and it’s a great step up for anyone who has previously created simple items like bibs, reusable wipes, or even a baby’s hooded towel. The pants may not be entirely symmetrical the first time, but this is something that will improve with practice. It’s important to ensure that the pattern is cut as accurately as possible and that seams are sewn an even distance from the edge of the material. This will help to ensure symmetry and prevent the leggings from fitting oddly on a baby.
If you don't have any leggings already, borrow a pair from a friend to use as a pattern, even popular ‘slouch’ leggings which can give a baby additional mobility and a looser fit. The great thing about these leggings is that a basic pattern guide can be used to create leggings of all sizes, allowing parents or friends of the family to create DIY baby leggings that are the perfect fit, even as the baby grows through their first year, and into their toddler
years. The best material is a pure cotton or a cotton polyester blend. Polyester is less breathable but it has
some elastic quality that can give the leggings a little stretchiness.
A Rewarding Project That Any Parent Can Try
This is a great project to save some money and create unique clothing with fun materials, knowing how to make baby leggings is a skill that any parent with a sewing machine should learn. Like most DIY projects, proficiency builds with time, and creating attractive store-quality DIY baby leggings will become second nature after just a few completed projects.

