DIY Burp Cloths for Your Baby

Baby burps and dribbles are easily wiped away when you have a burp cloth on hand and one thing that I have found is that it’s super simple to make your own DIY burp cloths from basic materials that you might already have at home.
If you have a sewing machine and are looking for your next project, then this is one that I highly recommend. Once comfortable with the technique, the process only takes a few minutes of preparation and sewing, and once you complete your first pattern it will become easy to make cloths from scrap fabric and specialty fabric in the future.
Creating DIY burp cloths at home is not only a rewarding project, but it’s also one that saves money.
Materials and Tools for DIY Burp Cloths
- Sewing machine, with basic stitching patterns
- Sewing/fabric scissors
- Standard sewing pins or clips
- Cotton fabric of your choice, (Should be thick and strong)
- Terry cloth or a bath towel, (Absorbency is key)
Creating a Pattern
I have found a few different DIY methods for creating baby burp cloths and through trial and error, it became clear that not every instruction set is completely helpful. Too many of them were rigid and had an excessive number of steps, and I believe this should be a fun project that any parent can start, even with only basic skills in sewing.
The first step is to get a pattern sorted, or at least have a basic idea of what you’re trying to achieve. You won’t need a traditional sewing pattern, because DIY burp cloths will be made from half of a fat quarter of fabric (9” x 11”).
Steps: Assembling and Sewing DIY Burp Cloths
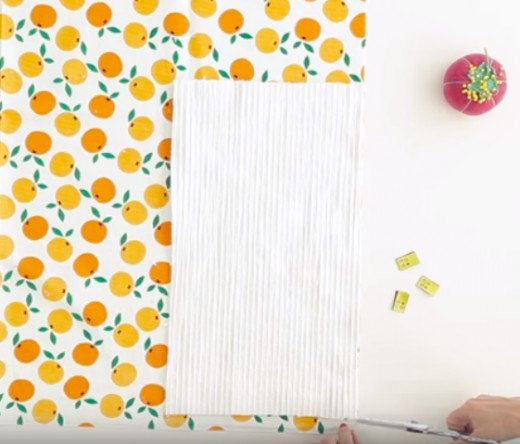
- Take one fat quarter of fabric with a design of choice, and cut it in half to create two even rectangles.
- Use the fabric as a guide to cut a piece of terry cloth or towel to the same size.
- For the next step, the terry cloth and towel will be placed together, with the right sides facing inwards. Taking sewing pins or clips, it’s now time to clip all of the edges together. Leave one end unclipped, as this will be used for turning the fabric around the right way.
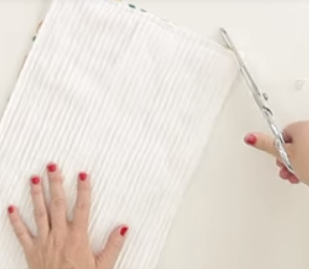
- If there are excessive differences between the two pieces of fabric, these can be trimmed before clipping or pinning. (I also like to cut along the edges diagonally, which I find allows for better seams and a better overall look on the burp cloth. This extra step is entirely optional, and experimentation is recommended to find the best method.)
- When the fabric is all pinned together or clipped, turn the material so that it is the right side out. I like to iron the material at this stage, to ensure that it is nicely smoothed before sewing. Iron the fabric on a hot dry setting for this step. During this step, fold the open end inwards, and iron over it, before applying pins or clips to keep the fabric held together.
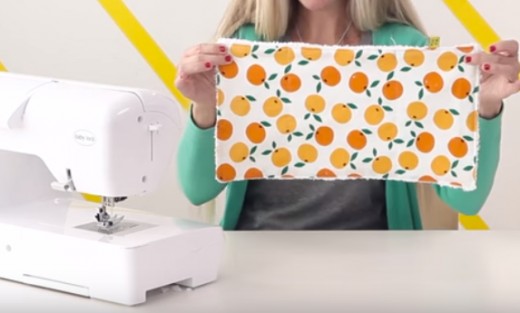
- The seams can now all be sewn together. I found that a close zig-zag pattern is the best for securing the edges. Each sewing machine is different, so you’ll need to work with what is available.
- With everything sewn together, your DIY burp cloth will be complete!
An Easy Process That Allows for Creativity
I’ve discussed creating a burp cloth in a standard rectangular pattern, but the truth is that you can make a cloth out of virtually any type of cotton and towel that you have at home. If you have some leftover cuts from other projects, you don’t need to stick to a basic rectangle. Circular designs will work well, and you could even create your own star patterns, squares, or anything that you like. It can be fun to cut out material in the shape of a teddy bear head, or you could even make football inspired burp cloths if your baby is the latest member of a sports-mad family. The point is that you are creative and because this is such a simple project where the only real work is cutting, pinning,
and sewing the material, it means that any kind of experimentation will not take up too much of your time, and the material that you use will be minimal.
This Project is the Most Environmentally Friendly Way to Have Burp Cloths at Home
I don’t believe that it should cost a fortune to raise a baby, and it’s much better to save money for more important purchases like clothing, medicine, and other baby products that you can’t make at home. Creating your own DIY burp cloths is not only a fun and rewarding project, but it’s also kinder to the environment. You won’t need to rely on cloth that is made in a factory, and then shipped thousands of miles to your home, and you’ll know the exact materials that have gone into your new burp cloths. If you’re worried about contaminants that can end up on commercially processed baby items, then making cloths at home will provide you with peace of mind. Perhaps even more importantly, creating at home is more affordable, and I’ve definitely noticed a difference. Buying material is inexpensive and you can even use leftover material that you have around the home. You could create ten or more cloths with purchased material, and it would still be more affordable than buying a pack of two or three cloths from a store or online.
Get Started with the Easiest Baby DIY Project
This is the best project to get started on if you want to make things for your baby, or even if you want to give gifts to friends and family who have babies. I’ve become an expert at making my own DIY burp cloths, and with these simple instructions and a little practice, you’ll be easily making your next cloths at home, and it could be a gateway to many other successful DIY projects in the future.


