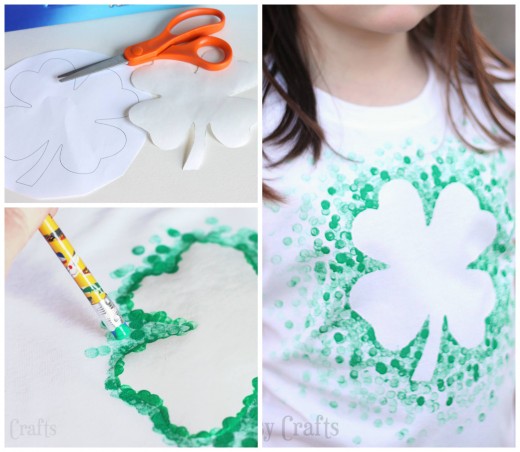
Paper plate with fabric paint ready for the eraser stamp shirt craft! | Source
Cardboard is placed inside the Tshirt to make sure that the paint doesn't go through to the other side of the shirt. | Source
Bat design which is perfect for Halloweeen | Source
WHAT YOU NEED:
T-Shirt- White and other light colors work the best
Fabric Paints
Scissors
Paper
A shape or design in mind
Pencil
Piece of cardboard that is bigger than your design
INSTRUCTIONS
Lay your T-Shirt out on a clean table top.Place the piece of cardboard on the inside of the shirt. This is important. It helps the paint not seep through the front part of the shirt to the other side.
After you have decided on a design or shape, draw it on a piece of paper the cut it out.
Put the fabric paint in medium size piles on a paper plate. Then you can put the eraser of the pencil in the paint.Make sure it is coated, but not dripping.
Place the dots of paint using the paint along the outside of the shape that you chose.
To give your shirt a more fun look, try using multiple colors. A rainbow effect would probly turn out super awesome looking.
After you are down put it up away from anything that may mess it up, and let dry.
Before washing it. Wear it for the day like normal. Then put it in the dryer for 15-20 mins before washing it. This helps the paint set in even more.
Enjoy
2.) Recycle Comic Books To Make A New Container For Your Kids Action Figures
Click thumbnail to view full-size
Source
Source
Showing the process of making the comic tin can craft | Source
This is a super fun and quick craft for both parent and child.
WHAT YOU NEED
Comic Books- You can go with the new bright comic books or the old faded ones. It really depends on the color you want to go with.
Scissors
Modge Podge- Matte or Glossy work fine.
Tin/Container
STEPS
Choose which pages of the comic book that you are planning on putting on the Tin/Container.
Use piece of scratch paper to measure out the shape of the container. You are going to use this to cut the actual comic book. You dont want to mess up the page in the process.
Put scratch paper with measurements on top of the comic book and cut about 2 cm below it. This gives it enough space for you to place it on the tin/container.
Using a paintbrush, put the modge podge or glue on the back of the comic page. Its better to do on the back of the actual page rather than the tin/container because you are less likely to rip the paper from adding too much. This often happens because it gets too heavy.
Place the picture on the container or tin. Gently press the page against it to make sure its stuck in place. You dont want it going anywhere, and you dont want any bubbles forming.
After its dry enough, you can use the paint brush to put the modge podge on the front of the paper. You need to make sure you do it completely bottom to top. This will make sure that it will stay attached to the tin/container. Otherwise the page might decide to peel off in the not to distant future.
As long as you have done all of the above right, you should be set.
Let dry and enjoy.
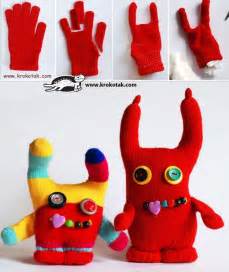
3.) Super Cute Glove Monsters
Click thumbnail to view full-size
Source
Source
Source
WHAT YOU NEED:
Gloves
Buttons
Felt
Glue
Stuffing
Thread & Needle
Scissors
INSTRUCTIONS:
Turn the glove inside out
Mark where you are planning on sewing
Decide how many legs you want your monster to have. Or if like in the above photo, your monster can have horns. If this is the case, then cut the two middle fingers of the glove off. Most of the monsters I have seen only have 4 legs. If you want the same, then you are going to need to cut off the thumb of the glove and sew the opening back up before moving on to the next step.
Next you will stuff the glove with the stuffing.
After stuffing, turn the cuff of the glove inwards inside the glove. Now you can sew the opening where the stuffing went, shut.
Try not to overstuff your glove.A fat monster may seem like a "cute" idea, but it also is more likely to be torn open out of nowhere.
Now its time to start adding on the felt pieces and buttons to make up the face. If you have not cut the felt into shapes yet, do this first.
Make sure to cut out a few circles for the eyes. White, yellow and lime green are good colors for the monsters "white of the eyes". Then you can sew on the buttons to finish the eyes. You also should use white felt for the teeth and some pink felt for the mouth.
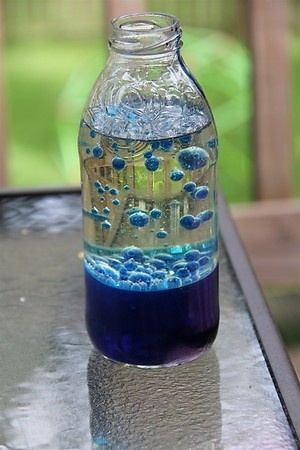
4.) Homemade Lava Lamp
Click thumbnail to view full-size
Source
Homemade lava lamp using a more sturdy plastic water bottle | Source
Homemade lava lamp using red food coloring instead of the usual blue | Source
WHAT YOU NEED:
Empty Plastic Water Bottle or Glass Bottle-If you are looking for something that looks more expensive, then steer clear of thin plastic water bottles.
Food Coloring
Cooking Oil
Water
Alka Seltzer Tablets
INSTRUCTIONS:
Fill the bottle 2/3 with the cooking oil. Pour water the rest of the way. Leave 1" open from the top. You an also do it the other way around. If you do the water first then the oil, you will be able to watch everything separate but you will have to wait for it separate completely before moving onto the next step.
Add several drops of the food coloring into the bottle.
Break the Alka-Seltzer into four pieces.
Add one of the pieces into the bottle and you can watch the lava lamp in action. You will need to put a tablet into the lava lamp everytime you want to watch it "do its thing".
5.) DIY Skee Ball
Click thumbnail to view full-size
Skee ball game made out entirely of cardboard boxes and duct tape. | Source
The cans to use for your skee ball game | Source
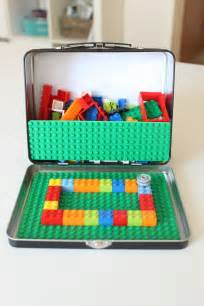
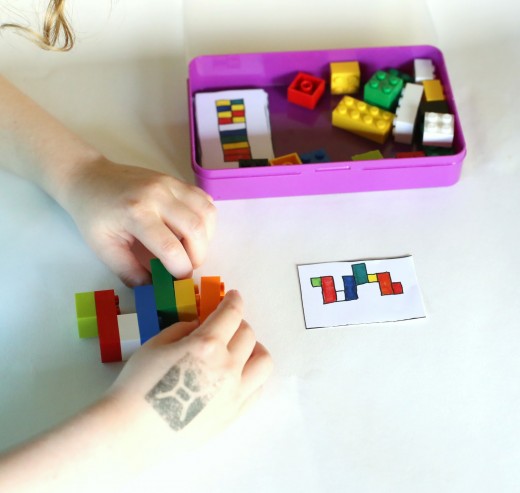
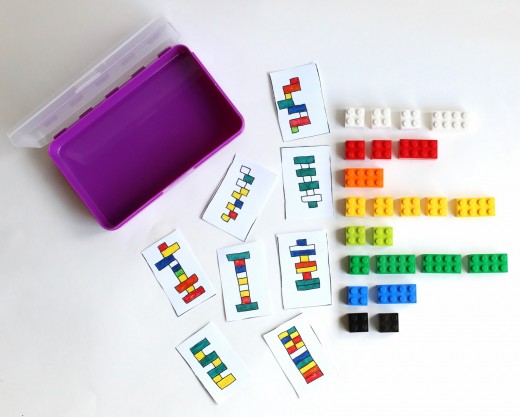
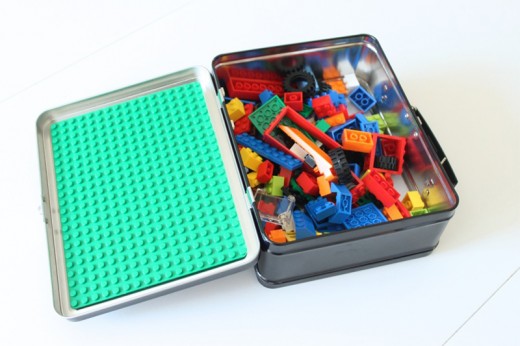
6.) Portable Lego Kit
Click thumbnail to view full-size
Source
Source
Source
Source
WHAT YOU NEED:
Container you plan on using for project
Legos
Super Glue
Index Cards
Markers
INSTRUCTIONS
Measure the lid of the container you are going to be using.Make sure that it matches up with the measurements of the large green lego piece.
Use the super glue to glue the green lego to the lid of the container. Let sit for a lil while.
Use markers to draw "lego goals" on the index cards. This helps your child by them looking at the photo and mimicking the drawing. You can also give do some sort of point system for each correct lego creation.
Now you are ready to get on the road with your lego kit! Have fun.
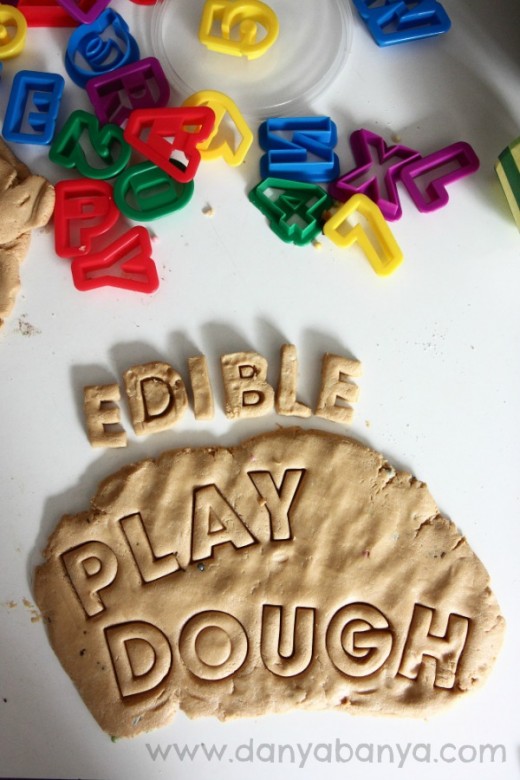
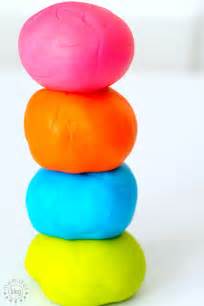
7.) Incredible Edible Playdough
Click thumbnail to view full-size
Source
Source
Source
WHAT YOU NEED:
Package of Jello or Kool Aid Mix- You can choose any, just make sure its unsweetened.
Flour
Water
Salt
Cream Of Tartar
Cooking Oil
Large Sauce Pan
Tupperware Container
Measuring Cup and Measuring Spoon
RECIPE:
1 cup Flour
1 cup Water
1/4 cup of salt
3 teaspoons of Cream of Tartar
1 Package of Jello or Koolaid mix
1 Tablespoon cooking oil
INSTRUCTIONS:
Mix the dry ingredients into the large saucepan
Add the water slowly
Then stir over medium heat until the dough thickens
Put it on a surface that an handle the heat
Once cooled a bit, knead until it is at a temp to where your child is able to play with it.
You can put the edible playdough in a tupperware container and it should be able to stay fresh for about 6 months!
As a user in the EEA, your approval is needed on a few things. To provide a better website experience, hubpages.com uses cookies (and other similar technologies) and may collect, process, and share personal data. Please choose which areas of our service you consent to our doing so.
This is used to provide data on traffic to our website, all personally identifyable data is anonymized. (Privacy Policy)
HubPages Traffic Pixel
This is used to collect data on traffic to articles and other pages on our site. Unless you are signed in to a HubPages account, all personally identifiable information is anonymized.
Amazon Web Services
This is a cloud services platform that we used to host our service. (Privacy Policy)
Cloudflare
This is a cloud CDN service that we use to efficiently deliver files required for our service to operate such as javascript, cascading style sheets, images, and videos. (Privacy Policy)
Google Hosted Libraries
Javascript software libraries such as jQuery are loaded at endpoints on the googleapis.com or gstatic.com domains, for performance and efficiency reasons. (Privacy Policy)
Features
Google Custom Search
This is feature allows you to search the site. (Privacy Policy)
Google Maps
Some articles have Google Maps embedded in them. (Privacy Policy)
Google Charts
This is used to display charts and graphs on articles and the author center. (Privacy Policy)
Google AdSense Host API
This service allows you to sign up for or associate a Google AdSense account with HubPages, so that you can earn money from ads on your articles. No data is shared unless you engage with this feature. (Privacy Policy)
Google YouTube
Some articles have YouTube videos embedded in them. (Privacy Policy)
Vimeo
Some articles have Vimeo videos embedded in them. (Privacy Policy)
Paypal
This is used for a registered author who enrolls in the HubPages Earnings program and requests to be paid via PayPal. No data is shared with Paypal unless you engage with this feature. (Privacy Policy)
Facebook Login
You can use this to streamline signing up for, or signing in to your Hubpages account. No data is shared with Facebook unless you engage with this feature. (Privacy Policy)
Maven
This supports the Maven widget and search functionality. (Privacy Policy)
We partner with Say Media to deliver ad campaigns on our sites. (Privacy Policy)
Remarketing Pixels
We may use remarketing pixels from advertising networks such as Google AdWords, Bing Ads, and Facebook in order to advertise the HubPages Service to people that have visited our sites.
Conversion Tracking Pixels
We may use conversion tracking pixels from advertising networks such as Google AdWords, Bing Ads, and Facebook in order to identify when an advertisement has successfully resulted in the desired action, such as signing up for the HubPages Service or publishing an article on the HubPages Service.
Statistics
Author Google Analytics
This is used to provide traffic data and reports to the authors of articles on the HubPages Service. (Privacy Policy)
Comscore
ComScore is a media measurement and analytics company providing marketing data and analytics to enterprises, media and advertising agencies, and publishers. Non-consent will result in ComScore only processing obfuscated personal data. (Privacy Policy)
Amazon Tracking Pixel
Some articles display amazon products as part of the Amazon Affiliate program, this pixel provides traffic statistics for those products (Privacy Policy)
Clicksco
This is a data management platform studying reader behavior (Privacy Policy)