Canning Green Beans

Preserving summer and fall's bounty has always been a family tradition. I remember my Grandmother canning beans and now my Mother and myself canning beans. We never freeze them as they lose their texture, even though I have bought frozen green beans (don't tell my Mother) to use in stir fry or soup.
Supplies you will need:
Beans
Salt
Water
Colander
Jars
Lids and Bands (Ball Brand, family choice)
Large stock or canning pot (large enough to hold five jars)
A couple of hours
Here's what you do:
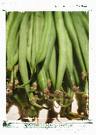
Pick the beans
Snap the beans
Wash and dry the beans
Wash (sterilize) and dry your jars and lid bands
Pack the jars with beans
Add a pinch of salt to each jar
Add enough water to cover the beans
Wipe the mouth of jar with a clean paper towel so the lids will adhere
Add the jar lid (Ball brand) and the band
Screw the band on loosely (not tight, you will see why later)
Place the jars in a large canning pot, the jars should not be touching
Add water to the pot just to midway of the jars
Cook or process on med-high until the water in the pot boils
Turn the burner to medium and process until the water bubbles inside of the jar
Cook or process for another five to seven minutes and turn the heat off
Let the jars sit in the water until cool enough to handle and lids are sealed

Detailed instructions:
If you are lucky enough to have a garden, great! You can pick your own fresh beans. If not, the Farmers Market is the best choice since their produce is usually fresh, picked that day or at worst the day before. Otherwise, really fresh, blemish free beans from the grocery will work.
Once you have your beans, they need to be snapped. This can be done by snapping the stem end and the tale end off of the bean or you can cut them. Which ever is easiest. We always had a bean snapping contest at our house. My Grandmother would say, "Let's see who can snap the most beans the fastest!"
Now that all of your beans are snapped, they are ready to be "picked over" and washed. This is when you remove any parts of the bean that are blemished or trash the whole bean. At this point some folks go ahead and snap the bean into bite size pieces, if desired or leave whole. I guess it depends on how you plan to use them later. Wash then really well with cool water and dry with clean, lint free tea towels.
While your beans are draining/drying you now need to wash and dry your jars. Before dishwashers, my Grandmother always sterilized her jars in the same big pot the beans would process in later. She did this by filling the jars with water and putting them in a water bath, boiled the water and jars for a few minutes. But today, I put them in the dishwasher, alone and run through the quick cycle. Now, if your hands can stand it, you can hand wash in nearly boiling water. This way is really quicker.
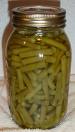
Ok, now you are ready to "pack your jars". Once all is clean and dry, start adding your beans to the jars and really pay attention to how the beans fall into the jars. Strategically placing the beans in jars will give you a large yield when you are ready to cook them later and look nicer in the jar. You know, if you plan to show them off, do it well. Be sure to leave a little "head room" in your jar, maybe a ¼ inch at the top, the beans and water will expand some during the cooking process and once preserved the beans on top will turn a dark color if you do not have them fully covered with water. So, leave a little room. Now that the beans are in the jar, add a pinch of salt, nature's own preservative, and add water enough to cover the beans. Wipe your jar mouth with a clean paper towel or lint free cloth and add the Ball lid (other brands don't seem to consistently seal. Pretty much hit or miss. Go with the Ball brand). This ensures the lid will seal completely. Any debris on the jar mouth can ruin the entire jar of beans. Add the band and screw on lightly allowing the lid to contract and expand during processing. If you screw the lid on too tightly, the jar can explode during the process.
Have your stock or canning pot ready on the stove. Gingerly add the jars to the pot leaving "wiggle" room between each jar. (My pot will only hold five quart size jars or six pint size jars.) Add your water midway of the jars and I always weave a tea towel between the jars so they don't clank together and possibly break. Set your burner to med-high until the water in the pot boils and then reduce to medium. Cook until the water inside of jars bubbles. Process for five to seven minutes longer and turn off the burner.
By now, some of you lids should have made a popping sound, this is good, meaning the jar lid has sealed. Sometimes you have to press lightly on the lid and it will seal. All lids should be sealed by the time the jars are cool enough to handle.
Should you have any jars that do not seal, eat them that day or the very next day. These beans are not preserved, but are still ok to eat in the immediate future.
These preserved beans will keep nearly forever as long as the lids are still sealed, they don't expire. I have a friend whose Mother has beans from 1996; they are as green as the beans I canned yesterday.