How to Brew a Pour Over Coffee

How to Brew a Pour Over
If you are a coffee neophyte, you might not know what a pour over is. Pour over coffee is as the name implies, you take your ground coffee and pour hot water over it through a filter to get coffee. It is most similar to a traditional automatic drip coffee machine, but the key difference being that it is done manually. This ensures the most even extraction of coffee from the beans, as many automatic coffee makers will run water through the same portion of the beans, giving an over extracted bitter coffee.Learning to do a pour over is probably one of the easiest ways for someone who is getting interested in craft coffee to make café quality coffee from the comfort of their own home. You don’t need a several thousand-dollar espresso machine or coffee grinder, but you do need some tools.

What tools I recommend
For todays guide, I will be using coffee beans from Happy Mug Coffee. I order whole beans and grind them myself with my previously reviewed LIDO 3 hand grinder. You can get your coffee pre-ground, or if you bought whole beans you can have a local café grind them for you, but I recommend grinding it yourself for the best possible flavor. Much like a spice, much of the flavor is lost over time immediately after grinding.
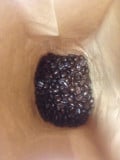
Our coffee grounds blooming with just a little bit of water added.The pour over brewer that I will be using is my Chemex, which I reviewed previously as well. It is excellent for making larger batches of pour over. You will need special Chemex filters if you are using it, for other methods, regular cone filters from the grocery store will work, but I recommend bleached ones, as unbleached or natural filters impart a cardboard taste to the coffee.
You will need a gooseneck kettle for most pour over methods, which you can acquire on Amazon for pretty cheap. I’m using the Hario 1.2 Liter Gooseneck kettle, which is of excellent quality and one I would definitely recommend.
Lastly, you will need a kitchen scale that can weigh in grams, preferably tenths of a gram. This is important for two reasons. First, you need to be able to weigh your coffee beans before grinding. Having a consistent cup of coffee means weighing as opposed to unreliable volumetric measurements, which are often inconsistent. The second reason you need a scale is that as you are brewing, you will place the whole brewer on a scale to measure how much water you are adding in milliliters. These are relatively inexpensive and incredibly useful in the kitchen. I use mine for baking as well and it drastically improved the quality of my baked goods.
Boil your water
At this point, you will want to begin boiling your water on your gooseneck kettle. I recommend letting it come to a full boil, and then letting it rest for a minute before use. You don’t want it too hot, as this can result in bitter coffee, or too cold as this will result in sour coffee. They make electric kettles that brew to a specific temperature which can be incredibly useful. I recommend aiming for 204 degrees Fahrenheit.
Prepare your filter
You will want to prewet your filter with some boiling water. This serves two purposes, one it heats the brewing vessel so the water doesn’t cool as it hits it. Secondly, it will rinse away paper taste from the filter. Dispose of this water, then add the beans.
Bloom the beans
For this next step, if you are brewing fresh coffee, as you add water you will notice it bubble up. This is because fresh coffee beans will emit carbon dioxide when you add hot water, so add a little water (50ml or so), wait 30 seconds, then resume pouring.
Pour in concentric circles
You will want to brew in concentric circles ensuring you are evenly pouring the water. This is where it is important to measure your brewer as you are going so you can see how much water you are adding. 1 gram of water = 1 mL of water, so if you are using 20 grams of coffee at a ratio of 1:15 coffee/water, you should tare your brewer and add 300 grams or milliliters of water.
Draw down phase
At this point, it should take another minute and a half or so for the water to finish flowing through the filter. Your total brew time should be around four minutes with a Chemex. Take note of the time so you can adjust your grind size on your beans for the next time you brew.