How to Grow Your Own Nutritious and Delicious Sprouts

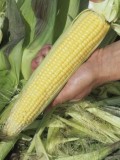
Radish Sprouts
Sprouts - The Perfect Food
One of the easiest and most satisfying gardening projects also results in one of the most nutritious of foods: freshly sprouted seeds or beans. A sprout is simply a baby plant, filled with concentrated vitamins, enzymes and antioxidants inherent in the seed from which it arises, but in a much easier to digest and tastier package.
To add to the fun, any seed you can imagine can be turned into a sprout, although some are easier to grow, taste better or are packed with more nutrients than others. Some are delicate (alfalfa), some chewy (mung bean), some spicy (radish, clover, onion), but all are inexpensive and can turn even the narrowest windowsill into a mini garden from which you can harvest crops over and over again, all year round.
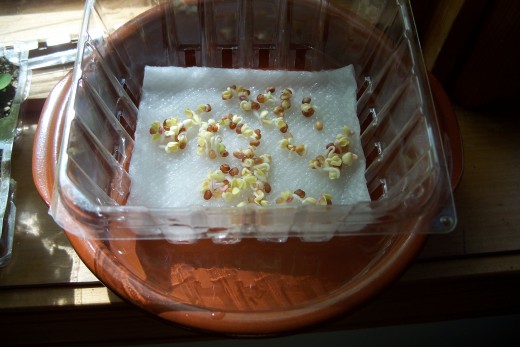
Start by spreading the seeds in your sprouter
How to Make Your Own Free Bean & Seed Sprouter
There are a vast multitude of sprouters sold, and yet you can get the best sprouter for free, by recycling the tiny plastic crates in which cherry and grape tomatoes are sold at your local grocery store. You want the kind that has open slits on the sides, bottom and lid.
Here’s how to grow the tastiest, freshest sprouts possible, in only a few brief days:
First, buy the seed you wish to sprout. I’ve provided links to several online sprout sources, but a garden center will have plenty of seeds and beans to try. I will be using the gorgeous, spicy and highly nutritious Rainbow Radish Sprout Mix from Park Seed to illustrate this article, which—along with their Mung Bean and Watercress Seeds—have become my favorite sprouting varieties. To start, I recommend smaller seeds (radish, watercress, alfalfa) because they mature more quickly than the larger ones (mung and adzuki beans, peas, lentils).
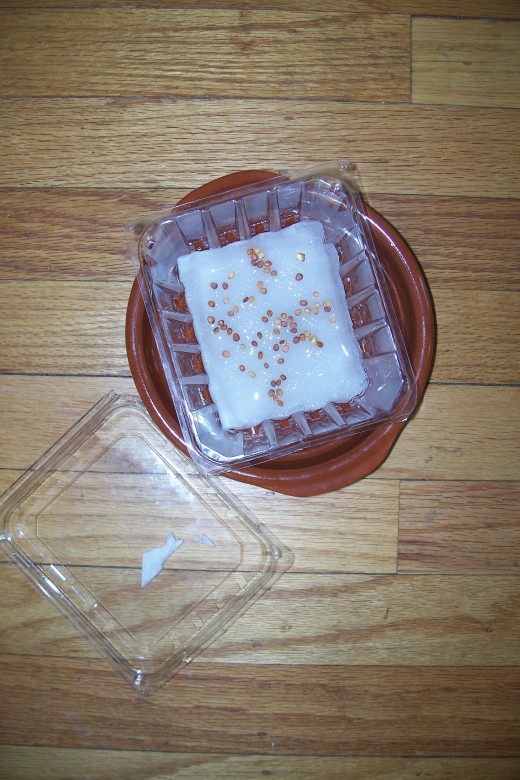
Empty the grape tomatoes from their small plastic crate. Soak the crate, top down, in warm water for an hour and then scrape as much off the label from the top as you can with a small knife or fingernail. Don’t worry if you can’t get it all off; the only reason to remove it is to let in more light for your baby sprouts. Fold a single paper towel so that it will fit, flat, in the bottom of the crate, which from now forward I will refer to as your “sprouter.”
Fun & Easy Windowsill Sprouting
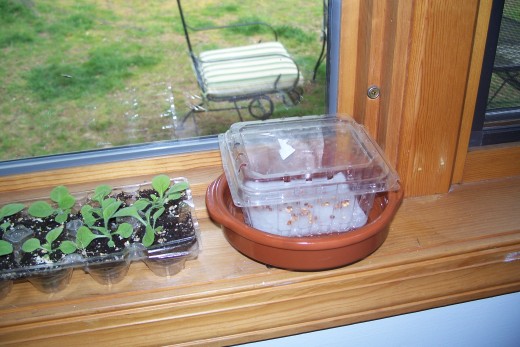
Find a shallow plate, dish or lid large enough for the sprouter to fit inside, but small enough to fit on a windowsill. Be creative—you may have a plastic leftover container lid that’s just the right size, for example, or a small candy dish. It only needs to be deep enough to hold a very small depth of water, only enough to keep the paper towel in the bottom of your sprouter moist.
Hold the bottom of your sprouter under the kitchen faucet and soak the paper towel thoroughly. Press it with a fingertip to force out most of the water. Add enough water to the dish under your sprouter to cover the bottom and put your sprouter in it.
Open the package of sprouting seeds; shake some out into the palm of your hand. Sprinkle the seeds on the wet paper towel at the bottom of your sprouter, spacing them as evenly as possible with a bit of space between them. (If you are sprouting lentils, adzuki beans, mung beans or any larger grain or bean, soak the seeds in plain water overnight before planting them in your sprouter. Remember that larger seeds will take longer to sprout but may actually reach perfect-for-eating size sooner than smaller seeds such as those of the radish family.)
Put the cover back on your sprouter and put it on your windowsill. A window that gets about a half a day of direct sun is best—either morning or afternoon, whichever you have. I have seen directions for sprouting that recommend keeping your sprouter in the dark, but I prefer to let the sun give my sprouts extra nutritional value and color.
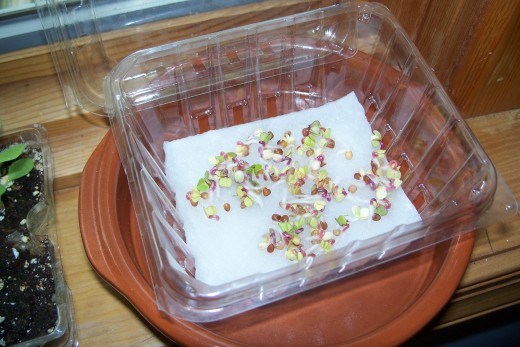
Day 2 - The Seeds Begin to Sprout
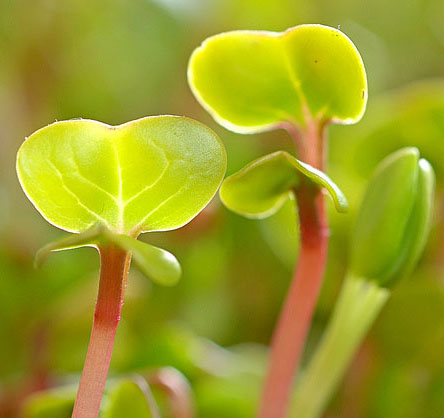
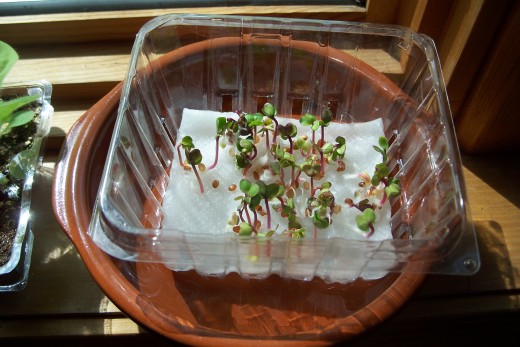
Day 4 - Little Radish Sprouts
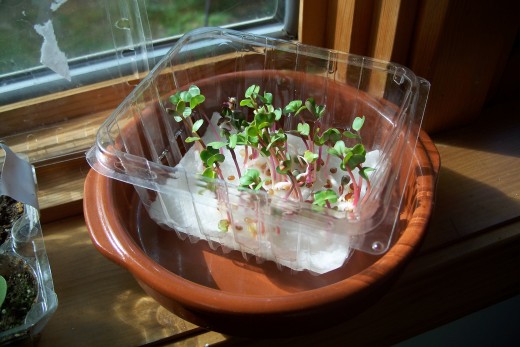
Day 6 - Growing Radish Sprouts
Online Sources for Sprouting Seeds
- The Grooviest Sprouting Seeds on Our Planet!
Welcome to Sproutpeople's Sprout Wonderland. Our site contains hundreds of pages of detailed sprout information and hundreds of sprouting seeds and supplies for sale. Sprouts, sprouts, sprouts, sprouts, sprouts. - Park Seed - A Great Source for Sprouting Seeds & Beans
Park Seeds is proud to offer the best selection of vegetable seeds and plants available anywhere. Whether you’re looking for hybrids, heirlooms, organics, or open-pollinated varieties, we have something special for you!
Watching Your Sprouts Grow!
Check the dish under your sprouter twice a day and add water as needed. Within twenty-four hours you will notice that the radish seeds have swollen, and some have begun to split open. By three days after you planted your sprouter the seeds will have little “tails” (their roots) and a protruding furled leaf. Radish seeds are ready to eat at any time, but are best when the baby plant is 1 ½” to 2” tall, standing up in your sprouter like a tiny forest.
Sprouts can be sprinkled over any salad, added to sandwiches or tossed into stir-fry just before serving. Your radish sprouts will taste like, well, like radishes, no surprise there, but the flavor is at the same time more intense and more delicate. I particularly enjoy radish sprouts with a classic Mexican ceviche appetizer made with wedges of avocado and marinated shrimp; I’ve added my recipe below.
Enjoy your sprouts; plant a new batch as soon as you have made your first harvest, using a fresh paper towel each time you reuse your sprouter. If you cannot eat them when they are ready, you can slow down their growth by putting your sprouter in the refrigerator, but keep the paper towel damp should you choose to chill your sprouts.
Day 7 - Ready to Eat Sprouts!
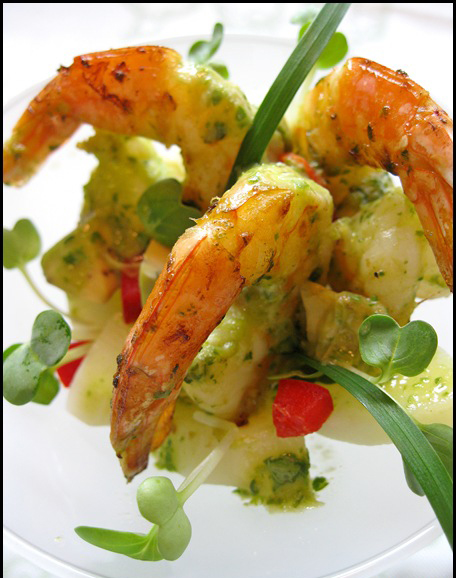
Shrimp, Avocado and Radish Sprout Ceviche
Preparation
Glorious Radish Sprouts

Ingredients
- 12 Jumbo Shrimp, Peeled & deveined
- 1/2 cup Jicama, Peeled, finely slivered ( A root vegetable native to Central and South America; ask for it )
- 1/2 cup Medium Red Bell Pepper, Sliced into narrow, ¼” slivers
- 1 Ripe Avocado, Peeled, seeded and cut into ½” thick wedges
- 1/2 cup Radish sprouts, Tightly packed
- Chives
- 1 T. Extra Virgin Olive Oil
- 2 Limes
- Salt to taste
- For Marinade Mix in Separate Bowl:
- 1 1/2 T. Lemon Juice
- 1 1/2 T. Lime Juice
- 1 T. Seasoned Rice Vinegar
- 1/4 cup Radish Sprouts, Tightly Packed
- 1/2 T. Dijon Mustard
- 1/2 cup Extra Virgin Olive Oil
- 1/2 t. Sugar or Stevia
- Pinch Salt
Marninate the Shrimp
Instructions
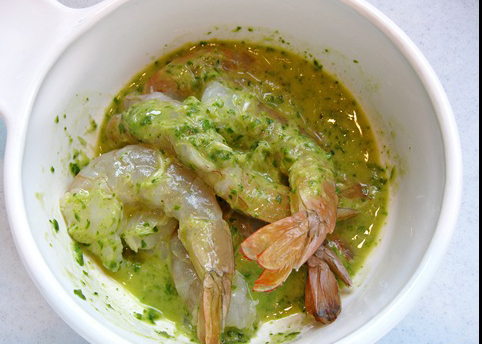
- Place all marinade ingredients into a small food processor and pulse until sprouts are finely chopped. Place shrimp in a shallow bowl. Add 3 tablespoons of the sprout mixture to the shrimp. Marinate the raw shrimp for about 20 minutes while you prepare the rest of the ingredients. Set aside the left over marinade mixture to use it as a dressing.
- Put slivered jicama in a small bowl, drizzle 2 T. marinade/dressing over it and toss well. Put aside.
- Place 1 T. olive oil in a medium sauté pan and cook the marinated shrimp over medium heat until cooked and pink, about 3 minutes on each side. Discard any remaining shrimp marinade—it contains raw shrimp juices and should not be used as an uncooked dressing. Chill the cooked shrimp.
- Layer the ceviche in martini or wine glasses, or in individual glass bowls. Layer as follows, from bottom up:
- Jicama slivers, red pepper slivers, 1 T. dressing; shrimp, fresh sprouts, avocado, 1 T. dressing drizzled over all. Stick a few chives into the ceviche for a dramatic presentation and add a few more sprouts on top.
- Refrigerate the ceviche until serving; serve icy cold with tortilla chips, wedges of lime and the remaining dressing in a small bowl
This ceviche is a wonderful first course for any southwestern entrée and goes well with margaritas, Mexican soda or beer.
Enjoy!
(I am an artist and the author of the Suburban Sprawl series of novels as well as two nonfiction books. Find out more about my work at RobertaLeeArt.com.)
Copyright © Roberta Lee 2012. All rights reserved.
You might also like to make:
- How to Make Easy and Delicious Tomatillo Salsa Verde
Salsa Verde (green sauce) is a staple in Mexican cuisine made from peppers, onions, cillantro and tomatillos. Learn to make this easy recipe in a food processor, blender or the traditional Mexican mortar & pestle, the ancient molcajete. - How to Make Perfect Chili Rellenos
Perfectly made Chili Rellenos are one of the masterpieces of traditional Mexican cooking. With a silky smooth interior and a slightly crisp coating, this dish of few ingredients can be dauntingly difficult to make. My recipe will take you through the