- HubPages»
- Food and Cooking»
- Dessert Recipes»
- Cookies & Biscuits
Pan De Muertos - Bread for El Día De Los Muertos Celebrations

A Tasty Treat for the Holiday
Pan de Muertos are special loaves of sweet bread baked by Mexicans to celebrate Dia de los Muertos or Day of the Dead which is celebrated on November 2nd (All Souls Day in the Roman Catholic Church).
Like any traditional recipe, there are variations from region to region and family to family.
The recipe below is based upon one brought home from school by my son when his religion class was learning about All Soul's Day & Dia de los Muertos (hey, we live in Tucson and Mexico is just down the road from us).
This is a traditional yeast bread so budget about 6 hours from start to finish for the project if done at once or make it in stages over a couple of days.
Don't do it like I did the first time by starting after dinner and suddenly discovering at Step 5 that I had to let it sit for an hour and a half and then another hour at Step 6 and this did not include the 40 – 60 minutes required to bake it.
While originally observed by pre-Columbian Indians in Mexico, the observance became merged with the Catholic Church's All Souls Day holy day following the Spanish conquest of Mexico.
Today Dia de los Muertos is observed throughout Mexico and is becoming increasingly popular in the American Southwest and in other areas of the country with large Mexican communities.
Ingredients For Bread and Optional Glaze
- 5½ Cups Flour
- ½ Cup Milk
- 1 Cup Sugar
- ½ Cup Water
- 1 Teaspoon Salt
- ½ Cup Margarine
- 1 Tablespoon Anise Seed, This is optional
- 5 Eggs
- 2 Packages Dry Yeast, Buy new yeast to ensure it is still active
- ½ Cup Sugar, This is for the Optional Glaze
- 1/3 Cup Orange Juice, This is for the Optional Glaze
- 2 Tablespoons Grated Orange Peel, This is for the Optional Glaze
Glaze Options
The glaze is optional.
You can prepare and serve the bread without any glaze or use a different glaze or frosting of your choice.
Another option is to skip the glaze and simply add the orange peel and juice to the bread mix itself. If you do this be sure to reduce the water by 1/3 cup as the orange juice will make up the difference in liquid.
As far as the orange juice and orange peel are concerned you can either squeeze the juice from a fresh orange and grate the peel or purchase orange juice and dried orange peel from a store.
Warning - Advanced Planning Needed
This is a traditional, from scratch type of recipe.
As I warned above the bread needs time to rise before finishing and baking.
At a minimum you will need about a six to seven hour block of to prepare and bake this in one day or you can divide the process into about two hours of preparation the first day, 2 hours of preparation the second day plus about forty minutes to bake the second day.
In between the two 2-hour mixing sessions the mixture has to be set aside for 1½ to 2 hours and allowed to rise as described in Step 7 of the Instructions below.
The easiest way to prepare this bread is to do the first part (up to Step 7 below) then place the bread in a covered bowl and place it in the refrigerator let it sit in there until the next day.
Instructions For Making the Bread
- Mix or sift together in a bowl 1½ cups of the flour with the sugar, salt, anise seed (optional) and yeast.
- Combine and heat in a saucepan or microwave dish the milk, water and margarine (if using microwave, place ingredients in covered dish and place on high for 1 – 2 minutes (until margarine softened enough to mix in – do not boil).
- Pour warm liquid mixture (from step 2 above) into the dry ingredients (from step 1 above) and beat until all ingredients combined.
- Add 4 of the eggs and 1 more cup of flour and mix until blended.
- Gradually blend in remaining flour and mix until all dough is moist.
- Lightly dust a large cutting board or other clean smooth surface with flour and kneed the dough for 8 – 10 minutes (I warned you that this was an old fashioned traditional process).
- Place the dough in a greased bowl and let it rise until it has doubled in size. If you have all day to make this you can just leave bowl on counter at room temperature and go do something else for the next 1½ hours or so until the dough has risen sufficiently and you have finished whatever else you are doing. However, if you cannot afford to make this an all day project, do not despair. Simply cover the bowl and place it in the refrigerator until tomorrow or the next day (don't go much beyond 2 days). Then tomorrow take the bowl with the dough out of the refrigerator when you come home from work (or 2½ - 3 hours before you plan to continue this project) and let it sit until it has risen sufficiently.
- Again, lightly dust a large cutting board or other clean smooth surface with flour and place risen dough on it. Roll dough on surface to coat all sides with flour. Remove ¼ of the dough and set aside in a bowl for later use. Form remaining ¾ of dough into a bowl and place on a greased baking sheet. Flatten ball into a circle about 6 inches in diameter and set baking sheet aside on counter.
- Take the remaining ¼ of the dough which was set aside in step 8 above and divide it into 4 equal portions. Roll 2 of the portions into 7 inch ropes which will be used to form the cross bones.
- Take the remaining egg and separate the yolk from the white (if you can crack the egg and pour just the white into a small bowl while keeping the yolk in the shell, Great, otherwise simply pour entire contents of egg – but try to keep yolk from breaking – into small bowl and manually separate yolk from white leaving white in bowl. If you get some yolk in the white don't worry – just try to separate the two as much as possible). Once you have the egg white separated, add 2 teaspoons of water and mix the two well.
- Take the two ropes of dough (from Step 9 above), rub one side of each with the egg white mixture and place in an X or cross bone fashion on top of the circular piece of dough on the baking pan. Make sure the side coated with egg white is the side making contact with the dough in the pan as the egg white mixture will act as a glue to keep the two together.
- Roll one of the remaining reserved portions of the dough (see Step 8 above) into a 2 inch ball. With your finger, make a 2 inch wide indentation in the center of the loaf (i.e., where the 2 "cross bones" intersect). Coat bottom of 2 inch ball with egg white mixture and place ball in indentation.
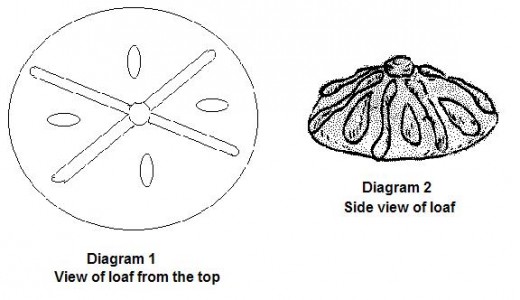
- Cut remaining piece of dough into 4 portions and shape each into a teardrop. Secure onto sides of loaf with egg white mixture – there should be one "teardrop" in each of the 4 quadrants formed by the "cross bones" (see diagram 1 below")
- Place in oven and bake at 350º for about 40 minutes.
- Make glaze right after removing bread from oven. Mix the sugar, orange juice and grated orange peel in a saucepan or microwave dish and boil for 2 minutes (if making in a saucepan on stove top stir while boiling to prevent sugar from burning – whatever you do, don't walk away and leave mixture on top of stove boiling as the liquid will boil away quickly and the heated sugar will form a rock-hard layer to your pan). Optional: If you prefer a different color glaze, add a few drops of your favorite food color and mix well.
- Pour glaze over warm bread. As an added attraction you can sprinkle some sugar (or colored sugar if you prefer) on the bread while the glaze is still soft. Then let the bread cool and the glaze harden.
Cook Time
Dia de los Muertos Bread of the Dead
Take this Quiz to See if You are Ready to Make this Bread
view quiz statisticsThis content is accurate and true to the best of the author’s knowledge and is not meant to substitute for formal and individualized advice from a qualified professional.
© 2006 Chuck Nugent