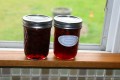
Free Fruit Red Cherry Jam

2017 Was A Bumper Year
Click thumbnail to view full-size


Grow Your Own
We have only have a small back garden but it packs a punch.
Each year we usually try to grow some produce such as radishes, tomatoes, garlic, lettuce and, or, herbs.
Our garden also has some established strawberry plants and a few fruit trees which were planted a couple of years ago.
The fruit trees are plum, pear, apple and cherry.
2017 was the first year we had a bumper crop of apples and red cherries and we also had a couple of pears worth eating too.
But the problem with the cherries is they are very sharp or even sour depending on your taste preferences.
With 2018 looking set to be another record breaking year for our cherry tree using this ‘free’ fruit efficiently is a must.
So what about red cherry jam or jelly?
Strawberries Are Naturally Sweet But Sour Fruit Sets Better
Making Jam
You basically need:-
- Suitable fruit
- A large preserving pan or stockpot
- Glass jars
- Jar lids or a set of jam pot covers
- Sugar
- For a jelly and some fruits water
- In some cases pectin or lemon juice
- Optional - a cooking thermometer
- Optional - a sieve and or a square sheet of muslin
- Small saucer for testing the set of the mixture
- Large wooden spoon for stirring the jam
- Optional - Large slotted metal spoon
- Large and medium sized spoons
- Heatproof jug for filling the jars and a funnel
Pectin
One dictionary definition of pectin is-
A soluble gelatinous polysaccharide which is present in ripe fruits and is used as a setting agent in jams and jellies
Sharp flavoured fruit such as my red cherries and baking apples are full of pectin when they are ripe.
This means any jam, jelly or fruit preserve made from these fruits will set well.
If you are using a fruit low in pectin it will need adding.
Over the counter pectin, in liquid or powder form, is available at a range of outlets including some supermarkets. It is suitable for a vegetarian or even a vegan.
But consider mixing fruits to increase the amount of pectin.
Bramble or blackberry mixed with baking apples gels well as a jam or jelly. It is the addition of the apples that boosts the pectin and the set.
The Glass Jars
You can purchase suitable jars, with or without lids, at a reasonable cost but in these environmentally times it is much better to save used jars.
I tend to wash glass jars and keep them stored away as they have a variety of uses.
So when it comes to making my jam or jelly it is simply a case of selecting the best and most appropriate sized jars.
Make sure you avoid jars with chips or cracks.
My jars originally contained store bought jam, marmalade, pasta sauce and pickles.
Before I packed them into a box all the jars were washed and labels removed. As my image shows they are now very dusty but a hand wash followed by a hot wash in a dishwasher will do the trick.
Make sure you do not use any jars that have a lingering smell of say garlic or pickles.
Having washed my dusty jars in the dishwasher on a hot-cycle they are now good to go.
If you do not have a dishwasher wash the jars by hand in hot soapy water, rinse well and leave stood upside down in an oven set to the lowest temperature when you are making your jam. The jars will then be super-clean and sterilized.
My Glass Jars
Click thumbnail to view full-size


Lids And Jam Pot Covers
By and large I have not kept any jar lids. When making jam you need a tight seal to keep the product fresh for as long as possible and used lids do not always do this.
I bought a couple of sets of jam pot covers which include-
- Labels
- Rubber bands
- Wax paper seals
- Paper lids
The pack has a variety of sizes.
Jam Pot Cover Set
Click thumbnail to view full-size


The Pan
You can buy a designated jam making stockpot or preserving pan but you do not have to.
Use a large stockpot, probably the largest that you have, for making jam. An enamel or stainless steel pan works well.
Avoid using an aluminum pan as it may leave the jam tasting tinny.
A low wide pan will enable the jam to cook quickly and so taste better
The Basics of Making Jam
The basic principles are
- Use fresh clean fruit that is not under ripe
- Make sure you wash the fruit and drain it well in a colander or sieve before putting in the pan
- Ensure all fruit stalks are removed
- If you need to stone the fruit do so. Alternatively sieve after cooking and make a jelly
- Use the correct ratio of sugar to fruit
- Only use very clean jars that are not chipped or cracked
- Ensure any jars, cutlery, pans and plates used are scrupulously clean
The basic ingredients are
- Fruit
- Sugar
- In some cases water
Some recipes recommend adding lemon juice to aid the set of the jam (See Pectin above)
Sweet cherries are not high in pectin but my red sour cherries should be.
Making The Jam is Easy as 1, 2, 3
Making jam, fruit preserve, conserve or jelly is all about boiling the mixture for the correct length of time and heating the fruit and sugar and to the correct temperature.
When the mixture reaches a temperature called “setting point” the cooking is complete.
- Use equal amount of fruit and granulated sugar. For each pound of fruit use a pound of sugar
- Adjust to suit your taste once you have some experience of making jam
- You could use one pound of fruit and one pound of sugar making around three jars of jam as a trial run
- Chill a saucer in the fridge or freezer for use in testing the set of the jam
- Place the washed fruit and sugar into the pan over a very low heat
- Stir occasionally every until all the sugar is dissolved
- If the heat is too high the sugar may stick to the pan
- Once the sugar is completely dissolved turn up the heat
- The aim is to bring the fruit mixture to a rapid, rolling boil.
- This is when the bubbles cannot be calmed down by stirring with a spoon
- At this stage you will need to cook for a further 3-5 minutes until setting point is reached
- Look out for setting point signs when the mixture begins to thicken and boil more slowly. The bubbles should now be thicker and heavier
- It’s now time to test the jam to see if setting point has been reached
- Move the pan away from the heat source while you check. This is important
- Use a spoon to put a little of the jam mixture onto a cooled saucer.
- After a few seconds push the mixture with a clean finger and see if it wrinkles
- If it does the jam is ready. If it does not return to the heat for a minute or two longer
- Carefully pour or spoon the jam into the jars
- If you are using a funnel and jug to pour into the jars ensure they are sterilized too
- Screwing a lid on each jar while the jam is still hot should offer a good seal
- I prefer to use shop bought jam pot covers. These include a wax disc which seal the jam.
- Apply the wax disc at the top of the jam while hot. Once the jam has cooled place a dampened cellophane cover over the top of the jar, securing with an elastic band
- Label you jam with its contents and date made
- If the seal is not good the jam will stay fresh as long. Any such jars of jam should be stored in a fridge and used as soon as possible
Almost Time To Harvest The Fruit And Make This Jam
Click thumbnail to view full-size


The Stage Is Set
Within the next week the fruit will be picked, stoned, washed and turned into jam.
This is the first time I have made red cherry jam but I am well acquainted with the basics of jam making.
That said will my red cherries make a great jam?
Drop back for the verdict and images of the jam once it is made!
ILB Of Fruit To ILB Of Sugar Trial Run
Click thumbnail to view full-size


Making Jam
Have you made jam and if so was it easy?
© 2018 Eileen Kersey


")