How to Make a Teapot Cake with Tiramisu filled teacups, Girls Party Cake

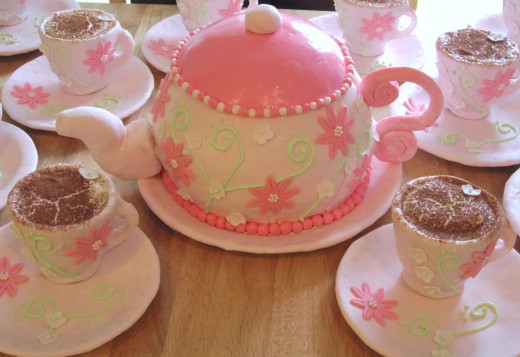
You can't get much girlier than a tea set. So when there is a true girly-girl in your life why not make her a tea set cake? Here are step by step instructions on how I made this adorable cake.
Cake!
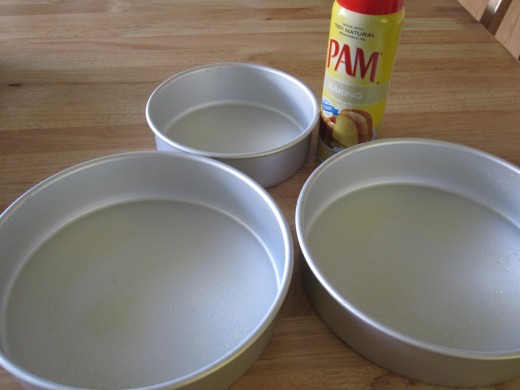
For the teapot you'll need to make two boxes of packaged cake mix or two batches of your favorite recipe. Pour the batter into a 6in and two 8in cake pans (all pans are 2in high) until the batter is only 1/3 from the top of the pan. Bake as your recipe directs. Once cooled put your cakes in the freezer for at least a couple of hours to make then easier to carve.
Cut any dome shape off the 8in cakes but leave the 6in dome. Time to stack your cakes. Start with an 8in on bottom use your favorite filling or frosting and lay the other 8in on top. Add more filling but only were the 6in will lay. Now do your best to carve the cake into a roundish shape. Don't worry if there is a little gap between 8in and 6in, you can fill it with frosting later. Only carve a very little on the bottom. To make it easier to put the fondant on you could leave the bottom layered uncarved.
Now dirty ice your cake. Make sure it is as smooth as you can make it. Be sure to fill any gaps between the layers. To help make a round shape smoother I use a piece to computer paper. Lay an edge aginst the cake, letting it bend to it's shape, and pull it up against the cake. Once your icing is satisfactory let it set for 20-30min.
Meanwhile get some fondant ready. Use two full batches of marshmallow fondant. Color a 1/4 of it bright pink, 1/8 or less leave white and the rest a very light pink (or whatever colors you want for those parts of my cake.) Save a plum size ball of white and a small fist size of bright pink for the flowers. You'll have lots of left over light pink, it goes everywhere... so its ok. Roll out and cover the teapot with the light pink. Roll out and cut a smaller circle (maybe 7in?) of the bright pink and place it on top as the lid. Be very careful when placing the lid.. no redos! Roll a ball of light pink and glue it on top for a lid handle.
Now take the remaining fondant and hand mold a spout and side handle. Place toothpicks into them where they will attach to the cake. Let them air dry overnight and handle with care. With any little leftover bits of fondant roll cute little beads out of them and glue (water and gum-tex) them to the pot as I did.
Its not nessesary but you can also cover your cake board or plate with fondant.
Flowers!
The little white blossoms are my favorite part of this cake! I took a video while I was making them, see below. A plum size amount of fondant should make about a hundred of these little guys. Let the blossoms air dry to make hard.For the pink flowers roll your fondant to 1/8 inch and use a pretty flower shaped cutter. Using a knife make an indention in each petal. Be careful not to cut all the way through. I wanted these flowers to stay pliable so I stored them in a single layer in gallon zip-lock bags.
This project took 61 blossoms and 25 pink flowers (make extra just in case). Once all your flowers are made make a fondant glue by mixing a little bit of gum-tex into water. A teaspoon into 1/2 a cup of water should be good... honestly I never measure my glue ^_^ Using a paintbrush or your finger dab a little bit of the glue onto the center of each flower and add one pearl for each blossom and seven for each pink flower.
How I made the little white blossoms
Tiramisu Cups!
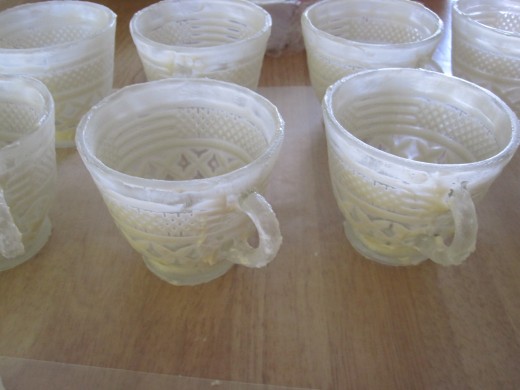
Before filling the teacups with my absolute favorite dessert, tiramisu, I cover them in fondant. First they need to be dirty iced. I just used store bought creamy vanilla. Make your icing as smooth as possible. This is especially important if you have to use bumpy cups like I did (I wanted 10 cups and this was the only set that I had that many of). I really hope you have smooth cups... Once your icing is smooth and slightly set add your layer of fondant. I turned my teacups upside down and wrapped the edges inside of the cup. The handle takes a little molding but it shouldn't be a problem if you keep your fondant from getting too dry. Trim any fondant that goes more than an inch inside the cup.
You'll also want to cover a little saucer plate with fondant. to save on icing only use it under the lip, or you can use a little fondant glue (water and gum-tex). Once both cup and saucer have been covered "glue" your cup to the plate with a little water. Make if off centered so you have room to decorate. Plus as a bonus, the extra room is perfect for putting a slice of cake or ice cream on.
Now you'll want to fill your cups with your favorite tiramisu recipe. I made a hub for my favorite and it's near the top of the page ^_^
Putting it all together
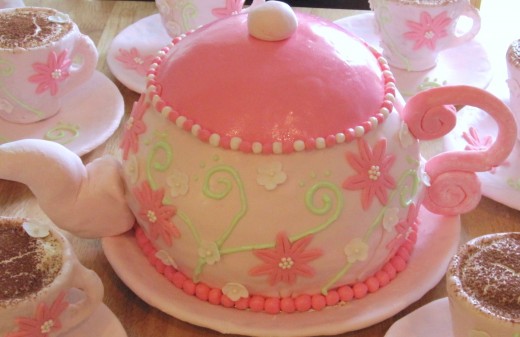
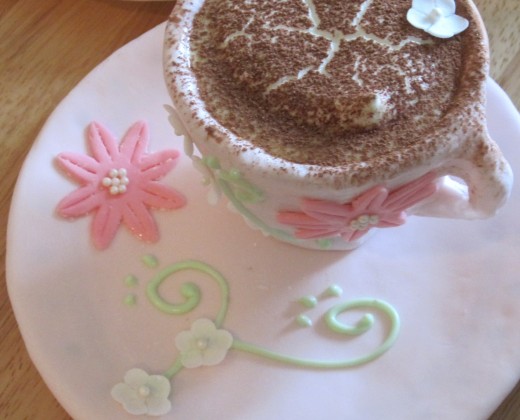
It is now time to decorate! Using my pictures above as a guide use a med-thin textured green icing to make swirls and dots. Then using fondant glue (water and gum-tex), "glue" the flowers on. I sure hope you have as much fun making this cake as I did! ^_^