Cooking in a wood fired cob (earth) oven.

Cooking in a wood fired oven. Cob (clay/sand) in particular.
Recently, my family helped me build a cob oven in our back yard. We used locally sourced clay, sand and some straw to build the oven dome over a base of concrete block, and a brick base. Once it was dry, it was time to start heating it up, and cooking in it! And the things we've cooked have all come out amazing!
This sort of oven provides heat in several ways. Convection, conduction, and radiated. Heat is radiating from the walls of the oven, it's being conducted to the food from the floor of the oven, and the air is swirling around to provide convection heating as well.
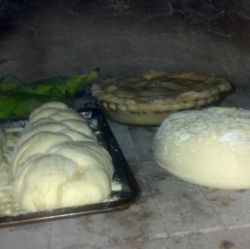
What sorts of things can you cook in a wood fired oven? Anything that can be cooked on a grill, or in your oven in your kitchen. So far, we've cooked bread, pizza, chicken, beef, pork, sausage, ribs, and a host of vegetables. And don't forget slow cooked (overnight) baked beans, or my favorite... Pie.
So far, a typical evening of cooking for us has been to start with pizzas, roast off some vegetables and meats, then pull the fire and cook some bread and a pie. The pizza serves as our appetizer while the meats and veggies are roasting, and the pie makes a fine dessert. The bread is eaten the next day after it's had time to cool. It makes for a great night of visiting with friends, and a meal that is not your traditional "dinner's ready! Now sit down and eat." but is rather one that allows your guests to have a little to eat at a time, but eat over a couple of hours of enjoying each others company.
Good food starts with a good fire.
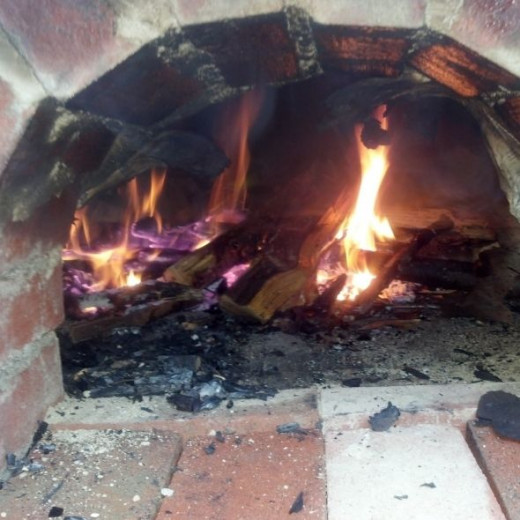
Before you can start cooking in a wood fired oven, one must set fire to some wood. My cob oven, with 8 inches of mass in the dome takes about 90 minutes to fully heat to the point that the soot on the dome flashes off (turns into carbon dioxide) and appears clean.
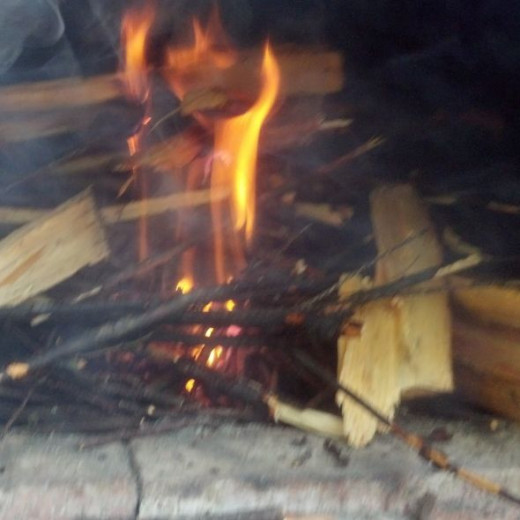
One should use small pieces of wood, so that the surface area of the pieces is maximized. The wood should also be dry, so that all the energy from the burning is used to heat the oven, rather than to dry the wood and let it burn. Wood should be dried for at least 6 months prior to use. Hardwoods such as oak, maple, and birch are recommended due to their burning characteristics, and the flavor they can impart to the food. Pine will heat up an oven quickly, but will impart poor flavor to the food. If the fire is to be removed prior to cooking, it's not the worst thing you could use.
Like all cooking fires, the type of wood you use will greatly influence the flavors imparted to the food. Hardwoods tend to provide the best flavors. Think of the choices one would make when using wood in a smoker.
Kindle the fire
There are a couple of competing ideas about building a fire, but the one that works best is the one you are most comfortable with. I grew up in scouting with the simple tepee and log cabin type fires, so this is what I tend to go with. Others advocate a top-down method.
I use some home-made fire starters made with pine shavings, mixed with paraffin wax. These burn well, are easy to light, and inexpensive to make. They are also non-toxic, and burn completely so no residue is left on the brick at the bottom of the oven. I would avoid commercial fire starters, as I don't know what's in them, or if they leave a residue. You could also use newspaper with some vegetable oil (which causes it to act like a candle) drizzled on it, or just the paper by itself as your starter.
First into the oven goes 3 large pieces of wood placed in a "U" shape to contain the fire, and provide a place to build the cabin. I then place a small layer of fine kindling on the base of the oven, then place the starter on top. From there, a tepee of small branches is built in a tepee shape on top of the starter, and then start building the rest of the wood pile on top of all of this in a log cabin shape. I place small pieces of wood (split to about 2" square cross sections) in layers until I have a large stack over the kindling pile.
A long grill lighter is used to light the starter, which then lights up the rest of the stack. Once lit, stand back, and watch it go. Remember that the fire should first consume the smallest wood, and spread to the larger. The smaller you make your kindling, the better it will begin burning, and the faster the fire will spread and begin heating your oven.
The top-down method basically builds the fire in reverse. Large pieces on the bottom, kindling on top, which is lit, then allowed to burn down. Intuitively, it doesn't make any sense to me, as heat rises, but plenty of video on the internet seems to indicate differently. Experiment and see what works best for you.
You want the fire big enough to provide a lot of heat to the oven, but keep in mind that any fire that's coming out of your door is not heating the mass of your oven.
Active fire, or residual heat?
Once your oven is hot, and you'll know when it's hot by the color of the interior of the dome (The soot burns off to carbon-dioxide, or "flashes" and leaves the dome clean... it's amazing the first time you see it happen.), it's time to decide how you want to use your oven.
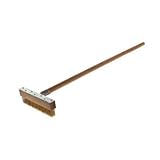
If you're making things that require a lower heat, like bread, pies, or other baked goods, you would remove the fire, sweep the floor clean (I use a wet straw broom), let the heat come down a bit and put your food in to cook. If you have an infra-red thermometer, you can determine exactly what temperature you want to let the oven reach before putting in your food.
Other things, like pizza, and roasting meats or vegetables take higher heat and in this case, simply push the fire off to the side, and start cooking! Pizza can go right on the floor of the oven (after it's been swept clean), but things like roasts, or vegetables are probably best cooked in some sort of shallow pan. The heat of the floor will come up through the oven, and the direct heat of the fire will cook from the top.


Pizza!
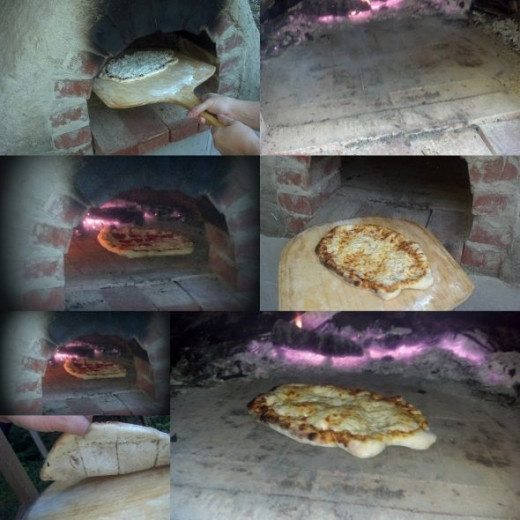
A great thing to start cooking in your new wood fired oven is pizza. They are easy and fast to cook, and certainly are a hit. They also do not require you to have your oven to full temperature, so you can start feeding your guests while the oven is coming to it's final temperature. The extremely high and dry heat of the fire and floor will instantly crisp the crust, making true "pizza shop" pizza in your own oven. The crust simply can't be replicated in your home oven, even with a pizza stone.
Build your fire on the spot where you'd place your pizza, and once a good fire is established, and you've got a good bed of coals going, move the fire to the side of the oven. Sweep and clean the cooking space, then begin to prepare your pizza.
I purchase my pizza dough from the local pizza shop. They charge me a couple of bucks for a large dough, and to be honest, they do a much better job making their dough than I do. Good dough also should be made a few days in advance, and often I do not know that I'm going to make pizza (or fire the oven for that matter) until the day I fire the oven. In New England, we have 2 competing styles of pizza, a "Greek" style pizza which is generally found at the House of Pizza type places and uses a wet "batter" type of dough, or a soft Italian type crust (more like bread dough) found at places like Sal's, Papa Ginos, and a few randomly located independent shops. The Italian type crust is the one you're looking for. If you can't find a pizza shop near you that has this type of dough, you can also purchase something similar at your local grocery store.
Stretch the pizza out to a size that will fit on your peel, and in the space you've cleaned on your oven floor, and dress your pizza. This is truly a situation where "less is more." Your pizza will be cooked in just a couple of minutes, as you're dealing with an extremely hot oven. Your home oven goes to 550F max, a wood fired oven is in the 700+ range. It's this high heat, along with the wood smoke that makes the pizza so special. The crust will crisp, and scorch in a few places, but that is the magic.
Slide the pizza in, and keep an eye on it. Watch closely, and if one side starts to brown too much or scorch, give it a turn. If you get to the point that the bottom is done, but the top still needs some more time, and you have a metal peel, you can put the pizza on the peel, and hold it up in the top part of the oven. The air at the top of the dome is even hotter than the air at the bottom, and this will finish cooking the cheese & toppings in just a minute or two.
Roasting
Now that we've sated the hunger of our guests with a few pizzas as appetizers, it's time to eat the actual meal. I've found that my oven will do a very nice job of roasting meats and vegetables while I'm getting the oven hot, and while I'm making the pizzas to start the party off.
When we first started using the oven, we weren't really sure how to go about cooking in it, so we just started putting things in that we'd successfully cooked in our home oven, and watching carefully to see what to do next. We've found that the recipes that you use inside will work just fine outside, but the cooking times may change, and the flavors certainly do change due to the high heats and the addition of the wonderful smoke from the fire.
Vegetables were the first up on our experiment list, so we peeled some small boiling onions, and soaked some fresh ears of corn in the husks. The onions got a bath in some oil and Montreal Seasoning (a blend of salt, pepper, garlic, and other spices). They went in to the oven in a pan, alongside of the corn. About 20 minutes later, the onions had caramelized nicely, and the corn husks had scorched to an even black. We pulled these out of the oven and went on to the meat.
We started by taking some country style pork ribs, and simply covering them with my BBQ rub, and sliding them in a pan into the oven. Next to that went a large steak, which could have almost been considered a small roast. They went to the back of the oven while the pizza was cooking, and every 5 minutes or so, I'd spin the pans around or flip the meat, depending upon what they looked like when I pulled them from the oven. After about 30 minutes, the internal temps of both meats were where I wanted them (160F for the pork, 130F for the beef), and they came out to rest. While the meat was resting, we cut the corn into several lengths, and put them back into the pan with the onions. The pan was returned to the oven to reheat. They came out piping hot in about 5 minutes, and made an amazing accompaniment to the meal.
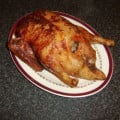
Our next expedition into roasting was a chicken. Potatoes were cubed, dressed with oil and a salt/pepper/spice mix and put in the bottom of the pan. This was covered with a chicken which was cut open down the backbone and spread flat. This technique is called spatchcocking, or butterflying. It allows the chicken to cook faster, and is a great technique for the grill. As usual, the chicken was placed into the back of the oven while we made pizzas for our guests, rotating the chicken a couple of times, along with flipping it over. Once the internal temperature reached 170F, it was pulled out to rest.
Books that might help

Bread
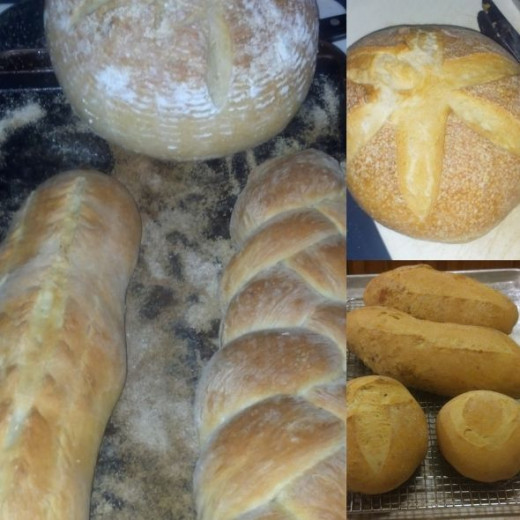
One could wax on for days about bread, and some of my friends would probably say that I have on more than one occasion. But this isn't a lens about making bread. This is a lens about cooking in a wood fired oven. On the topic of bread construction, I'll point the reader to the many books, websites, blogs, and classes dedicated to the art of mixing, kneading, rising, forming, and shaping of bread. Once you've figured out what sort of bread you're making, and it's risen properly and been formed, you can get to the cooking.
Cooking your bread in a wood fired oven will give your bread a crust not achievable in your home oven. The direct heat from the floor, the radiated heat from the walls of the oven, the intense heat of the swirling air, and the moisture trapped at the beginning of cooking by the door on the oven, will give you a crispy chewy crust that normally only comes from the local neighborhood bakery.
While you've been heating your oven, if you use a wooden door, it should be soaking in water. This will prevent it from burning, and also provide additional moisture for the cooking process.
To cook bread, you're looking for a lower heat, and will be using the residual heat trapped in the walls of your oven, so you'll need to remove the fire and coals. I sweep them into a metal trash bucket if I'm not burning a campfire next to my oven, or directly into the fire-pit if I am. From there, I then sweep the brick floor with a wet broom. The water on the broom further enhances the moisture content of the air in the oven by flashing to steam as it cleans. I pay particular attention to the area on which the bread will be placed to make sure that as much ash and coals as possible have been removed.. You'll likely still end up with some bits of ash, sand or possibly a leftover bit of wood coal, but these simply part of the process of wood fired oven cooking. I tend to sweep the bottoms of the bread when they come out, so it's not been a problem at serving time.
As you've been cleaning your oven, the heat has been leaving the oven through the walls, and some through the door, bringing the overall temperatures down a little, and evening out across the interior, which is perfect for longer term cooking items. Slash your tops, slide your bread in, and load up the oven. Make sure you leave enough space so that the breads will not touch after they rise a little more in the oven due to oven spring, but feel free to fill up the oven. More bread will not appreciably reduce the cooking time, and since you've gone through the effort of making the bread, and heating the oven, you might as well make a lot of bread, and share it with your friends. I've never had anyone turn down fresh bread!
Close up the oven with your soaked door, and sit back with a cold beverage to wait. How long your bread will take depends on a lot of factors, but I generally give it a half hour to start, and then check on things every 10 minutes or so until it's starting to look brown, then I check every 5 minutes or so. Some say that bread can accurately be judged to be done by the sound it makes when it's thumped from the bottom, but that takes some experience. If you're not confident with that process, using a probe thermometer can help. Bread is done when it's190F-200F in the middle.
Cool the bread on a rack when it's done to preserve the crispy crust on the bottom for at least 45 minutes... if you can. When you squeeze the bread, listen to the crackle and try to remember what they said in the market scene in the movie Ratatouille. You can tell a good bread from the SOUND of the crust. The smell isn't a terrible thing to have to endure either... if you can resist cutting into it and slathering it with butter while still steaming hot.
Additional batches can be baked after you've emptied the oven, but keep in mind that the temperatures have dropped a little during the first backing, so it will take a little longer to cook the next batch(es). Depending on how much mass your oven has, and how much insulation will determine how many batches you can cook before reheating your oven.

")


