Homemade Pumpkin Pie and Crust From Scratch

Recipe for Pumpkin Pie and Pie Crust
A tried and true recipe for pumpkin pie that has been tweaked and re-worked for over 20 years is now being shared with you. All 5 steps of making pumpkin pie are listed including: picking the right pumpkin, cooking the pumpkin, making the crust, making the filling, and lastly cooking the entire pie.
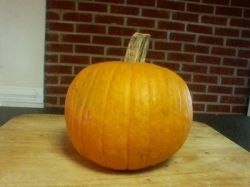
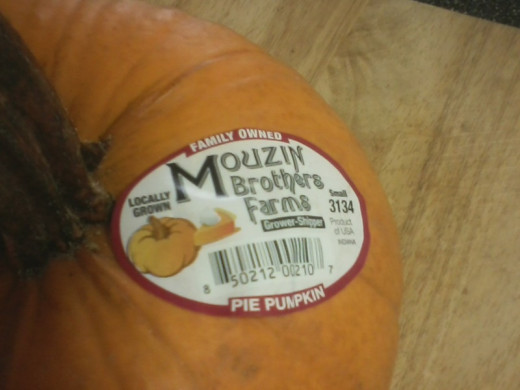
Pumpkin Picking Tips
How to pick the right pumpkin to cook
Your local grocer and even hardware stores usually have pumpkins outside lining the sidewalks in the fall, which you can find as early as October 1st in most parts of the USA. You don't want the big jack-o-lanterns for carving, for they are too stringy. You also don't want the little miniature pumpkins that are used for harvest decorations and table centerpieces for they are also the wrong pumpkins and it would also take too many of those to buy and cook to net enough pumpkin. You want a "sugar pie pumpkin" that is mid size and may or may not be oval (some are more round) and they have a thinner skin to them and are sweeter.
Sometimes they have a sticker on them that says "pie pumpkin". If you cannot find one with the other pumpkins, then you may want to look for the ones on display in the produce department of the grocery market or even go to a pumpkin patch where they are grown in order to pick a good one. Sometimes they have a stem and sometimes not, and although I have seen tiny black dots resembling ground pepper, you certainly don't want one that has a stem that is all black or soggy or large cracks in the pumpkin, and the pumpkin should be free of soft spots as well.
Pie pumpkins can last 3 to 5 weeks if uncooked and uncut and unrefrigerated. I leave mine on the kitchen counter or better yet a glass table top. Note: some people use Cucurbita moschata squash (not the crookneck variety) if the Cucurbita pepo squash isn't available in their area. In my area the pepo variety I use is orange, not the green kind, and the orange pepo is mostly found and used in the USA for pumpkin pie.
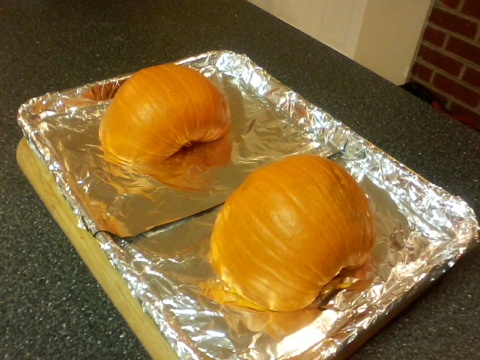
Cook Fresh Raw Pumpkin
Cooking the pumpkin winter squash (Cucurbita pepo)
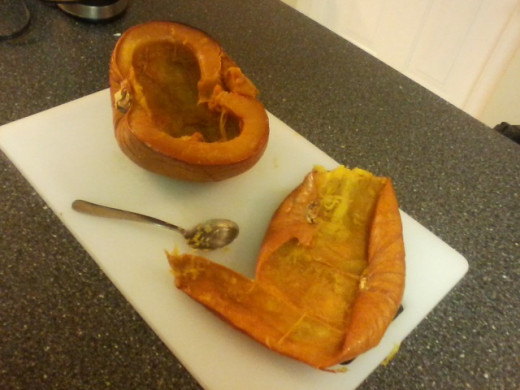
If it has a stem, cut as much of it off as you can or core it out, but either way this will take a sharp knife. Then cut the pumpkin lengthwise (top to bottom) in half, so you have 2 melons or two half moons. Clean out the seeds and cut out a hunk of the big strings, but leave the small ones, because they will come out easier after cooking, and some will be almost non existent after blending.
Place the 2 humps face down (with the open side downward and mound side up) on an aluminum foil lined cookie sheet. You could also use a jelly roll pan, but make sure your pan has sides and is not flat to the edges. You will cook this in the oven on low heat for a long time so as not to burn the pumpkin. It may have a little darkened color when you are done, but it should not look burnt. When the 2 mounds look sunken in, or can depress with an easy finger touch, then the pumpkin is cooked. Cooking times vary depending on the oven and more importantly due to the size of the pumpkin. Cook approximately 1 1/2 hours to 2 hours at 250 degrees fahrenheit, which is equal to about 121 degree celsius.
Original article, Copyright retained
Pictures credit: taken by me (self taken)
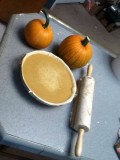
Homemade pie crust
How to make homemade pie crust
This recipe is for a pastry crust, not a graham cracker crust, and it too is from scratch. While the pumpkin squash is cooking in the oven, you'll have plenty of time to make your own crust. You do not need a lattice crust on top as seen in cobblers and fruit pies. You also do not need to bake this crust first before adding the filling. Flour today in America is already sifted when packaged, but you can sift again for extra fineness if you like. Butter should not be substituted for the shortening as it doesn't deliver the same kind of flaky crust you are trying to achieve.
Crisco alternative:
Also known as "Trex", White Flora, Cookeen, or Copha in other countries, which looks like white lard.
THINGS YOU WILL NEED:
- Rolling pin
- 4 pieces of waxed paper (or plastic rolling mat)
- Electric Mixer
- Measuring cups
- Measuring spoons
- Spatula (rubber tipped)
- Pie pan or pie plate (9 inch is best or 22.86 cm)
- Fork to prick dough in bottom of pan
INGREDIENTS:
- 1 cup all purpose flour
- 1/2 teaspoon iodized salt
- 2 Tablespoons tap water
- 1/3 cup plus 1 Tablespoon solid vegetable shortening or Crisco
Preparing Your Pie Crust
Stir the flour and salt in a large mixing bowl (for electric mixer), and add the shortening. Mix together at low speed for about 1 minute, while scraping the bowl with a spatula constantly. Add the water and continue mixing for about another minute until it is moist, but slightly lumpy. Do not overmix, because it is supposed to be a little lumpy, but after you gather the dough and press into a ball and against the sides it won't be anymore. You may have to add an additional 1-2 tsp more water or either wet your hands to gather it into a ball.
Roll between 2 pieces of wax paper on bottom (overlapping) and 2 pieces on top (also overlapping for sizeness). Do not roll the dough too thin, or you will not be able to get it off the wax paper in one piece and it will stick to it, but you also can't roll it too thick or you won't have enough dough to go around the pie pan. Carefully and slowly peel off the top pieces of wax paper and while holding the 2 bottom pieces, quickly flip it onto the pie dish. Then remove those bottom wax pieces ever so slowly.
Start patting the center and work your way towards the outer edge and then up the sides to get out air bubbles. Make sure you have enough to cover the edge of the pie pan and either make a smooth edge with your thumb or press thumb indentations every half inch or so around the plate to form a pattern of little peaks. Use a fork to lightly prick the dough (without tearing) in the bottom of the pie pan in a couple places.
Recipe credit: my mother

Pie Dough Rolling Tips
If you cannot get the dough off the wax paper without tearing the dough, then don't worry not all is lost, because you can scrape it off, roll it in a ball again and try rolling it out with new pieces of wax paper. This is not a deal breaker and has happened to me more than once, but you might want to try spinkling the bottom wax paper with a little flour before rolling it out and spinkle a little on top the dough before the top pieces of wax paper are added, and this light flour sprinkling will help prevent sticking.
Also it is hard to roll the dough evenly all around as you will have a little more dough rolled out to the left than the right or vice versa, but that's ok just rob Peter to pay Paul, by taking off a hunk where you have too much and smoosh it down on the side where you have too little, kinda like a self-gluing or patchworking of pie dough, which works just fine. If you are afraid to attempt your own pie crust, then if you really must buy one, then I would skip Pet-Ritz, which is in a pie pan already, but instead I would use the Pillsbury already prepared pie crusts (15 oz.), which are better.
You are now ready to make your pie filling and that recipe follows below.
Article original, Copyright retained
Homemade Pie Filling
How to make homemade pumpkin pie filling
Instead of canned pumpkin or packaged pumpkin, you will use the fresh pumpkin squash that I taught you how to cook above. You will remove the pumpkin halves from the oven, which you may have to let cool a little bit.
Take a fork or a spoon and scrape out the cooked pumpkin, leaving only the skin (a shell lining) behind, which you will discard. I like to run this through a blender or food processor (not a juicer), in order to get the consistency finer. It is at this point that I also look for and remove any remaining large strings. The small ones are no big deal and are really part of the fiber of the vegetable. I actually have a "Ninja" brand blade system that is faster than the average blender. Another reason to run it through a blender or food processor is because in the process of making it finer, it also compresses or packs down more, so you can get more cooked pumpkin in the pie when you measure it by the cup, so the end result is a heartier thicker pie, instead of a loose filling.
THINGS YOU WILL NEED:
- Blender or food processor
- Fork or spoon for scraping out pumpkin contents
- A saucepan to melt butter (or a microwave oven)
- Electric mixer
- Measuring cups (both liquid measuring cups and dry measuring cups)
- Measuring spoons
- Spatula
INGREDIENTS:
- 2 cups cooked mashed pumpkin
- 2 large eggs, slightly beaten
- 1 1/4 teaspoon of cinnamon (* see conversion at bottom)
- 3/4 teaspoon of ground ginger
- 1/2 teaspoon of nutmeg
- 1/2 teaspoon of cloves
- 1 1/2 cups of canned evaporated milk (12 oz) - * * see note below
- 3/4 Cup of regular granulated white sugar
- 1 Tablespoon of melted margarine or butter (if this is not used, then 1/2 tsp salt)
ALTERNATES (optional):
* * You can split the canned evaporated milk so half the amount called for is canned evaporated milk and half is canned sweetened condensed milk, so it's 3/4 cup each. If you choose this route, you will not need the granulated sugar as seen above. Also you can use fresh spices using a spice grinder, otherwise bottled or canned spices are fine, but make sure they are not too old, as they do lose their flavor and aroma over time. Do not use the same spice grinder that had crushed red pepper flakes as you can never really ever get that taste out and you should have a separate grinder for that.
Article original, Copyright retained
Picture credit: my own work (self taken)
Baking The Pie
Using the homemade recipes I supplied to bake your pie
ITEMS YOU NEED:
- Pie pan or pie plate with the prepared dough recipe already pressed into pan
- Pie filling already made in recipe above
- Knife to insert in middle for doneness (and to cut pie)
- Oven mits or hot pads
- Garnish with a sweet whipped dairy topping
INSTRUCTIONS:
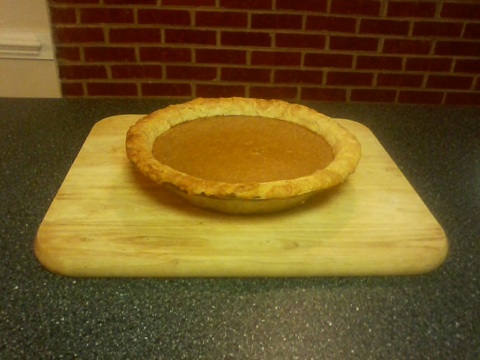
Make sure oven rack is in the middle, whereas only meats are done on the bottom. If you have 5 slots in your oven, put the baking rack on 3. Preheat oven to 425 degrees fahrenheit, which is 218 Celsius. Pour the homemade pie filling that was previously prepared into the pie crust lined pan also previously prepared. Carefully and without spilling, tap the glass pie pan once or twice on the counter to get out air bubbles.
Once oven is preheated and reaches desired set temperature, place filled pie pan in oven on the middle rack and bake for 15 minutes. Then after the first fifteen minutes, reduce the temperature to 350 degrees fahrenheit (or 177 C) and bake for an additional 45 minutes approximately or until a knife in the center comes out clean.
Article Original, Copyright retained
Picture credit (from below): my own work (self taken from my own baked pie)
Conversion Measurements
Conversion measurements from USA to metric for pie filling:
- 1 1/4 tsp is 1.25 teaspoon [US] = 6.1 milliliters or 6.16 grams
- 3/4 tsp is 0.75 teaspoon [US] = 3 milliliters or 3.69 grams
- 1/2 tsp is .50 teaspoon [US] = 2 milliliters or 2.46 grams
- 12 ounce [US, fluid] = 354 milliliter
- 3/4 Cup is 0.75 cup [US] = 0.7 cup [metric] or 0.75 cup [US] = 177.4 milliliter
- 1 tablespoon [US] = 14 milliliter or 14.78 grams
Conversion Measurements from USA to metric for pie crust:
- 1 Cup [US] = 0.9 cup [metric] or 1 cup [US] = 236.5 milliliter
- 2 Tablespoons is 2 tablespoon [US] = 29.5 milliliter or 2 Tblsp [US]=29.57 grams
- 1/3 cup is 0.333 cups [US] = 78.7 milliliter
Other units of measure to convert for cooking can be found here.
© 2014 GetFactsnotHype
")